
Most people know cantaloupe as a juicy summer fruit, but its microgreens are a total game-changer. These tiny greens pack a surprising burst of sweet melon flavor with a refreshing crunch that’s perfect for adding a twist to your meals.
They grow fast, take up barely any space, and are loaded with nutrients your body will thank you for. From boosting your immune system to supporting skin health, these greens are more than just a garnish.
If you’re into fresh flavors, quick results, and feel-good food that’s as fun to grow as it is to eat, you’re in for something special. Let’s turn your windowsill into a mini harvest of goodness 🌱
Why Choose Cantaloupe Microgreens?
Choosing cantaloupe microgreens over traditional greens brings several advantages. First and foremost is the flavor. These greens surprise the palate by offering a subtle melon taste while maintaining a crunchy, leafy texture. As observed during the growing process, even before harvest, they begin to carry a gentle aroma reminiscent of cantaloupe fruit. After harvest, the grower noted that they “give you the vegetable feel but it tastes like melon.” This complex flavor profile makes them stand out on a dish, offering chefs a flavorful garnish or salad base that excites diners.
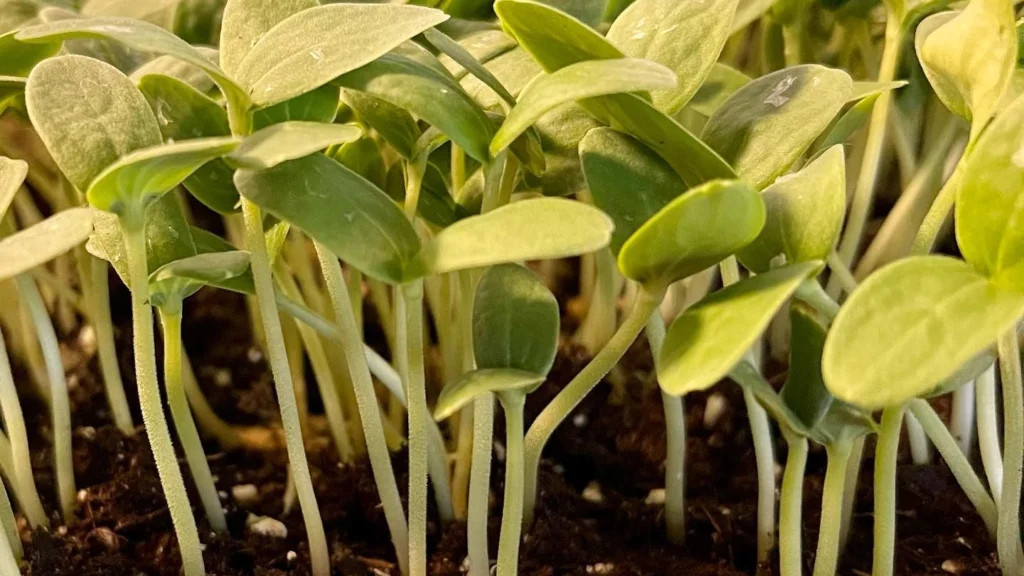
Secondly, they bring color and visual intrigue. These microgreens grow in tight canopies, producing clean, pale green leaves with a delicate texture that enhances any plate’s visual appeal.
Third, they are fast-growing and relatively low-risk when basic protocols are followed. With proper sanitation and consistent moisture, they sprout within days and can be harvested by the end of the first week.
Another important reason to grow them is differentiation in the marketplace. For microgreen farmers looking to expand beyond the usual broccoli, arugula, or pea shoots, cantaloupe provides a conversation-starter at farmers’ markets and a niche offering for local chefs.
Additionally, cantaloupe microgreens require no special treatment compared to other microgreens, making them suitable for beginners. Although the grower in our example admitted it was his first time cultivating them, he successfully followed a structured process and achieved a healthy crop within a week.
Step-by-Step Guide to Growing Cantaloupe Microgreens
Materials Needed
To grow cantaloupe microgreens successfully, you’ll need a standard microgreen setup. This includes two growing trays — one with holes (for drainage) and one without (to retain water). The growing medium can vary, but many growers use a custom soil mix tailored for microgreens. In this particular case, a mix referred to as “Tiny Leaf Microgreen Mix” was used and spread evenly into a 2-inch-deep tray.
The exact amount of seed used was 50 grams per tray, weighed using a scale for consistency. Using the correct weight is crucial for proper density. Too many seeds can lead to crowding and mold issues, while too few can produce a sparse canopy.
Hydrogen peroxide was used to mist the top layer after seeding. This sanitizes the surface and helps prevent fungal growth. A gentle mist spray from a garden hose was used to water the soil before planting. It’s important to avoid high-pressure settings on your hose as they can disturb the soil surface and displace seeds.
Gloves and proper PPE were worn during harvest to maintain hygiene. Clamshell containers were used for packaging, with clear labeling that included crop name, harvest date, and lot number. This labeling system is essential for traceability and marketing, especially if you’re selling commercially.
Germination Process
Germination for cantaloupe microgreens typically takes about 4 days. The seeds are spread evenly across a pre-moistened soil surface. One key step is to tamp the soil down gently to create a flat and stable growing surface. After sowing, the seeds are lightly misted again and then covered.
There are two common methods of covering:
- One uses only a blackout tray on top
- The other, which was followed in this instance, involves a blackout tray, a layer of soil over the seeds, and a weight on top.
This latter method ensures that seeds maintain contact with the soil and encourages uniform sprouting. After covering, the trays were placed into a dark germination area and left undisturbed for about four days. During this time, seeds push through the soil and begin to establish themselves.
Sanitizing the bottom of the trays before covering was emphasized, as it reduces the chance of pathogens affecting the young sprouts. Misting during this phase should be minimal to avoid waterlogging.
By the end of day four, the microgreens showed strong germination with many seed hulls beginning to fall off naturally. This is a good indicator of healthy growth.
Light & Growth Stage
After germination, the trays are moved under grow lights. The lighting period begins around day four and continues for another three to four days until harvest. During this time, watering is adjusted. Instead of spraying from the top, most growers prefer bottom watering. This helps prevent mold and keeps the foliage dry, which is important for overall crop health.
Sanitation becomes even more critical during this stage. As mentioned by the grower, daily sanitizing is performed to prevent issues like damping-off. This disease can cause sections of the microgreens to wilt and die off, particularly in overly wet environments.
Although most of the crop grew well, there were a few patches that experienced minor dieback. The grower noted this likely resulted from ineffective sanitizing in those areas. Despite this, the majority of the crop was strong, uniform, and had vibrant color.
A fully grown tray of cantaloupe microgreens displays compact, healthy growth with visible signs of the seed hulls falling off, which is an indicator of readiness.
Harvesting & Packaging
The cantaloupe microgreens were harvested on day seven. The proper harvesting method involves holding the canopy gently and slicing just above the soil line. This prevents dirt from mixing with the greens. After harvesting, the microgreens are fluffed by hand to loosen the leaves and add volume for packaging.
An 8-ounce clamshell container was used for packaging. The freshly harvested microgreens filled the container nicely and retained their shape and freshness. Correct labeling is crucial — the grower emphasized the importance of spelling the crop name correctly, as “cantaloupe” had been previously misspelled on some labels.
The labeling includes:
- The crop name (“Cantaloupe”)
- The lot number
- The harvest date
This ensures traceability and maintains professional standards, especially if the greens are sold to chefs or markets. Once sealed and labeled, the microgreens are ready for delivery or sale.
🌿 Recommended Microgreens Supplies |
Nutritional Value & Health Benefits of Cantaloupe Microgreens
Cantaloupe microgreens are not just flavorful—they are packed with nutrients that offer real health benefits. While detailed nutritional analysis on cantaloupe microgreens specifically is limited, what we do know is that most microgreens contain 4 to 40 times more nutrients than their mature counterparts, according to USDA research. Since cantaloupe fruit itself is rich in vitamins A and C, its microgreen version is expected to be even more concentrated in these antioxidants.
Key Nutrients Likely Found in Cantaloupe Microgreens:
- Beta-carotene (Provitamin A): Supports eye health, immune function, and skin regeneration.
- Vitamin C: Acts as a powerful antioxidant, promoting collagen production and protecting cells from oxidative damage.
- Folate: Crucial for DNA synthesis and repair, especially important for pregnant women.
- Potassium: Supports heart health and helps regulate blood pressure.
- Polyphenols and Flavonoids: Provide anti-inflammatory benefits and may help reduce the risk of chronic diseases.
Since microgreens are often consumed raw, their full enzymatic and nutrient content is preserved—unlike cooked vegetables,s which may lose a significant portion of their vitamins through heat exposure.
Beyond micronutrients, cantaloupe microgreens are also high in fiber and low in calories, making them an excellent choice for anyone focused on weight management or digestive health. Their sweet and mild flavor makes them especially appealing to children and those who typically avoid bitter greens.
Common Mistakes to Avoid When Growing
Even though cantaloupe microgreens are beginner-friendly, growers can still run into several issues if proper steps are skipped. Drawing from the cultivation process, here are the most important mistakes to avoid:
Improper Seed Density
Using either too many or too few seeds can impact the yield and quality. In the example, 50 grams of seed was weighed carefully to cover the tray evenly. Without this balance, microgreens can become overcrowded (leading to mold) or too sparse (leading to poor harvest volume).
Skipping Soil Tamping
After filling the tray with soil, the grower carefully leveled and tamped it down. This creates a flat, uniform growing surface that ensures even germination. Loose or uneven soil can cause some seeds to sprout poorly, leading to an inconsistent canopy.
Insufficient Sanitation
Sanitation was stressed multiple times throughout the growing process. Trays were sanitized before covering, and daily sanitizing was recommended during the growth stage. Still, the grower noticed dampening-off disease in small sections of the tray, which resulted from areas that may not have been adequately sanitized. This disease causes seedlings to rot and collapse due to fungal pathogens.
Overwatering During Germination
During germination, only light misting was used. Applying too much water or using a high-pressure setting can compact the soil or wash away seeds. The grower emphasized setting the hose to a gentle mist setting before watering.
Ignoring Light Timing
The timing of light exposure is critical. Moving the trays under grow lights too early can cause poor root development, while waiting too long may lead to leggy and pale microgreens. The trays were transferred to light on day four, which proved optimal for strong growth and coloration.
Improper Labeling
Even simple post-harvest errors can cause problems. The grower noted that misspelling “cantaloupe” on labels had happened in the past. Proper spelling, harvest date, and lot number are essential for professionalism and traceability—especially if you’re distributing to retail or wholesale buyers.
Culinary Uses: Tasty & Creative Recipes
Cantaloupe microgreens provide a unique sweet flavor that opens up a wide range of culinary possibilities. They deliver a soft, crunchy texture with subtle notes of melon, making them ideal for both savory and sweet dishes.
Here are some creative ways to use them:
Cantaloupe Microgreen Salad with Citrus Vinaigrette
A light summer salad combining cantaloupe microgreens, orange segments, sliced almonds, and feta cheese. The vinaigrette, made from lemon juice, olive oil, and a touch of honey, balances the natural sweetness of the greens.
Melon-Mint Smoothie Booster
Add a handful of cantaloupe microgreens to a smoothie made with frozen cantaloupe chunks, mint, Greek yogurt, and coconut water. This gives an unexpected boost of nutrients without overpowering the flavor.
Avocado Toast with Cantaloupe Microgreens
Top sourdough toast with smashed avocado, a squeeze of lime, and a generous handful of cantaloupe microgreens. Finish with sea salt and chili flakes for a nutrient-dense breakfast or brunch dish.
Cantaloupe Microgreen Spring Rolls
Use rice paper wraps to create spring rolls filled with julienned carrots, cucumbers, rice noodles, and cantaloupe microgreens. Serve with a spicy peanut dipping sauce for a refreshing appetizer.
Dessert Garnish for Yogurt Parfaits or Panna Cotta
Their subtle melon sweetness makes these greens ideal as a garnish for chilled desserts. Layer them with granola and fruit in parfaits or place them delicately atop panna cotta or lemon tarts for a restaurant-style finish.
Cantaloupe microgreens also pair well with prosciutto, mozzarella, and balsamic reductions, making them suitable for gourmet plating.
Market Potential & Selling Tips
Cantaloupe microgreens occupy a unique niche in the microgreens market. While most growers focus on more common varieties like radish, sunflower, or broccoli, cantaloupe provides something different and more memorable—both in taste and in marketing appeal.
Target Customers
- Gourmet chefs and restaurants: Always on the lookout for unique garnishes and ingredients that add flavor, story, and visual appeal to dishes.
- Farmers’ markets: Customers are increasingly seeking unique products that can’t be found in grocery stores. Offering samples (like a taste of the microgreens on a toothpick) can help drive interest.
- Health-conscious consumers: With a fruity flavor and antioxidant benefits, these microgreens can appeal to buyers interested in functional foods and superfoods.
- Subscription produce boxes or microgreen deliveries: Cantaloupe microgreens can be marketed as a seasonal or limited-edition variety.
Packaging & Labeling
Use clear clamshell containers (like the 8-oz one shown in the growing process) to showcase the greens’ color and volume. Always include:
- Crop name (“Cantaloupe Microgreens”)
- Harvest date
- Lot number
- Storage instructions (e.g., “Keep refrigerated; consume within 5–7 days”)
A good label not only communicates essential info but also increases the product’s perceived professionalism and value.
Pricing
Because they are more exotic and less commonly grown, cantaloupe microgreens can often command a premium price. In high-end markets, microgreens can sell for $2.50 to $5 per ounce, depending on packaging, freshness, and presentation.
Unique Selling Proposition (USP)
Position cantaloupe microgreens not just as another salad green, but as a “fruit-flavored microgreen with health benefits and culinary versatility.” Use descriptive marketing language that highlights their sweetness, rarity, and visual beauty.
Tips for Home Gardeners & Urban Growers
Growing cantaloupe microgreens at home or in an urban setting is not only possible—it’s remarkably rewarding. Unlike full-sized cantaloupes that need large spaces, pollination, and weeks to ripen, microgreens are harvested in just 6 to 8 days, making them ideal for home and small-space cultivation.
Here’s a breakdown of smart tips and considerations for growing cantaloupe microgreens successfully at home:
A. Optimal Growing Environment
Cantaloupe microgreens thrive best in controlled indoor conditions, but they can also grow well on a sunny balcony or near a south-facing window.
- Temperature Range: Maintain a range of 68°F to 75°F (20°C to 24°C) during germination and growth.
- Light Requirements: After the initial 4-day germination period, move them under full-spectrum grow lights for 12–14 hours per day. Natural sunlight also works if available.
- Air Circulation: Use a small fan to maintain airflow and prevent mold growth. Stagnant air is a leading cause of fungal issues in microgreens.
B. Tools and Materials You’ll Need
Start with the right equipment to simplify your growing process:
- 2-in tray system: One bottom tray without holes and one top tray with drainage holes
- Seed scale: For accuracy, —50 grams is the sweet spot per tray
- Microgreen soil mix: Light, fluffy soil ensures drainage and root aeration
- Spray bottle or gentle hose nozzle: Avoid disturbing seeds with high-pressure water
- Zerotol or hydrogen peroxide: For sanitizing trays and spraying over soil to prevent disease
- Grow lights: LED grow lights with adjustable arms or timers are ideal for consistent light delivery
- Weight: A small, flat object, such as another tray or a brick, helps during the germination phase to promote uniform sprouting
These materials can often be reused, making cantaloupe microgreens one of the lowest cost-per-harvest crops you can grow indoors.
C. Step-by-Step Growing Routine (Home-Friendly)
Here’s a summary adapted from the cultivation method demonstrated:
- Prepare your trays: Place the holed tray into the solid tray and fill it with your pre-mixed soil blend. Level and tamp down the soil gently to create an even surface.
- Moisten the soil: Use a light spray to dampen the top layer. Don’t soak.
- Weigh and spread seeds: Measure 50 grams of cantaloupe seeds and spread them evenly across the soil. Take your time—clumping leads to uneven growth.
- Sanitize with a fine mist of hydrogen peroxide or Zerotol. This helps sterilize the seed surface and reduces the risk of mold.
- Cover and stack: Add a thin layer of soil on top of the seeds, tamp it down gently again, and place a clean tray or weight on top.
- Germination period: Leave in the dark for 4 days, misting daily and keeping it lightly moist. The weight helps the seeds root firmly and push through uniformly.
- Exposure to light: On Day 5, remove the top tray and transfer the microgreens to a well-lit area or under grow lights. Mist as needed, but avoid overwatering.
- Harvest at Day 7 or 8: When the greens are 2–4 inches tall and have vibrant leaves, gently grasp the canopy and slice just above the soil line.
D. Storage & Use at Home
Once harvested, microgreens can be stored for up to 7 days in the fridge in an airtight container. Use a paper towel inside the clamshell to absorb moisture and prevent rot.
Pro Tip: Always harvest right before you plan to eat them for maximum nutrition and flavor. Cantaloupe microgreens are incredibly fresh-tasting and can be added directly to sandwiches, wraps, omelets, and smoothies.
E. Scaling Up for Urban Growers
If you live in an apartment or urban area and want to turn this into a side hustle or small business, start with:
- 5 to 10 trays per week to serve a few farmers’ market booths or CSA boxes
- Build a micro-rack system with shelves and lighting to maximize vertical space
- Brand your greens with eco-friendly packaging and educational labels (highlight their fruity taste, short grow cycle, and health value)