
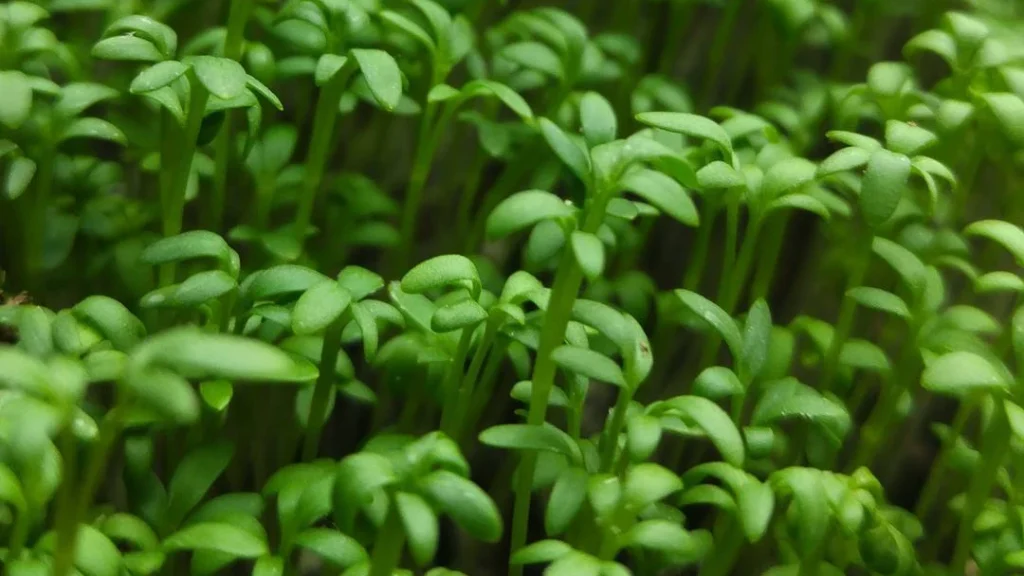
Cress microgreens grow fast, taste bold, and pack more nutrition than most veggies on your plate. In just 6 days, you can go from seed to harvest right on your kitchen counter with no garden, green thumb, or special gear needed.
These little greens aren’t just tasty, they’re science-approved. A CDC study ranked watercress from the same family as the number one powerhouse vegetable, scoring a perfect 100 out of 100 on nutrient density.
That means more vitamins and antioxidants in fewer bites. Add them to eggs, salads, or sandwiches for an instant upgrade in flavor and health 🌱💪🥗
Types of Cress for Microgreens
Cress refers to several fast-growing leafy greens, but in the microgreen world, there are two primary types that growers usually focus on: garden cress (Lepidium sativum) and curled or watercress (Nasturtium officinale). Both grow rapidly and are known for their unique, sharp, peppery flavor.
Garden cress is the most common variety used in microgreen cultivation. It has small, smooth leaves and grows upright. It’s particularly well-suited to dense seeding and fast production cycles, often ready for harvest in 6 to 8 days.
Curled cress or watercress has more decorative, frilled leaves and tends to be slightly more delicate in structure. It also grows quickly and can be used not only at the microgreen stage but also cultivated further to make dishes like watercress soup, a favorite among chefs and gardeners alike.
One unique aspect of cress seeds is their mucilaginous nature. When soaked in water, they form a gelatinous coating, similar to chia seeds. This makes them more difficult to handle using traditional soaking and rinsing methods. Because of this, many experienced growers recommend not pre-soaking cress seeds unless you have a specific technique in place to deal with the gel layer. In some cases, growers will soak them for 24 hours and then spread the gelatinous mix directly onto moist soil. However, this can be messier and more prone to uneven distribution, which is why most prefer dry seeding for ease and control.
Supplies and Equipment Needed
Starting a cress microgreen grow doesn’t require much, and most of the tools can be found around the house or easily purchased online. However, the quality of your tools and materials will directly impact the cleanliness, speed, and quality of your crop.
Seeds: Since cress seeds are small and relatively cheap, they offer a high return on investment. For a standard 10×20-inch tray, around 1 ounce (28 grams) of seed is ideal. If you’re just experimenting at home, even a couple of teaspoons is sufficient in a smaller food-grade container.
Containers: For beginners or small-batch growing, a shallow plastic food container or any clean tray about 2 inches deep works well. For commercial growers, a 10×20 microgreen tray is the industry standard. This larger size allows for uniform soil depth, consistent germination, and efficient watering.
Growing Medium: One of the best soil blends recommended by growers combines 50% coconut coir and 50% organic potting soil. Coconut coir is made from the husk of coconuts and is valued for its ability to retain water while offering good drainage. Organic potting soil adds a touch of nutrition to the mix and gives structure to the tray. This combo keeps costs down, especially if you’re buying in bulk. One dehydrated brick of coir can expand to the volume of a full bag of potting mix for roughly half the price, making it an economical solution.
Watering Tools: A fine mist spray bottle is essential in the early stages to avoid displacing the seeds. After germination, bottom-watering using a secondary tray is recommended to prevent mold and stem rot.
Lighting: Cress grows well under indirect sunlight, but a full-spectrum LED grow light can produce denser and more uniform crops, especially in winter or low-light environments.
Harvesting Tools: A sharp knife or pair of scissors is needed for clean cutting. One grower recommends a Vorox-brand razor knife, which slices cleanly and helps reduce the risk of dragging soil up into the greens.
Optional but Useful:
- A seed shaker for even distribution
- A second tray or piece of foil for blackout during germination
- Airflow system (small fan or open space) to prevent mold
🌿 Recommended Microgreens Supplies |
Step-by-Step Growing Process
Cress is one of the fastest and easiest microgreens to grow, but precise technique ensures higher yield, cleaner harvest, and longer shelf life. The full process takes about 6 to 10 days, depending on how large and leafy you want the greens.
Seed Preparation
There are two main schools of thought regarding whether to soak cress seeds before sowing. One approach is to skip soaking altogether, as cress seeds form a gel when wet and can clump together. This is preferred by most growers for ease and cleanliness.
Alternatively, some growers soak the seeds for 24 hours, during which they become encased in a jelly-like membrane. This mix is then carefully spooned onto the medium. While this can help with faster germination, it requires extra care to ensure even distribution.
Preparing the Medium
Fill your tray or container with your chosen medium to about 1 to 1.5 inches deep. Level the surface as uniformly as possible. A smooth surface ensures even seed contact and consistent germination. Lightly mist the surface with water using your spray bottle. This helps the seeds adhere when dropped and prevents them from rolling or bunching together.
Sowing the Seeds
Distribute the seeds evenly over the surface. You can do this:
- By hand (for small containers)
- With a spoon if using pre-soaked seeds
- With a seed shaker, which is particularly helpful for achieving an even spread across large trays
The goal is full but not overcrowded coverage, allowing air to flow between seedlings as they grow. Overcrowding leads to poor air circulation, increased humidity, and a greater risk of mold or rot.
Once seeded, mist the surface again gently to settle the seeds and encourage initial contact with the moist soil.
Germination (Days 0–2 or 3)
Cover the tray to create a dark, humid environment, which encourages fast germination. You can do this using:
- Another microgreen tray is placed upside down
- Aluminum foil (for small batches)
- A lid or cloth that keeps out light but allows a bit of air circulation
Cress is exceptionally quick to germinate, often showing root and shoot development within 24 to 48 hours. During this phase, avoid overwatering. The soil should remain moist but not soaked, as excess moisture without airflow can cause mold.
By Day 2, you’ll usually see yellowish sprouts emerging. This pale color is due to the lack of light, which is perfectly normal. Once most seeds have sprouted, it’s time to uncover the tray and expose the seedlings to light.
Growth and Care (Day 3–7)
Once the seeds have germinated and the tray is uncovered, the growth phase begins in earnest. At this stage, light and moisture management become the most critical factors to produce strong, healthy, and vibrant cress microgreens.
Light Requirements
Cress does not require intense light, but adequate and even lighting ensures upright, uniform growth and a deeper green color. If you’re growing indoors, placing the tray near a bright window with indirect sunlight for 8–12 hours a day is sufficient. However, for optimal and more controlled results, especially in winter or commercial settings, use full-spectrum LED grow lights.
Grow lights should be positioned about 12 to 18 inches above the tray. This prevents seedlings from becoming “leggy” or stretching too much. If your cress is bending toward the light or growing too tall, too quickly, that’s a sign the lighting is insufficient or uneven.
Watering Techniques
After germination, switch from top-misting to bottom watering. This involves placing the growing tray into another tray filled with about half an inch of water. The soil draws moisture upward via capillary action, keeping the roots hydrated while the foliage remains dry, reducing the risk of mold and damping-off.
Check water levels daily. Cress prefers consistent moisture, but never allow the medium to stay waterlogged. One grower noted that even a 24-hour cycle of overwatering can lead to yellowing, stunted growth, or fungal issues.
If you notice the top layer drying out, it’s okay to lightly mist, but avoid oversaturation. Aim for a moist but breathable medium.
Air Circulation
Good airflow is essential once the plants are growing. In enclosed indoor spaces, stagnant air encourages fungal growth. Use a small oscillating fan on low speed, positioned to gently circulate air above the tray. Alternatively, opening a nearby window daily for an hour or two can improve ventilation in smaller grow setups.
If the growing environment is overly humid, consider running a dehumidifier to maintain a relative humidity of around 50–60%.
Harvesting Techniques
Cress microgreens are typically ready for harvest between Day 6 and Day 10, depending on your preferred flavor intensity and leaf size. Early harvests (Day 6–7) give you a milder flavor and more tender greens, while harvesting later (Day 8–10) allows for a spicier taste and slightly more biomass.
Signs of Readiness
Your cress microgreens are ready when:
- The stems are about 2–3 inches tall
- The cotyledon (first leaf) pair is fully open
- Some trays may show initial signs of true leaf development
Once true leaves appear, the flavor becomes noticeably more pungent and mustard-like. Some growers prefer to harvest just before or at the start of true leaf development to balance flavor with texture.
How to Harvest
Use a sharp blade or clean scissors. Hold a bunch of greens upright with one hand, and cut just above the soil line with the other. Avoid tearing or crushing the stems.
One recommended tool is a Vorox razor blade, which delivers a clean, single-swipe cut and reduces the risk of pulling up soil or disturbing roots.
Avoid pulling the greens up by hand, as this brings soil and root matter into the harvest, increasing cleaning time and reducing shelf life.
Timing the Harvest
Harvest in the early morning or late evening, when room temperatures are cooler. Heat causes the microgreens to wilt quickly, and harvesting during cooler hours helps retain crispness and vitality.
If growing commercially, batch-harvesting just before market delivery ensures peak freshness. Some growers report that freshly harvested cress, when stored properly, can maintain crispness for up to 7 days in refrigeration.
Post-Harvest Tips and Storage
Proper handling after harvest is essential to maintain shelf life, appearance, and food safety.
Washing or Not Washing?
Home growers often skip washing harvested cress if it’s grown in clean, controlled environments without fertilizer or pest exposure. However, if you plan to sell or share your microgreens, a gentle wash is advised.
Use cold, clean water and a fine mesh strainer to rinse the greens gently. Shake off excess water and allow them to air-dry on paper towels or mesh racks for 15–20 minutes before storing.
Avoid soaking or agitating vigorously, as cress is delicate and easily bruised.
Storage
Once dry, transfer the microgreens to an airtight container or produce box. Line the container with a dry paper towel to absorb excess moisture, which prevents rot. Keep refrigerated at 35–40°F (1.6–4.4°C).
Avoid packing the container too tightly, as this can crush the greens and accelerate spoilage. When stored correctly, cress microgreens retain their color, flavor, and texture for 5–7 days.
If your harvest develops yellowing, sliminess, or a sulfur smell during storage, discard immediately—these are signs of bacterial breakdown.
Common Mistakes to Avoid
Even though cress is relatively easy to grow, several common pitfalls can reduce yield, increase disease risk, or compromise flavor.
Overwatering
Overwatering is perhaps the most frequent issue among beginners. It leads to soggy soil, mold, and root rot. Always switch to bottom-watering after germination, and let the soil surface dry slightly between waterings.
Using Soaked Seeds Without Technique
Soaking cress seeds can create a sticky, gelatinous mess. If you choose to soak seeds, use a spoon or spatula to spread them carefully. Better yet, skip soaking altogether and dry sow the seeds directly onto the moist medium.
Uneven Seeding
Clumped seeds cause uneven growth and promote rot in dense areas. Use a shaker or spread seeds evenly by hand to ensure uniform spacing.
Insufficient Light or Poor Ventilation
Cress grown in low light becomes leggy and pale. Similarly, poor airflow encourages mold. Ensure adequate lighting and place a small fan nearby for air circulation.
Late Harvesting
Waiting too long to harvest results in woody stems, bitterness, and reduced shelf life. Cress should be harvested between Day 6 and 10 for the best taste and tenderness.
Nutritional Benefits and Culinary Uses
Cress microgreens aren’t just fast-growing—they’re also nutritional powerhouses. In fact, according to the USDA’s Aggregate Nutrient Density Index (ANDI), watercress ranks at the very top, even surpassing kale. This index evaluates food based on the concentration of key vitamins, minerals, and phytonutrients per calorie, making cress one of the most nutrient-dense greens available.
Nutritional Profile
Cress microgreens are rich in:
- Vitamin K – vital for blood clotting and bone health
- Vitamin C – supports immune function and skin repair
- Vitamin A (in the form of beta-carotene) – essential for vision and immune support
- Calcium and Potassium – important for heart, nerve, and muscle function
- Glucosinolates – natural plant compounds with anti-inflammatory and anticancer properties
Despite their small size, microgreens contain up to 40 times more nutrients by weight compared to their mature counterparts, according to a 2012 study by the University of Maryland and the USDA. Cress, in particular, benefits from this nutrient concentration due to its naturally high phytonutrient density.
Flavor Profile and Uses
Cress microgreens have a distinct peppery, mustard-like flavor—similar to arugula but sharper. This flavor intensifies slightly with age, especially after the first true leaves begin to appear.
Culinary applications include:
- Sprinkling fresh over salads, sandwiches, or avocado toast
- Blending into smoothies or green juices for a zesty kick
- Mixing into scrambled eggs, soups, or pasta dishes
- Garnishing fine-dining plates to add flavor and visual appeal
One especially popular use is in watercress soup, which balances the peppery bite with creaminess and warmth—perfect for colder months.
Scaling Up for Commercial Production
While cress is perfect for home gardeners, it’s also a popular microgreen for chefs, farmers’ markets, and small-scale commercial growers due to its fast turnaround and strong flavor.
Why Cress is Ideal for Markets
- Quick turnaround (6–10 days): More crop cycles in less time
- Compact growth: No need for deep trays or large grow spaces
- Flavor-forward: Appeals to chefs looking for bold garnishes
- Low cost: Cress seeds are inexpensive, and soil inputs can be reduced with coco coir
Optimizing for Yield
In commercial trays (usually 10×20 inches), use approximately 1 ounce of cress seeds for even coverage. Too much seed leads to overcrowding and mold. Too little reduces yield. When done correctly, growers report consistent, dense, and clean canopies of cress ready for harvest in as little as 6 days.
Use stacking and blackout trays during germination to save space and optimize root development. Once germinated, move trays to lighted shelving systems or greenhouse benches.
Packaging and Shelf Life
For market or retail sales:
- Pack in clamshell containers with drainage pads to extend freshness
- Label with harvest date and storage instructions
- Unwashed, dry microgreens store best, offering 7–10 days of shelf life if handled properly
Selling directly to chefs? Consider offering fresh-harvested bundles or even live trays for maximum shelf life and freshness.
Sustainability and Environmental Impact
Cress microgreens are a sustainable crop for both home and commercial growers due to their minimal input needs and rapid turnover.
Low Water Usage
Unlike mature leafy greens, microgreens only require 7–10 days of water, often just a few ounces per tray if bottom-watered properly. The addition of coco coir in the soil mix improves water retention, reducing irrigation frequency by up to 30–40%.
Minimal Space, Maximum Yield
Cress can be grown in compact containers or stacked vertical systems, making it ideal for urban or indoor agriculture. In a footprint of just 10×20 inches, one can harvest enough cress for multiple meals or small-scale market orders—without the land, labor, or fertilizer needs of traditional farming.
No Chemical Fertilizers Required
Because cress microgreens complete their growth cycle using only the energy stored in the seed, no external fertilizer is required. This eliminates runoff risk and minimizes ecological footprint.
Compostable Waste
Spent soil and root mats from microgreen trays can be composted or added directly to garden beds, returning nutrients to the soil and closing the sustainability loop.