
Growing celery microgreens at home might sound tricky, but it’s actually one of the easiest ways to bring fresh flavor and nutrition into your kitchen. These tiny greens pack a crisp, peppery punch and grow beautifully in a small tray right on your windowsill.
From prepping your seeds to seeing those first sprouts peek through, each step is straightforward and satisfying. You don’t need fancy tools or a green thumb.
Just a bit of patience and the right method, and in about 10 to 14 days, you’ll be harvesting your own crisp celery microgreens. Perfect for smoothies, salads, or that extra touch on your favorite dish. Fresh, fast, and full of life 🌱💚🥗
Celery Microgreens vs. Full-Grown Celery
Celery microgreens are harvested much earlier in their growth cycle compared to mature celery. While a full stalk of celery may take between 120 and 150 days to reach harvest, celery microgreens are typically ready in around 18 to 21 days. This shorter cycle makes them a great option for those who want quick results with minimal maintenance.
There are notable differences in flavor and texture between the two forms. Full-grown celery is known for its fibrous stalks and a somewhat watery, crunchy texture that many people enjoy in soups or as a snack. However, that same texture can be a drawback for others. The stringiness of mature celery can be off-putting, especially when eaten raw. Celery microgreens remove that barrier. They offer the same classic celery taste in a tender, delicate form, without any of the stringiness.
The appearance is also quite different. Instead of a large, thick stalk, celery microgreens resemble small, leafy shoots with a pale green hue and fine stems. They are often used as garnishes, salad additions, or blended into smoothies, giving dishes a concentrated celery flavor without bulk.
For growers with limited space or those new to indoor gardening, celery microgreens also offer a low-risk, rewarding experience. They require far less time, less soil, and no complex spacing arrangements. Growing them is more about surface sowing and light management, rather than spacing rows and maintaining stalk height.
Nutritional Benefits of Celery Microgreens
Celery microgreens are more than just a flavorful garnish. They contain a dense concentration of nutrients that typically surpass what is found in their fully matured counterparts. Because microgreens are harvested shortly after germination, when the plant’s energy is focused on early growth, they often contain higher levels of vitamins, antioxidants, and polyphenols per gram.
One of the key nutritional elements found in celery microgreens is flavonoids. These are plant compounds with strong antioxidant properties. Flavonoids like apigenin and luteolin, which are present in celery, have been studied for their potential to reduce inflammation, support cellular repair, and even protect brain health. Long-term consumption of flavonoid-rich foods has been associated with a slower rate of cognitive decline, based on population-based dietary studies.
Celery microgreens are also appreciated for being free from the bulky fiber of mature stalks. While fiber is essential in the diet, some people may want the flavor and benefits of celery without the chewiness or digestive load. In this form, the nutrients are more bioavailable and easy to incorporate into a wide range of meals.
These greens also deliver trace amounts of important minerals like potassium and calcium and are low in calories, making them a functional addition to nutrient-dense diets. Because they are eaten raw, nothing is lost to cooking. This preserves the heat-sensitive vitamins and keeps the phytonutrients intact.
🌿 Recommended Microgreens Supplies |
Celery Microgreens Salad Recipe
A simple, flavorful salad that highlights the unique taste and tenderness of celery microgreens. This section will provide a step-by-step recipe using fresh microgreens, inspired by both Western salad styles and Asian flavor profiles.
Seed Selection and Preparation
Choosing the right type of celery seed is a foundational step in growing successful microgreens. One variety that has shown excellent results is Utah celery. It is widely available and performs well under both indoor and controlled environment settings. It produces consistent sprouts with a familiar flavor profile, making it ideal for microgreen growing.
Celery seeds are extremely small, almost dust-like. Because of their size, handling them requires care, especially during the sowing process. One important consideration is whether to soak the seeds before planting. There is a notable difference in germination rates between seeds that are soaked and those that are not.
Soaking celery seeds for 12 hours in water before planting helps soften the outer seed coat and allows moisture to penetrate more effectively. This boosts the rate and evenness of germination. In side-by-side comparisons, soaked seeds began sprouting faster and with more uniformity than dry-sown seeds. Soaked seeds produced a denser and healthier-looking crop in the early stages, while the non-soaked seeds showed patchy and delayed sprouting. For anyone looking to get consistent results, pre-soaking is a highly recommended step.
After soaking, the seeds can be drained and immediately spread over the prepared growing medium. There’s no need to dry them first. The moisture retained from soaking also helps them stay in place during the early hours post-planting, reducing the chance of them moving or becoming buried during the initial watering.
GrowingMedias and Methods
Celery microgreens can be grown using different mediums and systems, depending on the gardener’s preferences and resources. The two most common approaches are traditional soil-based growing and a soilless bioponic method.
For those choosing soil, it’s important to start with a properly moistened medium. Celery seeds are so small that if they are sown on dry soil and then watered, they tend to float or get buried under the surface. This is problematic because celery seeds require light to germinate. They should remain on or just barely pressed into the surface of the soil. Using a spray bottle or a gentle watering tool helps to avoid displacing the seeds.
Lighting and humidity play a major role in the germination process. Celery seeds should be placed under consistent light immediately after sowing. Unlike some seeds that germinate best in darkness, celery needs exposure to light from the very start. A humidity dome can be placed over the tray to retain moisture and create a stable environment. Once germination has occurred, proper airflow becomes necessary to prevent mold and to strengthen the seedlings.
The soilless method uses layers such as burlap and fiberglass, topped with mesh. Seeds are spread over this surface and then lightly weighted down using small rocks or similar objects. This helps keep the seeds in close contact with the moist surface, promoting even sprouting. The benefit of this method is a clean growing environment that avoids potential contamination from soil. There’s no need for compost, which reduces the risk of microbial problems. This method is especially useful for commercial setups or those who want a tidier, dirt-free harvest.
Both methods require close attention to moisture and light. While the setup may differ, the principle remains the same: celery seeds germinate best when given light, steady warmth, and even moisture from below.
Step-by-Step Growing Process
Starting with a clean tray is essential. If using soil, moisten it thoroughly before spreading seeds. If using a soilless method, ensure your base layers, like burlap and mes,h are saturated but not dripping. Once your base is ready, spread the seeds as evenly as possible. Because celery seeds are so small, it’s easy to accidentally overseed. Even a pinch can go a long way. A simple way to ensure even coverage is to use a toothpick or pen to gently move the seeds across the surface. This improves spacing and reduces clumping.
After sowing, lightly press the seeds into the surface, but do not bury them. A misting bottle can be used to settle the seeds without disturbing them. Keep the trays on a heat mat if possible, maintaining a temperature range of around 70 to 75 degrees Fahrenheit. This mimics the warm soil conditions needed for optimal germination.
Use a humidity dome during the first few days to create a mini-greenhouse effect. This helps retain moisture and promotes faster sprouting. Once germination begins, typically after seven days, remove the dome or lift it slightly to allow airflow. This reduces the risk of mold and helps the stems strengthen.
Ensure your light source is bright and consistent. Celery microgreens grow best with around 16 to 18 hours of light daily. LED grow lights or natural sunlight from a south-facing window can work well, but the intensity and duration need to be steady.
Throughout the growing process, avoid letting the surface dry out. Light, daily misting is usually sufficient. By day 18 to 21, you should see a lush, green tray of microgreens, ready to harvest.
Watering and Light Requirements
Watering celery microgreens requires balance. Because these are delicate seedlings, too much moisture can lead to mold, damping-off disease, or rot, especially in dense plantings. Too little, and the tiny roots may dry out before the plant has a chance to establish itself.
If using a soil-based medium, bottom watering is one of the most effective methods. This involves filling a secondary tray with water and placing the growing tray on top, allowing moisture to be drawn upward through capillary action. This keeps the surface dry enough to prevent mold while ensuring the roots stay hydrated.
For non-soil systems like burlap or fiberglass, consistent hydration is also crucial. In these setups, the base should be saturated but not soaking. These materials wick moisture up to the seeds. When layered properly, they offer a uniform moisture bed that supports germination and early root development. A continuous watering circuit can also be used in more advanced systems to automate this moisture management, but even manual watering can be effective when closely monitored.
Lighting is equally critical. Celery microgreens need full light exposure from the beginning. Unlike seeds that require darkness to trigger germination, celery benefits from light during the sprouting stage. Place the trays under grow lights for about 16 hours a day. Natural sunlight can work if it’s strong and consistent, but supplemental lighting ensures better control. Elevating or adjusting lights as the greens grow helps prevent them from stretching too much or becoming leggy.
Light intensity and direction also matter. Uniform overhead lighting will promote straight upward growth. If the light comes from the side or is too weak, the plants may bend or lean, resulting in uneven development and weaker stems.
Growth Timeline and Observation
Celery microgreens follow a slower germination path than other varieties. This means patience is essential, especially during the first 7 to 10 days. Unlike radish or broccoli seeds, which sprout quickly, celery takes its time. Even in ideal conditions, visible germination may not begin until after 7 days, and sometimes longer if moisture or temperature fluctuates.
During the early phase, the seeds remain mostly dormant to the eye. This doesn’t mean they aren’t active. Internally, the cells are absorbing water, enzymes are activating, and the first signs of growth are starting at the root tip. This latent phase is why soaking the seeds in advance is so helpful—it reduces the lag time by jumpstarting hydration.
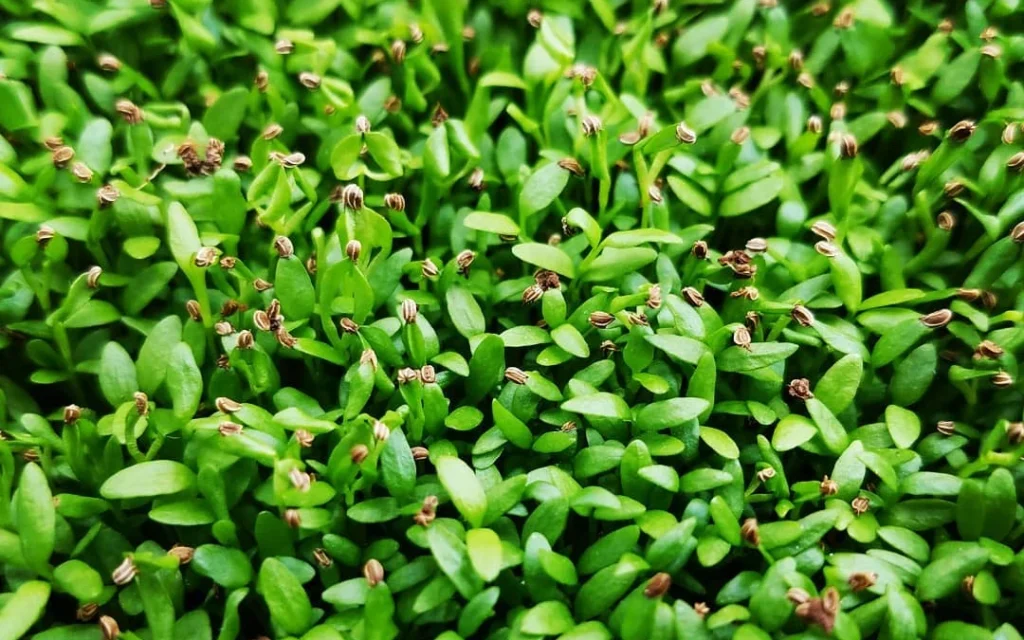
Between days 10 and 14, the cotyledons (the first leaf-like structures) start to appear. These are followed by the first set of true leaves. At this point, the tray begins to fill out. The leaves are narrow, fine, and feathered—clearly different from broader-leafed microgreens like sunflower or kale.
By day 18 to 21, the microgreens should reach their harvest stage. Their height will be between 2 and 3 inches, with bright green coloration and a distinct celery aroma. At this stage, the greens have reached their flavor peak, delivering a clean, herbal taste with a slight peppery edge. Beyond this point, the flavor remains, but the texture can begin to toughen slightly as the stems thicken.
Regular observation is key throughout this timeline. Watch for uneven growth or pale leaves, which may indicate inadequate light. Keep an eye on moisture by touching the soil or medium to check dampness. Even small daily adjustments can make a big difference in achieving a lush and healthy tray.
Harvesting Techniques
Harvesting celery microgreens is straightforward but should be done carefully to preserve quality and reduce waste. The ideal time to harvest is between days 18 and 21, when the first true leaves have developed but before the stems start to lignify or harden.
Use clean, sharp scissors or a kitchen knife to cut the greens just above the soil or growth medium line. Avoid pulling or yanking, as this can disturb the roots and lead to clumps of soil or medium sticking to the greens.
It’s best to harvest early in the day, especially if you’re using natural light. This is when the microgreens are at their most hydrated and least stressed by heat. Harvesting when dry is ideal. If the surface is wet, allow a few hours of ventilation before cutting to reduce the chance of mold during storage.
Post-harvest, avoid washing the greens unless they are visibly dirty. If you do wash them, use cold water and dry them quickly using a salad spinner or by laying them between layers of paper towels. Any leftover moisture can shorten their shelf life.
Store harvested microgreens in an airtight container in the refrigerator. Under ideal conditions, they can last up to a week. However, for the best flavor and nutritional value, they should be consumed within 3 to 4 days.
For those growing commercially or in larger quantities, staggered sowing can ensure a continuous harvest cycle. Planting trays every 2 to 3 days will provide a steady flow of ready-to-harvest greens without overwhelming storage.
Common Mistakes and How to Avoid Them
Several pitfalls can hinder the successful growth of celery microgreens, especially for beginners. One of the most common mistakes is overseeding. Because celery seeds are small, it’s easy to misjudge quantity. A dense seed layer may lead to overcrowding, poor air circulation, and higher chances of mold. Sparse, even distribution is more effective, allowing each plant enough room to develop without competing for space and light.
Another frequent issue is inconsistent watering. Overwatering causes root rot, particularly in low-drainage systems. On the other hand, letting the medium dry out can halt germination entirely or lead to patchy growth. The key is maintaining steady moisture without soaking the surface. A spray bottle, capillary mat, or bottom watering tray can help manage this balance.
Light mismanagement is also a problem. Placing trays in areas with poor light can lead to pale, leggy seedlings that collapse under their own weight. Celery microgreens are particularly sensitive to this and need strong, direct lighting from day one. Even minor gaps in lighting exposure can affect growth uniformity.
Neglecting seed preparation is another area where growers go wrong. Skipping the soaking step often results in uneven or delayed germination. While soaking isn’t mandatory, it significantly boosts the chances of a healthy, full tray.
Improper harvesting techniques can ruin a good crop at the final step. Pulling the plants or using dull blades can bruise the delicate stems and reduce shelf life. Always use clean, sharp tools and handle the greens gently.
Lastly, contamination is a concern, especially with organic or compost-based growing. Using recycled but clean materials like fiberglass and burlap offers a sanitary alternative without the risks associated with soil pathogens. It also simplifies cleanup and reduces mess indoors.