
Growing microgreens at home with a hydroponic system is one of the easiest ways to enjoy fresh, nutrient-rich food every week. Instead of using soil, hydroponics delivers water and nutrients directly to the roots, helping microgreens grow faster and cleaner.
With a simple setup of PVC pipes, a small water pump, and a reservoir, you can build a DIY hydroponic system that fits perfectly in a kitchen, balcony, or indoor garden. Microgreens such as broccoli, radish, sunflower, and pea shoots are ready to harvest in just 7–14 days.
This step-by-step guide explains how to create your own hydroponic system for microgreens at home, covering materials, setup, care, and harvest so you can enjoy healthy greens year-round.
Why Microgreens Thrive in Hydroponics
Growing microgreens in a hydroponic system at home is one of the most efficient ways to produce fresh, nutrient-rich food. Microgreens have short growth cycles, usually between seven and fourteen days, which makes them a perfect match for water-based growing. Instead of sending roots deep into the oil, these tiny plants only need a shallow layer of moisture and oxygen.
In a home hydroponic setup, the growing channels are kept about half full of water. This allows roots to stay in contact with moisture while the upper part of the root zone remains aerated. A constant flow of water at about one and a half to two liters per minute per channel ensures the roots receive fresh oxygen and nutrients. For a four-channel system, this equals around three hundred sixty liters per hour, which is why choosing a pump with a little extra capacity keeps growth strong.
White PVC channels are recommended because they reflect light and prevent the water from heating up. Dark pipes absorb heat, raising water temperature and slowing nutrient uptake. Another benefit of hydroponics for microgreens is the ability to adjust the water level using a simple outlet elbow. Pointing it upward keeps the water high for young seedlings, while turning it downward lowers the level as roots grow longer. This easy control makes microgreens sturdy and uniform.
When grown in this way, microgreens develop quickly, remain free of soil mess, and offer high nutritional value. Studies have shown that microgreens may contain four to forty times more vitamins than mature vegetables, which makes hydroponic growing even more rewarding.
Types of Simple Home Hydroponic Systems for Microgreens
Shallow Tray Hydroponic System
A shallow tray is one of the simplest ways to grow microgreens without soil. Water is pumped into the tray and flows across a grow mat or coconut coir layer. The roots stay moist while the excess drains back into a reservoir. This design is ideal for beginners and works well for crops like broccoli, kale, and mustard that are harvested as a dense mat.
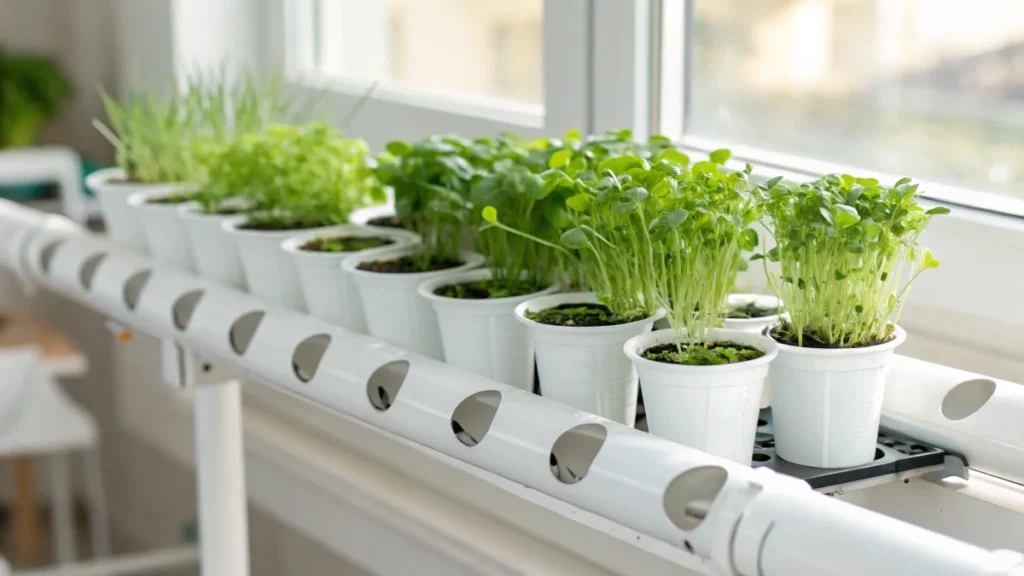
PVC Pipe Hydroponic System
For a scalable option, PVC hydroponic channels can be adapted for microgreens. Using one-meter pipes with a diameter of one hundred ten millimeters, holes are drilled across the top at regular intervals. Cups filled with grow mats or a thin growing medium are placed in these holes. Each cup becomes a small microgreen cluster, perfect for radish, mustard, or sunflower shoots.
Vertical Shelf Hydroponic Setup
Home growers with limited space can use a vertical rack that stacks trays or PVC pipes in layers. A single pump and reservoir circulate water through each level before returning to the tank. This design maximizes yield in kitchens, balconies, or indoor grow rooms.
Materials Needed for a DIY Hydroponic System for Microgreens
Setting up a hydroponic system for microgreens at home requires only a few key materials, many of which are inexpensive and easy to find.
PVC Channels or Trays
Use four PVC pipes, each one meter long and one hundred ten millimeters in diameter. This size provides enough space for roots and good water circulation. Alternatively, use seed trays with grow mats for a tray-based system.
Holes and Plant Holders
Drill holes every fifteen centimeters along the top of each pipe using a two-inch hole saw. Smooth the edges so cups fit evenly. If net pots are not available, plastic cups with side holes can be used instead.
End Fittings and Regulators
Install elbows at the inlet and a bulkhead fitting with an adjustable elbow at the outlet. This outlet allows you to control the water level depending on the age of the seedlings. Wrap fittings with insulating tape instead of glue so parts can be removed for cleaning.
Support Frame
Build a simple stand from PVC pieces about eighty centimeters tall and one meter wide. This keeps the channels horizontal and ensures even water depth across the system.
Pump and Flow Rate
Each channel requires one and a half to two liters per minute. For four channels, this equals three hundred sixty liters per hour. A pump rated around twelve hundred liters per hour with a lift capacity of one and a half meters is suitable for a small home rack.
Reservoir Tank
Each channel holds about five liters when half full. With four channels, the system holds around twenty liters. The reservoir should be three to four times this amount, ideally sixty liters, to maintain a stable water supply.
Tubing and Connections
Flexible tubing carries water between the pump, channels, and reservoir. Softening the hose ends in hot water helps them slide onto fittings securely.
Filtration and Lights
Wrap the pump intake with mesh or a produce bag to prevent debris from entering. For indoor growing, use LED grow lights that provide twelve to sixteen hours of light per day.
🌿 Recommended Microgreens Supplies |
Step-by-Step Guide to Building and Using the System
Building the Channels
Mark a center line across each pipe and drill two-inch holes every fifteen centimeters. Clean the edges so the cups fit neatly. Install the inlet elbow at one end and the outlet fitting with the adjustable elbow at the other. Shake out any plastic shavings before moving on.
Building the Frame
Assemble a PVC frame about eighty centimeters tall and one meter wide. Place four channels on top, making sure they are aligned with perforations facing upward. Secure them with tape so they cannot roll.
Water Circulation
Connect the pump to a main feed line and split it with tees so each channel receives water. At the outlets, direct short hoses into a collection pipe that returns water to the reservoir.
Water Level Regulation
Rotate the outlet elbow to adjust the liquid level. Keep it high for germination, so seeds stay moist, then lower it once roots grow. This prevents oversaturation and encourages healthy growth.
Reservoir Preparation
Fill the reservoir with fresh water and add nutrients at the right concentration for young plants. Place the pump inside and cover its intake with mesh. Test that the pump lifts water to the correct height and thatthe flow is even.
Testing Before Planting
Run the system for twenty-four hours before sowing seeds. Check for leaks at caps and fittings. Add extra tape if necessary. Ensure water flows smoothly and fills channels to about half their height.
Planting Microgreens
Line cups or trays with coconut coir, jute mats, or perlite. Moisten the surface and spread seeds evenly in a single layer. Place cups in the drilled holes or trays on shelves. For the first few days, keep water levels high so seeds do not dry out. Lower levels once the seedlings open their first leaves.
Maintenance and Care of Hydroponic Microgreens
A hydroponic system for microgreens is low maintenance but requires consistent monitoring.
Check water levels daily and top up with plain water to keep the pump submerged. A sixty-liter reservoir provides a good buffer against evaporation. Replace the nutrient solution every week to prevent salt buildup and to ensure a fresh supply for the plants.
Keep the system clean by removing end caps after each cycle and wiping inside the channels. Smooth edges and a mesh prefilter reduce debris that could otherwise clog the system.
Monitor water temperature. White channels keep the solution cooler, while black pipes absorb heat and can cause problems. If the room is warm, increase airflow around the rack to prevent overheating.
Maintain airflow and humidity control to avoid fungal issues. Provide consistent lighting for twelve to sixteen hours daily. If seedlings appear tall and leggy, increase the light intensity or adjust the height of the lamp.
Harvesting Hydroponic Microgreens
Microgreens are typically ready to harvest within seven to fourteen days, depending on the variety. Harvest when the cotyledon leaves are fully open, and the plants are about five to seven centimeters tall.
Use clean scissors or a sharp knife to cut just above the growing medium. For microgreens grown in cups, remove the cup and harvest the entire tuft in one cut. For tray-grown crops, slide the blade across the surface to harvest evenly.
After harvest, rinse the greens gently and dry them before storing. If pea shoots or sunflower shoots were grown, some may regrow for a second, smaller harvest.
Advantages of Growing Microgreens with a Hydroponic System at Home
Choosing a hydroponic system for microgreens at home offers multiple benefits compared to traditional soil-based growing.
Faster Growth
Microgreens thrive in a water-based environment because nutrients are delivered directly to the roots. With constant access to oxygen and moisture, plants mature faster. Most microgreens reach harvest in seven to fourteen days, and many growers notice quicker germination compared to soil.
Clean and Soil-Free
Growing microgreens without soil means no mess indoors. There are no weeds, no risk of pests living in the soil, and no muddy cleanup. This makes hydroponic microgreens especially appealing for kitchens, balconies, or small indoor gardens.
Year-Round Harvest
A home hydroponic setup can operateat any time of year. With a sixty-liter reservoir, consistent lighting, and stable water flow, you can grow fresh greens even during winter. LED grow lights make it possible to keep production steady regardless of outdoor conditions.
Efficient Use of Water and Space
Hydroponics uses up to ninety percent less water than soil farming because the water recirculates in a closed loop. A compact four-channel PVC setup can produce twenty to twenty-four individual plant sites at once. Vertical racks allow multiple trays or pipes to be stacked, multiplying the yield per square meter of floor space.
Higher Nutritional Value
Microgreens are already known for being rich in vitamins and antioxidants. Research has shown they can contain four to forty times the nutrient levels of their mature counterparts. A hydroponic system ensures consistent growing conditions, helping you maximize these health benefits.
Tips and Troubleshooting for Hydroponic Microgreens
Even with a simple DIY hydroponic system, small adjustments can make a big difference. Here are practical tips to keep your microgreens thriving.
Preventing Leaks and Water Loss
Always test the system for twenty-four hours before planting. Do not glue end caps, but seal them with insulating tape so they can be removed for cleaning. If you notice dripping at the seams, add more tape after drying the surface.
Maintaining Cool Water Temperature
Avoid black pipes because they absorb heat and can raise water temperature. Elevated temperatures reduce root efficiency and may lead to stunted growth. Use white PVC channels to reflect heat and keep the nutrient solution cool.
Ensuring Proper Oxygenation
If roots appear brown or slimy, increase water flow slightly above two liters per minute per channel. You can also add an air stone to the reservoir for extra aeration. Good oxygen levels prevent root rot and improve growth.
Avoiding Weak or Leggy Seedlings
Leggy microgreens are usually a sign of insufficient light. Provide twelve to sixteen hours of LED light per day and adjust the height so the canopy receives uniform coverage. A fan for gentle airflow also strengthens stems.
Managing pH and Nutrients
Keep the solution pH between 5.5 and 6.0 for most microgreens. Replace the nutrient solution once a week to maintain balance and prevent salt buildup. A sixty-liter tank provides stability, but regular monitoring ensures consistent results.
Controlling Algae and Mold
If you see green algae forming, cover exposed water surfaces and ensure channels remain shaded. Good airflow helps prevent mold on the leaves, while keeping the water level correct avoids over-saturation of the medium.