
Dandelion microgreens are one of the most underrated yet nutrient-rich greens you can grow at home. These tender young leaves carry a mild bitterness, similar to chicory or arugula, and add flavor, texture, and color to everyday meals.
Growing dandelion microgreens indoors or outdoors is simple and inexpensive, requiring only seeds, soil or coco coir, and a shallow tray or pot. In less than two weeks, you can harvest fresh greens packed with vitamins A, C, E, K, calcium, iron, and antioxidants.
Whether you want to boost salads, sandwiches, or experiment with new recipes, learning how to grow dandelion microgreens at home brings freshness, nutrition, and variety right to your kitchen.
Materials and setup
Seeds
You can use two types of seed. Clean wild seed collected from mature puffballs. Purchased seed such as red dandelion and other cultivated forms. Wild seed is free and easy to gather, but collectit away from roads and pet traffic and from areas that may have been sprayed. Rub the puffballs in a bag to separate the brown seeds from the fluff, then rinse in a tea strainer to remove dust. Purchased seed is consistent and easy to sow. One tablespoon weighs about 7.3 grams in a common red dandelion lot and covers one standard tray well. Another grow used 10 grams for a full tray and still had good coverage.
Growing medium
Coco coir works beautifully in trays. One successful tray used six cups leveled across the surface with twigs and clumps removed. Potting soil or garden compost also works and is a simple option for small containers. Paper towel and no substrate trials were tested and showed poor results, especially in darkness. For reliability, stick with coco coir or soil.
Trays and containers
For an indoor tray,s use a 10 by 20 slotted tray nested inside a 10 by 2 no-hole tray for bottom watering. Keep a second no-hole tray for blackout and as a weight lid. A darker top tray blocks light well. For outdoor or windowsill growing, a shallow pot or basket filled with soil is enough.
Watering gear and extras
A hand pump sprayer lets you mist without moving seeds. A small kitchen scale helps with consistent seeding. A clean weight of about 15 pounds on the top tray improves even germination and stem strength. Hydrogen peroxide spray is useful for spot treating mold if the humidity is high. Basic liquid nutrients are optional but can push growth once the roots reach the slotted tray. Ocean Solution and Farmers Pride were both used successfully. Simple LED bar lights, around twenty watts per bar, work well over a rack. One grower ran three such lights over a shelf with strong results.
🌿 Recommended Microgreens Supplies |
Step-by-step growing guide
Seeding and germination
Level six cups of coco coir in the slotted tray. Moisten lightly if it is very dry. Weigh out about 7 to 10 grams of seed for one 10-by-20 tray. One tablespoon is roughly 7.3 grams and was plenty for a dense red dandelion tray. Broadcast evenly. Mist from a distance so the seeds do not shift. Set the clean no-hole tray on top and add a weight close to 15 pounds. Place the stack on a shelf. Check morning and evening. If the medium looks dry, mist again. Most trays showed strong sprouting by day three.
A wild seed experiment found that germination is light sensitive. Seeds kept in darkness with no substrate did poorly, and even dark on paper produced only about five percent germination. Seeds on a bright windowsill in indirect light germinated well. Takeaway for home growers is simple. Do not keep dandelion seed in a deep, dark place from day zero. Use a short blackout as a growth technique after germination has begun, not as a full sprouting strategy.
Blackout and light
On day three, lift the weight and look closely. If most seeds are cracking and tiny roots are visible, flip the top tray into a dome to create a blackout chamber. Keep it domed for about two days. One successful grow left the blackout for two full days and moved to light on day five when the crop was standing tall. Longer blackout led to lodging in trials, so resist the urge to stretch them too far.
Move the tray under the lights after a blackout. Simple twenty-watt LED bars placed close above the canopy work well. If you are growing on a windowsill, choose bright indirect light rather than direct midday sun.
Watering and nutrition
Once the tray moves to light, switch to bottom watering. Start modestly. One grow used about two-thirds of a cup of nutrient solution at first, then checked later the same day and added more only if needed. Coco coir holds water well, so it is easy to overdo it. Keep the root zone moist but never flooded. If you see small patches of fuzzy growth in tight corners, spot mist with hydrogen peroxide and improve airflow.
Growth timeline and harvest
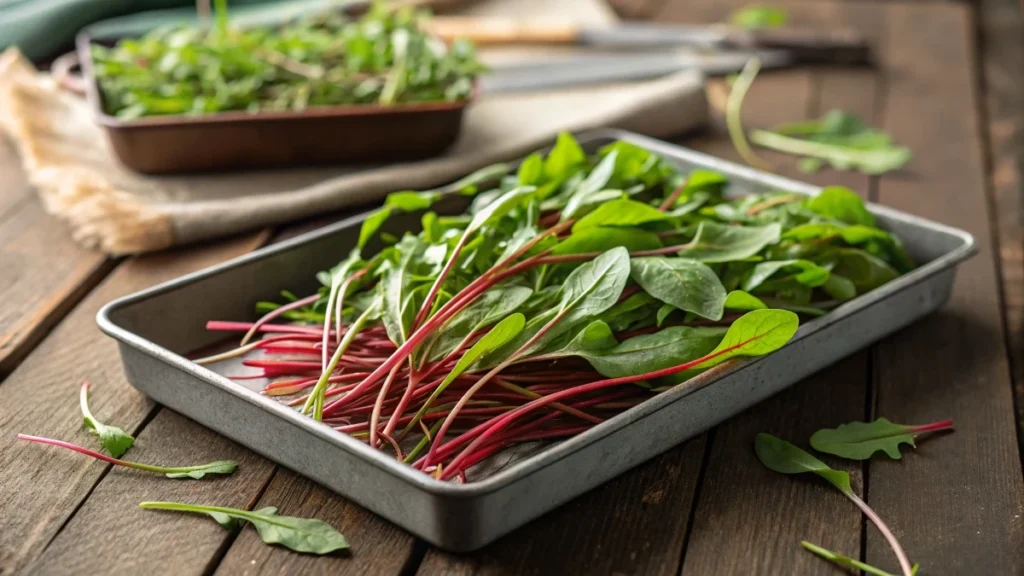
A consistent timeline looked like this. Day three check and move to blackout. Day five, remove blackout and place under lights. Day ten, the tray is lush, and the first true leaves are forming. Day twelve, the crop is ready for harvest at the true leaf stage. This stage gives the classic dandelion leaf shape in miniature and a fuller flavor. Harvest gently with a sharp knife or scissors. The crop is short, so keep fingers clear and cut slightly higher to avoid debris. One red dandelion tray produced about 79 grams of clean harvest after subtracting a three-gram bag weight.
Another grow that pushed toward baby leaf reported about 195 grams from a tray, but found the leaves delicate and very bitter. Choose your target based on flavor preference and use.
Flavor profile and taste tests
Growers reported a range of flavors that track with stage and handling. At the microgreen stage with first true leaves, tasters described a lettuce-like base with a light chicory note. In a bacon and tomato sandwich, the greens held their own, adding a small bitter accent that balanced salty fat and gentle sweetness. The same cook noted that adding rich blue cheese quickly masked the greens, so use them where you want a light, bitter counterpoint rather than in a stack of other strong flavors.
Trays grown longer to baby leaf size pushed the flavor much more bitter. One grower who harvested a large tray at this stage did not enjoy the taste raw. Cooking softens bitterness. Another home cook prefers to sauté dandelion greens with olive oil and garlic or to mix them into rice or eggs. For the earliest stage, use as a garnish or a small portion in salads and sandwiches. For stronger bitters, grow them larger and cook them.
Flowers and roots add to your kitchen options. Petals lend gentle sweetness when steeped in tea, especially when separated from the green base that carries bitterness. Roots can be dried and roasted for a coffee-style beverage. Leaves are best tasting before flower heads form. If you grow outdoors for repeated harvests, pick early and often to keep the flavor milder.
If you are sensitive to latex, note that the milky sap increases once flowering begins on mature plants. This is less of a concern at the microgreen stage, but it is worth knowing if you move on to the garden scale.
Nutritional and health benefits
Dandelion greens have been valued as both food and medicine for centuries, and at the microgreen stage, they still carry a significant nutrient load. Young leaves contain a wide range of vitamins, including A, C, E, and K, along with smaller amounts of B1. They also provide beta carotene, the plant compound that the body can convert to vitamin A. Their mineral content includes calcium, iron, magnesium, potassium, and copper. These nutrients are important for bone health, red blood cell formation, muscle function, and overall energy metabolism.
Several gardeners who grew and tasted them pointed out that dandelion greens are more than just salad material. They are often described as a tonic food. Research on dandelion leaves and roots supports their role as a mild diuretic, which can help reduce water retention. Traditional uses also link dandelions with supporting liver and gallbladder function. Some studies have highlighted antioxidant activity in dandelion compounds, meaning they can help protect the body from oxidative stress. Other reported benefits include support for healthy blood sugar levels and assistance in lowering blood pressure, though these effects are often discussed in the context of larger servings of leaves or roots rather than microgreen garnishes.
The bitter flavor is not simply a taste issue. It comes from natural plant chemicals that are part of what makes the greens beneficial. Bitterness can stimulate digestion and appetite, which is why many traditional cuisines pair bitter greens with heavier foods. This also explains why small amounts of dandelion microgreens work well in rich sandwiches or alongside fatty meats. They add both a sensory balance and a digestive aid.
When you grow dandelion greens at home, you control the environment. This matters because many wild dandelions are exposed to lawn treatments, roadside pollution, or pet waste. Clean homegrown microgreens are safer to eat fresh. They also allow you to harvest when the nutrient density is at its peak, which is typically at the young leaf stage.
Recipes and culinary uses
Dandelion microgreens fit into both raw and cooked dishes. Their chicory-like bitterness makes them versatile if you use them thoughtfully.
Fresh uses
One grower created a simple sandwich of bacon, tomato, mayonnaise, and snipped dandelion microgreens. The greens added a small bitter note that cut through the fat and balanced the tomato sweetness. Used in this way, they can replace or supplement lettuce in any sandwich. Another easy option is to scatter a small handful over mixed salads, where they join other greens to create contrast without overwhelming the plate.
Cooked uses
Cooking tames their bitterness. A common preparation is a quick sauté with olive oil and garlic, which softens the leaves and turns them into a side dish. They also work well folded into scrambled eggs or mixed into rice. At the microgreen stage, the leaves are delicate, so they should be added near the end of cooking. If you grow them longer toward baby leaves, they can handle more cooking time and can be included in stir-fries or soups.
Creative uses
The plant has other edible parts beyond microgreens. Petals from open flowers add gentle sweetness to teas. When separated from the bitter green base, the yellow petals can be steeped with nettle or other herbs to create a lightly sweet cup. Flower heads can also be infused into vinegars or oils, capturing their flavor for later use. Roots, though not part of microgreen harvests, can be dried, roasted, and ground to make a coffee substitute that has a mild bitterness and rich aroma.
For people who enjoy experimenting, dandelion microgreens can serve as an attractive garnish. Their red stems, in the case of red dandelion, bring a touch of color to a plate. They can top soups, grain bowls, or even roasted vegetables.
Tips, common problems, and solutions
Growing dandelion microgreens is straightforward, but a few issues come up repeatedly. Mold can appear in humid conditions, especially during blackouts when airflow is low. Spot spraying with diluted hydrogen peroxide usually clears small patches. To prevent mold, leave one corner of a container lid slightly open for ventilation and avoid overwatering.
Germination challenges often stem from a lack of light. Trials showed that seeds left in deep darkness sprouted poorly, with less than five percent success. Dandelion seeds respond better to light, so place trays in bright conditions once germination begins. Using a short blackout after sprouting is fine, but do not expect strong results if you keep them in the dark from the start.
The leaves are fragile. Harvest with care, using a sharp knife or scissors, and plan to eat them soon after cutting. They do not store as well as tougher microgreens like sunflower or pea shoots. If you need to keep them for a day or two, place them dry in a breathable container in the refrigerator.
Another point is seed sourcing. If you collect wild seed, avoid roadsides, parks, or lawns that may have been sprayed with herbicides. Collect from clean spaces and rinse seeds before planting. Purchased seed is more reliable and often available in red-stemmed varieties, but availability can be limited.
Finally, do not overload trays with seed. One tablespoon, about 7 grams, was found to be enough for a dense tray. Using more can lead to crowding, poor airflow, and greater mold risk. Keep the tray moist but not soggy, and expect to harvest in about twelve days when the first true leaves are visible.