
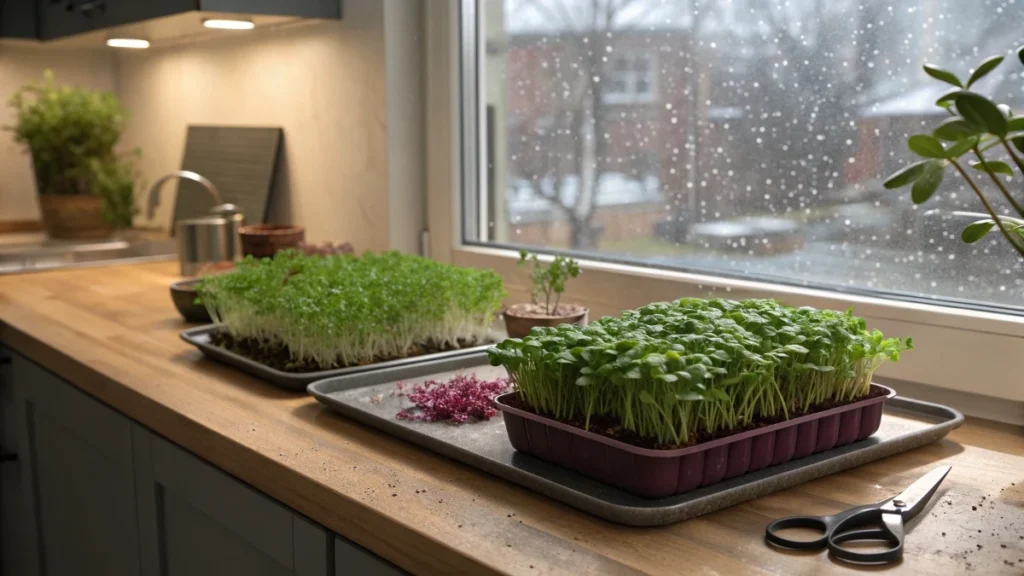
Indoor winter garden microgreens bring fresh flavor and color to the coldest months. These tiny greens grow fast and are often ready to harvest within seven to ten days, right on your kitchen counter or sunny windowsill.
With a handful of seeds, a small container, and a simple light, you can enjoy nutrient-rich greens all season long.
Microgreens such as arugula, radish, and mustard thrive indoors, offering a steady supply of vitamins, antioxidants, and vibrant taste when outdoor gardens rest. Growing microgreens indoors in winter is easy, affordable, and space-saving.
It brings homegrown nutrition, fresh flavor, and daily satisfaction while reducing grocery costs and food waste.
Why grow microgreens indoors in winter
Microgreens bring a burst of life to cold months. Most fast varieties reach a tender, flavorful stage in about seven to ten days, so you can cut something fresh while the yard rests. Their small footprint fits a kitchen sill, a corner shelf, or a slim rack. Dense sowing and quick turnover turn a spoon of seed and a scoop of mix into frequent servings for salads, eggs, wraps, and soups. At home, the cost drops to pennies per harvest compared to store packs, and the routine is simple. Sow once. Mist daily until sprout. Switch to bottom watering. Cut when cotyledons are open and stems feel crisp. Repeat all winter.
Fresh greens in seven to ten days
The short cycle makes planning easy. Stack two or three small containers, and you can harvest several times a week without managing a large setup.
Low setup and tiny footprint
You do not need a tent or a rack of lights. A sunny window or one clip light can support a steady supply. Deli cups or small pots work if they have drainage holes and sit in a tray.
Taste and nutrition in small leaves
Young leaves deliver bright flavor. Arugula adds zip. Radish mixes bring color and gentle heat. Superfood blends layer textures and hues so each cut looks and tastes complete.
Cheaper than store-bought
Store clamshells add up. Reused containers and modest seed quantities pay for themselves quickly when you sow densely and harvest at peak tenderness.
What you will need
Gather a few simple pieces that work together for fast starts, even moisture, and clean harvests.
Seeds
Choose reliable, quick sprouters. Arugula is fast and lively. Colorful radish mixes give purple stems and mild heat. Superfood blends provide a mix of textures. You can combine varieties in one container to balance flavor and color. Pair a punchy radish with a milder green for a rounded bite.
Growing medium
A fine seed starting blend helps tiny seeds anchor and sprout evenly. An indoor mix of coco coir with worm castings and vermiculite performs well. Coco coir holds moisture without becoming heavy. Worm castings offer gentle nutrients for steady growth. Vermiculite supports water retention and keeps the surface evenly moist for sprouting. The fine texture matters because seeds rest on a level bed and root quickly.
Containers and trays
Any container with drainage holes can become a microgreen tray. Deli cups, cow pots, or one-gallon fabric pots all work when paired with a drip tray. A tray catches drips and makes bottom watering simple. A six-inch height gives flexibility if you let a batch grow past the microgreen stage into baby leaves.
Helpful extras
A spray bottle for daily misting before sprouting. Precision snips for clean cuts. Yellow sticky cards for early gnat control. A basic clip grow light for uniform color if your window is weak.
🌿 Recommended Microgreens Supplies |
Sowing the right way
Microgreens are not spaced like full-sized plants. The goal is a uniform stand that you harvest young.
Dense and even coverage
Spread the seed so it nearly covers the surface in a single layer without heavy piles. This creates a thick stand that fills quickly and yields an abundant cut. After sowing, dust the surface with a very light sprinkle of your blend. Think of it as tucking seeds in rather than burying them.
Depth and spacing notes
Depth is shallow, and spacing is minimal since you are harvesting seedlings. For a single heavy cut, sow denser. If you want a lighter second cut, ease up on density so stems can thicken.
Light that fits your space
Light guides posture, color, and speed. Two friendly options work well in winter.
Sunny window
A bright windowsill with indirect or direct light can carry a full crop. Seedlings may stretch a little, which is fine with a seven to ten-day window. Rotate containers every day or two for an even stand. If a batch leans, harvest a day earlier while the stems are juicy.
Simple grow light
A clip light designed for seedlings improves uniformity. Keep it close to the canopy while seeds are sprouting, then raise it as the stand grows. You do not need a complex rig. One clip light can serve several small containers on a shelf.
Watering that actually works.
Watering decides whether your stand is fluffy or tired. Use two clear phases.
Pre-germination misting
Mist the surface once a day so the top stays evenly moist. Look for a light sheen rather than a wet layer. Consistent surface moisture speeds sprouting, which often shows in about three to four days for quick varieties. If the surface turns pale before evening, give a light second mist.
Bottom watering after sprouting
Once cotyledons open, switch to bottom watering. When the top looks light brown and dry, pour water into the tray below the containers. The media wicks moisture upward for even saturation without wetting foliage. This keeps the harvest clean and reduces damping issues. Empty any standing water after the media has taken what it needs.
Timeline and what to expect
A simple rhythm keeps the kitchen supplied.
Days zero to three or four
Seeds rest on a fine, moist surface and begin to root. Your role is steady temperature and gentle misting. Avoid flooding the surface.
Days four to seven
Cotyledons open, and the stand thickens. Move from misting to bottom watering. If using a window, expect a bit of stretch. With a clip light, keep it close and raise it as the canopy rises.
Days seven to ten
Flavor peaks and textures are tender. This is the sweet spot for a single heavy harvest. Use clean snips and cut just above the media to avoid grit. Some blends can offer a light second cut if stems remain long enough and moisture stays even, though the first cut is usually the most delicate.
Beyond two to four weeks
If you allow a container to keep growing, leaves expand and flavors shift. Mustard and similar greens can develop bolder notes. Thin a crowded stand to encourage larger leaves and keep picking for salads. The look moves from microgreen to baby green over time.
Pest prevention indoors
Indoor rooms feel safe to plants and also to small pests. You will most often see fungus gnats near moist media and aphids on tender shoots. Stay ahead from day one. Keep surfaces tidy, avoid standing water in trays, and provide gentle airflow. A small fan on low, a few feet away, helps the surface dry between waterings and makes it harder for gnats to settle.
Common issues
Fungus gnats favor consistently wet top layers and lay eggs in damp media. Larvae feed on organic matter and fine roots. Aphids multiply quickly on tender stems and hide under cotyledons in dense stands. These problems spread faster indoors because natural predators are scarce.
Easy controls
Place yellow sticky cards near trays to attract adult gnats and prevent population spikes. If you see aphids or persistent gnats on foliage, use an insecticidal soap labeled for edible plants. It works on contact and can be used up to the day of harvest when used as directed. Spray lightly where insects are visible and give the top layer a quick pass if gnats are present. Reapply weekly until the issue fades. Remove plant debris after each harvest and rinse trays before the next cycle.
Harvest, store, and use
Harvest at the tender stage when cotyledons are open and stems feel crisp. This often falls between day seven and day ten for quick varieties. Use clean snips and cut just above the media. Cutting a little higher keeps grit out of the bowl and speeds cleanup.
Harvest
Stand the container at the edge of your work surface and tilt it slightly toward you. Gather a small handful with one hand and make a clean cut with the other. Work in sections so cut leaves do not crush under your fingers. If you want a light second cut, leave enough stem and keep the moisture even. Expect the second cut to be lighter and slightly firmer.
Quick storage
Let freshly cut greens rest on a clean towel for a minute so surface moisture evaporates. Place them in a breathable container lined with a dry towel. Store in the refrigerator and use within a few days for the best texture and flavor. If condensation forms, vent the container and change the liner.
Everyday uses
Keep it simple on busy days. Fold a handful into eggs at the end of cooking. Top a bowl of soup right before serving. Layer into wraps for crunch and color. For salads, mix a punchy green like radish with a mild base for balance. A splash of olive oil, a squeeze of lemon, fresh pepper, and a sprinkle of seeds make a quick dressing that lets the greens shine.
Cost, yield, and small space wins.
A single windowsill can supply daily toppings. Store clamshells are priced for convenience, while home batches run on reused containers and modest seed quantities. Dense sowing turns a spoonful of seed into multiple servings. One shelf can hold several small containers that you rotate through the week. A simple cadence works well. Sow on the weekend. Harvest midweek. Start another container while you enjoy the first. Food miles shrink to a walk from sink to counter.
Troubleshooting fast
Even careful growers hit snags. Use these quick reads to steer the next batch.
Leggy stems
Seedlings reach for light when a window is weak. This is acceptable for a short harvest window. If you want a sturdier stand, bring in a clip light and keep it close to the canopy. Harvest a day earlier while the stems are juicy.
Slow or patchy sprouting
The surface likely dried unevenly, or the mix is too coarse. Use a fine seed starting blend, so seeds sit on an even bed. Mist once a day and again lightly if the surface turns pale before evening. Keep room temperatures steady and avoid cold drafts.
Musty smell or fuzzy patches
Crowding and constant surface moisture invite trouble. Improve airflow, ease up on misting once sprouts appear, and switch to bottom watering. Thin any heavy clumps with clean tweezers so air can move between stems. Rinse and sanitize trays between cycles.
A simple winter microgreens bowl
Build the bowl right after a fresh cut. Start with a generous handful of microgreens. Drizzle a little olive oil and add a squeeze of lemon. Crack black pepper over the top and sprinkle sunflower seeds for crunch. Fold in halved cherry tomatoes when you have them. If you enjoy a creamy note, crumble a little feta. Toss gently so stems stay intact. The flavors are bright and the textures clean.
Safety and hygiene basics
Clean tools and containers support quick, healthy growth. Wash scissors and trays with warm soapy water, then rinse and let them dry before each new cycle. Rinse harvests under cool water, spin or pat dry, and chill promptly. Follow labels for any pest control product and choose options approved for edible plants. Keep pets and household cleaners away from the growing area. Good habits turn small containers into a steady winter supply with very little fuss.
🌿 Recommended Microgreens Supplies
These are the tools and supplies I personally recommend for growing healthy and flavorful microgreens at home.
As an Amazon Associate, I earn from qualifying purchases.