
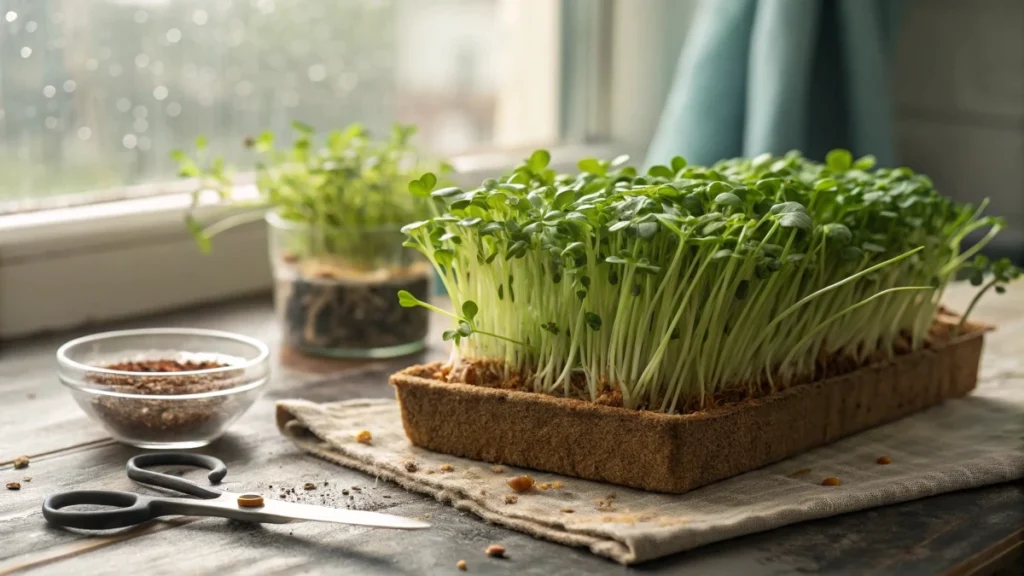
Peanut microgreens deliver a clean, nutty taste that sits between pea shoots and young sunflower greens. They are juvenile plants cut above the medium before the first true leaves fully open, so you get tender texture without the heavy oiliness of mature peanuts.
Home growers like them because the crop is quick, the inputs are simple, and the flavor stands out in bowls and warm dishes. In two weeks, you can go from dry seed to a bright garnish that lifts noodles, eggs, fish, or a grain salad.
If you already raise peas or sunflowers, peanuts fit right in with a similar routine, but need slightly more room because the seeds are larger. The payoff is a crisp stem, a pale green cotyledon, and a gentle aroma that plays well with citrus and herbs you already use across your microgreens content.
What you will be able to do after reading
You will choose seed confidently, set the right density for large legumes, manage blackout and light without guesswork, and finish with a clean harvest and storage. You will also know how to avoid common issues such as stacked seeds, soggy mediums, and uneven sprouting that often show up with large seed crops.
Key facts and growth timeline
From soak to harvest, the crop typically takes seven to fourteen days. Warmer rooms finish faster, cooler rooms slow the pace. A room temperature between twenty-one and twenty six degrees Celsius keeps germination lively while limiting stress. Aim for relative humidity in the forty to sixty percent range so leaves dry between waterings and stems stay firm.
Light can be simple. Provide twelve to fourteen hours each day with a household LED rack or a grow light that reaches moderate intensity. If you use a light meter app, target two to three thousand lux at the canopy in the first two days after blackout, then raise to four to six thousand lux as the canopy thickens. If you use a PPFD reading, begin around one hundred to one hundred fifty micromoles and move toward two hundred. These home-friendly numbers match the ranges you already use for other microgreens and keep color bright without introducing bitterness.
Expect a yield between three and five times the dry seed weight when density and moisture are right. Because peanut seeds are large, this yield range is realistic without crowding. A full ten-by-twenty tray can produce generous bunches for family meals, while a ten-by-ten tray is perfect for recipe testing and styling shots for your site.
Space needs are modest. One shelving tier with a light, a fan set on low, and two trays is enough to run steady batches. At this scale, water use for a full tray is often three hundred to five hundred milliliters per bottom watering session once growth is active. If you choose a small reservoir system, you will refill every one to two days in a warm room.
🌿 Recommended Microgreens Supplies |
Choosing the right peanut seeds
Start with raw, untreated peanuts. Look for food-grade or sprouting grade labels and avoid anything roasted or salted. Valencia and Virginia types both work, with Valencia often giving a slightly quicker and more uniform germination because kernels are usually smaller and more consistent.
Shelled kernels save time and hydrate evenly. Unshelled seeds are slower, can trap moisture under shells, and complicate density planning. For microgreens, the shelled route gives cleaner trays and fewer blind spots where a shell blocks light or airflow. Inspect seeds before soaking. You want plump kernels with an intact embryo tip, minimal skin damage, and no signs of storage moisture like clumping or a musty scent.
Treat the crop with the same care you give other legumes in mixed kitchens. If anyone in the household has a peanut allergy, grow and handle this crop in a separate area, wash tools and trays with a dedicated brush, and store finished greens in clearly labeled containers. Keep unused seed cool and dry. A sealed jar with a desiccant pack in a pantry or fridge extends vigor and reduces the chance of mold spores building up during storage.
Soaking and pre-sprouting for better germination
Rinse the kernels under cool running water until the water runs clear. Use a bowl or container that allows at least three parts water to one part seed by volume. Soak for eight to ten hours at room temperature. Longer soaks make large seeds feel waterlogged and can reduce oxygen around the embryo.
After the soak, drain completely and give a second rinse. Many growers see more uniform emergence when they pre-sprout for twelve to eighteen hours in a colander or mesh sieve. Spread the soaked seeds in a single layer, cover loosely to keep dust out, and rinse once during that window. Look for the first tiny root nubs. You do not need long tails. Early nubs are enough to anchor quickly when you seed the tray.
Two small habits make a big difference. First, never leave the seeds standing in puddled water between rinses. Second, keep the rinse water cool rather than warm so the seed surface stays crisp. These steps mirror the routines you already use for larger microgreen seeds and keep early growth clean and even.
Best growing mediums for peanuts
Peanuts appreciate a medium that holds moisture but drains freely. Fine coco coir or a light soil blend both work. Hemp mats can succeed, but large seeds may sit unanchored on slick fibers, so you will need careful watering and a firmer blackout weight. If you want the fullest flavor, a thin bed of soil blend often wins with a slightly richer aroma by harvest. If you want the cleanest handling, fine coconut coir keeps trays light and tidy.
Fill the tray with one to one and a half centimeters of medium and level the surface so water can move evenly. A smooth, gently tamped surface prevents small hollows where water can pool under the seed. Pre-moisten the medium so it feels evenly damp when pinched but does not drip. When you press a finger to the surface, you should not see free water rise.
Airflow through the medium matters for legumes. If you reuse trays, wash and let them fully dry between crops. If you mix your own soil, include a little perlite or sifted compost to keep the structure open. Your goal is a bed that stays moist, not muddy.
Tray setup and seeding density
Large seeds need breathing room. For a ten-by-twenty tray, begin with one hundred eighty to two hundred fifty grams of dry shelled seed, depending on kernel size. For a ten-by-ten tray, use ninety to one hundred twenty-five grams. These ranges give full canopy coverage without stacking, which reduces rot risk and makes watering easier.
Spread seeds in a single layer. Nudge crowded patches with your fingertips until you see small islands of medium between kernels. Those tiny gaps allow roots to dive and stems to rise without twisting. If your pre-sprout produced small tails, handle gently so the tips do not snap.
Top dressing is optional. A very thin sprinkle of sifted medium can help lock seeds in place and encourage straight stems, but keep it light so cotyledons do not carry heavy caps. Lightly mist the surface once to settle dust and to help the first roots find contact.
Blackout and germination phase
Place a clean tray or lid on top to create darkness and even pressure. Add a lightweight so the canopy pushes up together. One to two kilograms spread across a ten-by-twenty tray is enough. Check daily. The goal is steady moisture and a firm feel when you lift the lid, not a soggy sauna.
The blackout phase usually lasts three to four days for peanuts at room temperature. You will see thick white roots grasping the medium and pale shoots beginning to arc. Remove blackout when the canopy has anchored and reached two to three centimeters in height. If you remove too early, you may get floppy stems. If you wait too long, trapped humidity can soften the cotyledons and invite fuzz that does not brush off cleanly.
When you lift the lid, give the tray its first bottom watering and move it under light with a gentle fan nearby. The first hours after the blackout set the tone for the rest of the grow. Even light, moving air, and a dry leaf surface will give you the crisp texture and clean color you want for plating and photography across your microgreens recipes.
🌿 Recommended Microgreens Supplies |
Light, air, and water routine
After the blackout, place the tray under steady light and start with gentle intensity so the cotyledons open without stress. For the first two days, aim for two to three thousand lux or about one hundred to one hundred fifty micromoles if you read PPFD. From day three, raise intensity toward four to six thousand lux or around two hundred micromoles. Keep lights twelve to sixteen inches above the canopy for most household LED bars. If leaves look pale and reach upward, increase intensity slightly. If edges curl or color washes out, raise the fixture or shorten the daily cycle for a day. Maintain twelve to fourteen hours of light each day to drive sugar production and keep stems sturdy.
Begin bottom watering as soon as the tray goes under light. For a ten-by-twenty tray, use about three hundred to five hundred milliliters per session, then wait until the top of the medium looks evenly moist but not glossy. In warmer rooms, this can be once a day. In cooler rooms, it may be every other day. Avoid top watering since large seeds can hold droplets in the seed coat and invite surface moisture problems. Set a small fan on low so the air moves across the canopy and dries leaves within thirty minutes after any incidental splashes. Air that moves but does not bend the stems is the goal.
Simple checks that keep growth on track
Touch the medium through a corner hole. It should feel cool and damp, not wet. Lift the tray. A light tray signals the next bottom watering. Smell the canopy. It should smell fresh and nutty. Any sour or swampy note means you need more airflow and longer gaps between waterings.
Self-watering and low-maintenance options
A capillary wick system keeps moisture steady during busy weeks. Place a strip of absorbent fabric so it drapes through a slot in the growing tray and down into a shallow reservoir below. Fill the reservoir with one to one and a half liters of water for a ten-by-twenty tray. The wick pulls water up as the medium dries, which reduces swings between wet and dry. Refill every one to two days in a warm room and every two to three days in a cool room.
A capillary mat is another option. Lay the mat on a waterproof sheet, set the tray with holes directly on the mat, and keep the mat evenly moist. This method shines for large seeds like peanuts because it wets the entire base without flooding. If the canopy looks overly lush and soft, lift the tray on small spacers for a day to slow the wicking rate.
When to switch back to manual watering
If you see algae building on the tray base or the medium stays glossy for hours, pause the reservoir and return to measured bottom watering. Clean the tray and mat, let everything dry fully, then restart with a smaller reservoir fill.
Climate and mold management
Peanut microgreens stay happiest between twenty one and twenty six degrees Celsius with relative humidity around forty to sixty percent. Higher humidity slows leaf drying and can soften cotyledons. Lower humidity can cause edge curl and quicker wilting when watering is missed. Use a small hygrometer on the shelf so you can react in real time.
Differentiate harmless root hairs from true mold. Root hairs look like fine fuzz hugging the root line and vanish when the area is moistened. Mold looks like cotton that bridges between seeds or climbs the stem and often carries a musty scent. Increase airflow, trim back watering volumes, and remove any clearly spoiled clusters.
Clean tools, lids, and trays between crops. A common and food-safe approach is a dilute peroxide rinse. Mix one part three percent hydrogen peroxide with twenty parts water, wet all surfaces, wait one minute, then rinse with clean water and air dry. Good light, moving air, and clean trays prevent nearly every issue with legume greens.
Harvesting and storage
Watch for a firm stem, open cotyledons, and a bright, pale green tone. Most trays reach this stage between day eight and day twelve, depending on room conditions. Harvest height is usually seven to ten centimeters from the medium surface. Use a clean, sharp knife or shears and cut just above the medium so no grit reaches the bin.
Rinse quickly in cold water, then remove surface moisture. A salad spinner on low for ten to twenty seconds, followed by a rest on a clean towel, gives a crisp finish. Store in a breathable container lined with a dry towel to absorb any residual moisture. Keep in the refrigerator at one to four degrees Celsius. Quality is best in the first five to seven days. If leaves feel a little soft at service time, a brief rinse in cold water followed by a gentle spin restores snap.
How to keep flavor clean after harvest
Avoid sealing warm greens. Let the cut greens chill uncovered for fifteen minutes, then place them in their storage container. Keep the container in a stable cold zone, not on a refrigerator door.
Nutrition profile and health benefits
Peanut microgreens share the legume pattern that home growers value. You get a fresh source of plant protein along with fiber and a spectrum of B vitamins that support everyday energy use. The crop is harvested young, so the texture is tender and the flavor is mild rather than oily. A practical serving for a home plate is fifty to seventy grams, which layers a noticeable amount of plant protein on top of existing meals. The water content is high, which also makes them an easy way to add volume and freshness to warm dishes where you would normally reach for herbs.
Because nutrition develops as the cotyledons expand, steady light and a balanced watering routine do more for the final plate than any booster product. People with peanut allergy should avoid growing and handling this crop at home since even the juvenile stage can trigger reactions. If you run a mixed kitchen, label storage clearly and keep tools and towels separate.
Flavor pairings and culinary uses
The taste sits in a nutty and slightly grassy lane that plays well with bright and creamy elements. Lemon, lime, and mild vinegars lift the aroma. Yogurt, aioli, and soft cheeses carry the greens without hiding them. In savory bowls, they match sesame oil, ginger, and a light soy or tamari finish. With breakfast, they add crunch to omelets with spring onions. With grains, they wake up to a warm lentil salad or a barley risotto without feeling heavy.
Heat wilts them quickly, so use them as a final fold-in or a garnish on hot foods. On cold plates, they can act as the main green in a simple salad when mixed with cucumber, mint, and a thin honey lemon dressing. Their gentle crunch also works as a topper on open-faced sandwiches where sunflower greens might feel too bold.
Easy peanut microgreens recipes
Saffron risotto cakes with lemon aioli and peanut microgreens
Use leftover risotto that has cooled fully. Form small patties and pan-sear in a thin film of olive oil until the crust turns golden on both sides. Stir a quick lemon aioli by blending mayonnaise, fresh lemon juice, zest, a pinch of garlic, and a few drops of cold water for flow. Top each cake with a spoonful of aioli and a loose handful of peanut microgreens. The warm starch and citrus bring out the nutty note, and the texture contrast is excellent for photography and service.
Crispy tofu wraps with chili lime dressing and peanut microgreens
Press extra-firm tofu, cube it, and roast until edges crisp. Whisk lime juice, a touch of honey, chili flakes, and light soy into a thin dressing. Fill warm flatbreads with tofu, sliced cucumber, and a mound of peanut microgreens. Drizzle dressing at the table so the greens stay perky. This wrap travels well and keeps the flavor clean.
Warm lentil salad with mint and peanut microgreens
Simmer small brown lentils until just tender. Toss with olive oil, lemon, chopped mint, and sliced spring onion. Fold in peanut microgreens right before serving. The warm lentils soften the stems lightly while the herbs and acid keep the dish bright. Serve beside grilled chicken or fish.
Peanut microgreens omelet with spring onions
Beat eggs with a splash of milk and a pinch of salt. Cook gently in a nonstick pan, add sliced spring onions, and fold in a generous handful of peanut microgreens just before closing the omelet. The residual heat wilts the greens slightly and leaves a fresh bite. Finish with black pepper and a squeeze of lemon.
Cold noodle bowl with sesame peanut sauce and microgreens
Whisk tahini or smooth peanut butter with warm water, rice vinegar, soy, a little ginger, and a touch of sugar until creamy. Toss with chilled noodles. Top with cucumber ribbons, toasted sesame, and a large handful of peanut microgreens. The greens keep the bowl lively and prevent the sauce from feeling heavy.
Troubleshooting Fast Track
Uneven sprouting
Large seeds sometimes hydrate at different speeds. If one corner lags, you likely have a dry pocket or stacked kernels. Check that the medium was level and evenly pre-moistened before seeding. For the next run, spread seeds so you can see small islands of medium between kernels and mist once to settle them. Keep the blackout weight even across the tray so every area feels the same push. If you pre-sprout, stop when you see tiny root nubs rather than long tails since long tails tangle and break.
Yellow or floppy shoots after a blackout
This points to either an early lift from blackout or light that is too far from the canopy. After removing the lid, start with two to three thousand lux or about one hundred to one hundred fifty micromoles and place the fixture twelve to sixteen inches above the greens. Increase to four to six thousand lux or around two hundred micromoles by day three. Keep a gentle fan running so leaves dry within thirty minutes after any splash.
Fuzzy growth on the surface
Differentiate harmless root hairs from mold. Root hairs cling to the root line and vanish when moistened. Mold bridges between seeds and carries a musty scent. Lower humidity toward forty to fifty percent, increase airflow, and reduce bottom watering volume to three hundred milliliters for a ten-by-twenty tray until the surface looks dry within an hour after irrigation. Remove any clearly spoiled clusters and clean the tray rim.
Sour or swampy smell
This is a sign of poor drainage or overwatering. Lift the tray and feel its weight. If it is heavy hours after watering, lengthen the gap between sessions. Aim for a cool, damp feel in the medium rather than wet. Confirm your blackout period did not trap heat and condensation for too long. Three to four days is the usual window at twenty-one to twenty-six degrees Celsius. Clean tools and lids with a mild peroxide rinse before the next cycle.
Patchy mats and bare spots
Seeds that ride on top of ridges never anchor. Level the medium to a depth of one to one and a half centimeters and very lightly tamp before seeding. For a ten-by-twenty tray, use one hundred eighty to two hundred fifty grams of dry shelled seed, depending on kernel size. For a ten-by-ten tray, use ninety to one hundred twenty-five grams. These ranges fill the canopy without stacking. If you top dress, keep it as a dusting so cotyledons are not capped.
Leggy stems
Legginess comes from low light or excessive warmth. Hold daily light at twelve to fourteen hours and reach four to six thousand lux by day three. If your room is consistently above twenty-six degrees Celsius, growth may race ahead of leaf development. Add a short nighttime cool-down by improving airflow or moving the tray to a slightly cooler shelf.
Seed coats clinging to cotyledons
Dry air during the first hours after a blackout can cause hats to stick. Mist the air above the canopy once when you first move under lights, not the leaves, and keep relative humidity around forty to sixty percent. A thin top dressing at seeding also helps kernels anchor so coats slip free as stems rise.
Bitter or grassy flavor
Excess light intensity or an overlong harvest window can push bitterness. Harvest when stems are seven to ten centimeters, and cotyledons are open and pale green. Stay near two hundred micromoles or up to six thousand lux rather than chasing higher numbers. Rinse quickly in cold water after cutting and chill before service to set the flavor.
Slow growth
Cool rooms below twenty-one degrees Celsius extend the timeline. Expect the crop to move toward the twelve to fourteen-day end in cooler conditions. Confirm that you soaked for eight to ten hours and did not oversoak. Ensure the first two irrigations after blackout were generous enough to fully wet the medium from below without flooding.
Damping off at the base
Thin stems that pinch at the medium line come from stagnant, wet surfaces. Switch to strict bottom watering, reduce volume to the low end of the range, and increase airflow so the surface looks dry within an hour. Clean trays with a one to twenty dilution of three percent hydrogen peroxide, rinse, and air dry before reuse. Keep density within the ranges above so air can move between stems.
🌿 Recommended Microgreens Supplies |