
Growing garlic microgreens at home is an easy win for flavor and nutrition. In this guide, you will learn how to grow garlic greens from cloves and scallion-style microgreens from seed on a sunny windowsill.
Expect shoots in about seven to fourteen days from cloves and a dense tray of tender allium microgreens around day thirteen under simple lights. We will cover the best soil mix, daily watering, gentle feeding with aerated compost tea, and clear harvest tips that keep regrowth coming.
You will also find proven yield and cost notes plus three quick recipes, including lemon garlic pasta, a morning omelet, and a cozy potato soup. Start small today and enjoy fresh garlic brightness in every meal daily.
Garlic Greens vs Garlic Microgreens
Garlic greens come from planting individual cloves in a small pot. Each clove sends up slender leaves that you can cut and use like chives or spring onions. Indoors, the plant does not make a full head because it misses the cold period that triggers bulb formation. Outdoors with winter chill, the same plant can turn that energy into a bulb by late spring or summer.
Garlic microgreens can also refer to young alliums grown from seed, such as scallion or chive. These grow in a shallow tray and are cut once when tender. They are ready much faster than bulb garlic. The flavor is clean and onion-like with a soft garlic note. Both options belong to the allium family, and both deliver a bright, savory lift in small amounts. Choose cloves in pots when you want repeated snips from the same plant. Choose seed trays when you want a dense mat of tender shoots all at once.
What You Need to Get Started
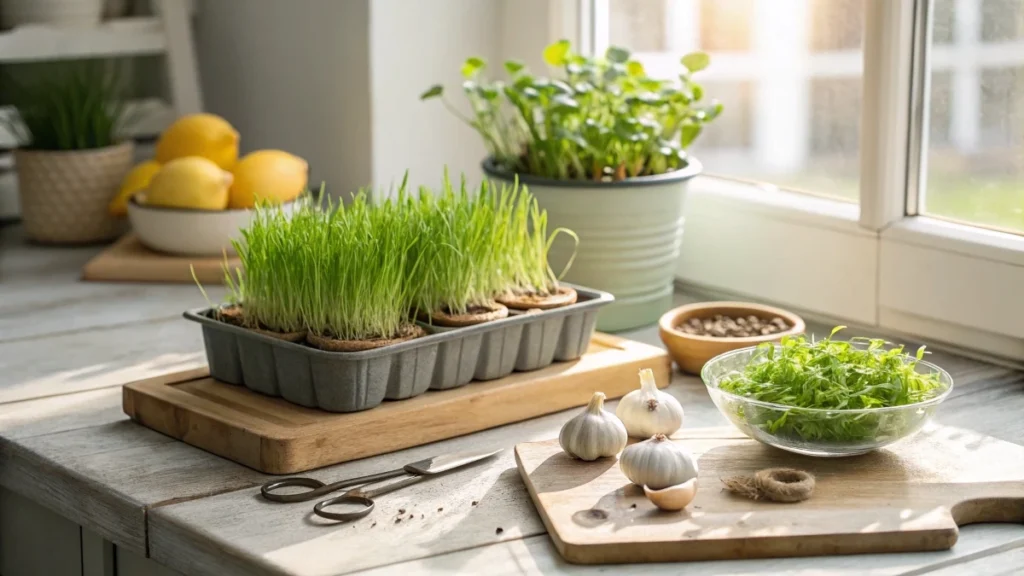
Use a small biodegradable pot or any container with drainage for cloves. For seed-grown alliums, use a simple stack of trays. A solid tray on the bottom holds water. A mesh tray in the middle holds the soil. A second solid tray on top acts like a lid to keep humidity steady during the first days. Fill with a loose potting mix that already includes compost and small white particles of perlite or vermiculite. That mix holds air and water in the right balance so roots can breathe.
Light matters. A bright window is enough for greens. If the window is weak, plants lean toward the light, which is a normal response to find the sun. Small LED bars are an easy upgrade if you want straighter growth. Warmth helps sprouting. A spot that is cold will slow the start. Keep a mister bottle nearby for surface moisture and set the pot on a small tray to catch extra water. Label what you planted and add the date so you can track progress. Always start with organic garlic since some store garlic is treated to delay sprouting.
🌿 Recommended Microgreens Supplies |
How to Grow Garlic Greens Indoors
Break the bulb gently so the cloves separate, and keep the papery skins in place. Those skins protect the clove while it settles into moist soil. Fill the pot with damp but not dripping soil. Make three holes about two inches deep. Place the clove root end down and the point up. Cover with soil and press lightly to remove big air gaps. Mist the surface and place the pot on a sunny sill.
Check daily. The goal is steady moisture. If the surface looks dry, mist. If the pot feels heavy and the surface is dark, wait. Sprouts usually show within the first two weeks. Leaves rise as narrow tubes. Let plants grow taller and cut a portion from the tallest leaves with clean scissors. Leave the base so the plant can push new leaves from the center. Because there is no winter chill indoors, do not expect bulb formation. Enjoy the repeated harvest of greens instead.
The See Through Clove Experiment
Set one clove in a shallow dish of water to watch the hidden steps. The root end goes down and should just touch the water. The top stays above the surface. Place it by the same bright window as your pot. Change the water often so it stays fresh. You will see roots appear first and then a green shoot. This small experiment makes it clear what is happening inside the pot where you cannot see. It is helpful for kids and for any grower who wants to understand timing.
Germination and Care Timeline
Week one
Cloves swell and wake up. Roots begin to extend. Keep the pot evenly moist and warm. If the window is very dim, expect slower movement.
Week two
Green tips emerge and stretch toward the window. Some pots show roots at the drain holes. The first leaves are slender and bright. Maintain moisture. Rotate the pot if the leaves lean strongly in one direction so growth evens out.
Week three
Plants thicken, and you can see two and sometimes three leaves per clove. New leaves rise from the center. At this stage, you can begin light trimming for taste tests. Do not cut the entire plant at the soil level if you want ongoing harvests.
Week four and onward
Plants are sturdy and ready for regular snips. If you plan to shift to outdoor growing for bulbs, you can transplant the whole biodegradable pot before winter so it experiences the needed cold. Indoors, you can keep harvesting leaves as they regrow.
Feeding and Watering
Moisture is the main driver of steady growth. Check the pot every day. The surface should feel slightly damp. Mist lightly rather than soaking the soil. If you do a liquid feed, keep it gentle. A simple homemade compost tea works well when prepared with enough air. Stirring and aeration keep the smell clean because oxygen-loving microbes take the lead. Before using, dilute the tea with an equal amount of water. A half-and-half mix is gentle and was used successfully to perk up indoor garlic. Apply a small amount to the soil and save the rest for houseplants. If the tea smells unpleasant, it likely lacked enough air, so start a fresh batch and stir it more often.
For seed-grown allium trays, misting is important during the first few days when seeds are germinating in the dark. A morning and evening mist keeps the top layer from drying. When the tray moves under lights, switch to bottom watering so the canopy stays clean and stems remain firm.
Transplanting Outdoors for Bulb Formation
Indoor garlic greens are grown for flavor, not bulbs. If you want full heads next season, move your potted plants outside before winter so they experience natural cold. A biodegradable pot makes this simple. Dig a hole deep enough to cover the entire pot, including the rim. If any part of the pot sits above the soil line, it dries out, and the plant struggles. Set the pot in the hole, backfill, and press gently so there are no air pockets. Cover the area with a blanket of leaves to hold moisture, soften temperature swings, and keep weeds down. Cold weather signals the plant to form a proper bulb in spring. Mark the spot and check soil moisture after long dry spells. In spring, you will see new growth pushing through the mulch.
Growing Scallion Style Microgreens from Seed
Garlic flavor also shines in young alliums grown from seed, such as chive or scallion. Use a simple three-part tray stack. The bottom tray is solid and holds water. The middle tray is mesh and holds soil while letting roots pass through. The top tray is another solid tray placed empty to trap humidity for even germination.
Fill the mesh tray with about two cups of a loose compost-rich potting mix. Level and lightly firm without compressing hard. Measure about two tablespoons of chive or scallion seed, which is roughly nineteen grams, for this small sprouting tray. Spread the seed evenly so there are no clumps. Cover the seed with about one cup of the same soil and tap lightly. Mist until the surface is evenly damp with no puddles. Place the empty top tray on and move the stack to a dark location with airflow. Mist in the morning and evening during this stage.
By day four, you will notice the soil lifting as roots anchor. Keep covered and keep misting. By day six, move the tray under the lights and begin bottom watering. Three twenty-watt T5 LED bars provide bright, even light at a low cost and work very well. From day seven to day nine, the canopy turns a strong green and fills in. The first harvest is typically ready around day twelve or day thirteen for short tender shoots. You can also keep growing for five to ten more days for a taller yield.
Lights, Watering, and the Day by Day
Light guides the quality of growth. In dim windows, seedlings lean toward the brightest side. Under bars or a brighter sill, they stand taller and straighter. During the first six days, keep the tray in the dark with good airflow and mist twice a day so the top layer never dries out. When the tray moves under the lights, switch to bottom watering. Add water to the solid bottom tray and let the roots drink for a short time, then pour off any leftover so the roots get air.
A simple timeline keeps you on track. Day four brings the first signs beneath the cover. Day six is the move to light and the change to bottom watering. Days seven through nine are the green-up and thickening. Days twelve to thirteen are the first clean harvest window for tender shoots. If the soil looks heavy or soggy at any point, give the tray time to breathe before the next watering.
Harvest and Yield
Harvest in small handfuls, so you do not pull plants from the medium. Grip gently and cut a little higher on the stems to avoid soil. Seed hulls often cling to the tops. They are thin and fine to eat, and many users do not notice them. If you prefer a spotless look, rub a few times with your palm or give a quick rinse. Dry well in a spinner or on clean towels before storing.
One sprouting tray seeded with nineteen grams produced about eighty-one grams of fresh scallion-style microgreens. That is roughly two point eight five ounces from a small home tray. If you extend the growth for another week, you can add height and weight, though the texture becomes a touch firmer. Store dry greens in a ventilated clamshell. They hold best for five to seven days when kept cold and dry.
Taste and Kitchen Uses
Garlic greens taste like a gentle spring onion with a warm garlic aroma. Scallion-style microgreens bring a clean onion note with a mild bite. Small amounts change a dish fast. Sprinkle over eggs, rice bowls, and soups. Fold into noodles and pasta at the end so the greens stay bright. Add to sandwiches and wraps for crunch and freshness. A spoonful of baked potatoes or creamy soups lifts flavor without overpowering. Children often enjoy the sweet pea-like notes in some microgreens, and the light onion tone in these greens is easy to accept in familiar foods.
Nutritional Benefits
Fresh young greens deliver concentrated flavor and a focused nutrient punch. In class, the teacher explained that microgreens can offer more vitamins and minerals in a small bite compared to the same bite of a mature vegetable. That is one reason they are a smart topper for everyday meals. You are adding color, texture, and micronutrients without changing portions much. Garlic greens also bring the familiar allium profile that many home cooks use for everyday wellness and seasonal cooking. Because you are harvesting minutes before eating, you keep that fresh taste and crisp texture that packaged herbs often lose.
Quick Recipes with Garlic Microgreens
Lemon and Garlic Pasta with Microgreens
Boil linguini until just tender. In a pan, warm olive oil with a little butter and add minced garlic until fragrant. Pour in a splash of chicken broth and let it come together. Stir in chopped parsley and basil. Add lemon juice and zest for a bright finish. Toss the pasta in the sauce and add a drizzle of olive oil so the strands stay glossy. Season gently. Off the heat, fold in a generous handful of microgreens, so they wilt lightly. Finish with a pinch of chili flakes and a sprinkle of cheese if you like.
Ten Minute Morning Omelet
Chop a handful of spinach. Sauté it with minced garlic in olive oil for about two minutes until just wilted. Pour in whisked eggs seasoned with salt and pepper. Let the eggs set without stirring. Add a small handful of a brassica microgreens blend over one side. When the omelet lifts easily, fold and cook a few seconds more. Slide to a plate and top with a little cheese or avocado. Breakfast is ready in minutes, and the greens stay bright.
Potato Soup with Scallion Microgreens
Warm a pot of creamy potato soup and season to taste. Ladle into bowls and top each one with a mound of scallion microgreens. The fresh onion note cuts through the richness and adds texture. A little cracked pepper and a ribbon of olive oil complete the bowl.