
Fresh greens do not have to be seasonal. With a jar or a shallow tray, you can turn dry seeds into crisp sprouts in under a week, or into tender microgreens in about one to two weeks. The payoff is big flavor, bright color, and that just cut freshness that store packs rarely keep.
This guide shows you the real difference between sprouts and microgreens, the easiest seeds to start with, the exact day-by-day routines, and how to store your harvest so it stays clean and crisp.
Sprouts vs Microgreens in Plain Language
What sprouts are
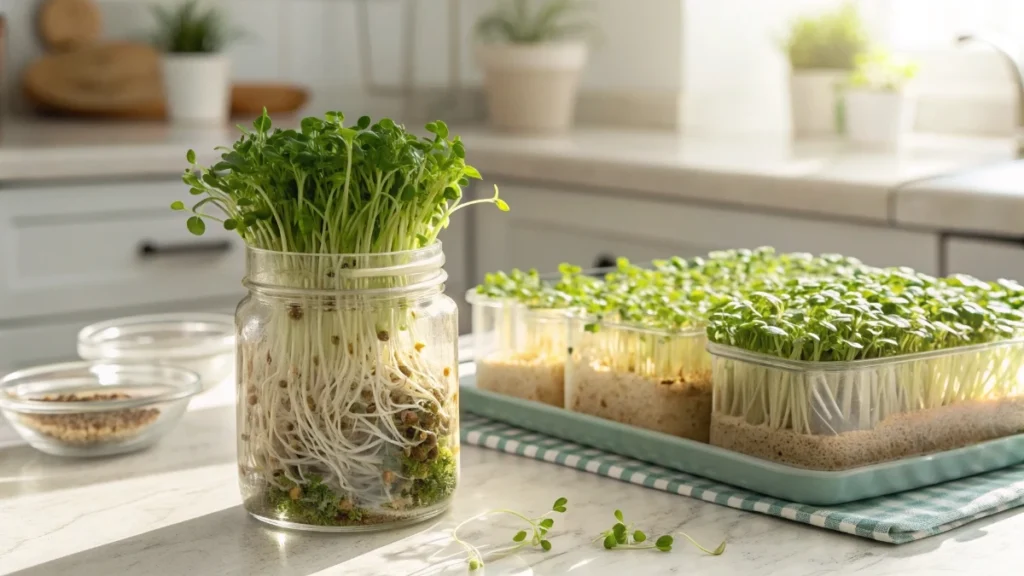
Sprouts are germinated seeds grown in water. You eat the entire sprout, including the root. They grow in a jar with a mesh lid or a clean cloth secured with a ring. Light is optional because the seed is running on stored energy.
Most sprouts are ready in 3 to 6 days.
The key habit is drainage. Sprouts live in a wet environment, so you rinse and drain 2 to 3 times per day, and you keep the jar angled so water never pools at the bottom. That one detail is what separates clean, sweet-smelling sprouts from slimy batches.
What microgreens are
Microgreens are young seedlings grown on a medium such as coco coir, potting mix, or grow mats. You harvest the stems and leaves, then leave the roots behind in the tray.
Microgreens need light after they sprout, and most are ready in 7 to 14 days. Slow herbs can take up to about 3 weeks.
Why the difference matters
Sprouts and microgreens feel similar in the kitchen, but the method changes everything.
- Sprouts are faster, but they demand more daily rinsing and careful draining.
- Microgreens take longer, but daily care is usually quick once you switch to bottom watering.
- Sprouts are very moist and have a shorter fridge life, often 3 to 5 days.
- Microgreens develop fuller flavor notes and can often hold 1 to 2 weeks when kept dry and cold.
🌿 Recommended Microgreens Supplies |
Safety First
Raw sprouts have been linked to foodborne illness outbreaks because bacteria can be present on the seed, and the warm, wet sprouting environment helps bacteria multiply. People at higher risk, including pregnant people, older adults, young children, and anyone immunocompromised, are commonly advised to avoid raw sprouts or eat them cooked. (U.S. Food and Drug Administration)
Microgreens are often considered lower risk than sprouts because they grow above the wet zone and you cut above the roots, but clean tools, clean trays, and safe storage still matter.
For storage temperature, a practical target is keeping foods cold at 40°F (4°C) or below, which matches standard food safety guidance. (U.S. Food and Drug Administration)
What to Grow First for Easy Wins
Best starter seeds for sprouts
- Broccoli
- Alfalfa
- Mung beans
- Lentils
- Salad sprout blends
Tip: Buy seeds labeled for sprouting or food use, since they are handled for that purpose.
Best starter seeds for microgreens
- Radish
- Broccoli
- Kale
- Pea shoots
- Sunflower
Fastest results usually come from brassicas like radish and broccoli. Easiest handling often comes from larger seeds like peas and sunflowers.
Simple Gear You Actually Need
For sprouts
- Wide-mouth jar
- A mesh lid, a clean cloth, and a ring
- A stand or dish rack to keep the jar angled for drainage
For microgreens
- Two nesting trays: one with holes inside, one without holes
- Coco coir, light potting mix, or a grow mat
- A basic LED light
- Spray bottle for the early days
- Scissors or a sharp knife for harvest
Step by Step: Sprouts in 3 to 6 Days
Day 0: Soak
Use a one-quart jar.
- Small seeds like broccoli or alfalfa: 1 to 2 tablespoons
- Fill with cool water
- Soak 4 to 8 hours (overnight is easy)
Day 1 onward: Rinse and drain
- Drain the soaking water fully
- Rinse with fresh water
- Drain again very well
- Repeat 2 to 3 times per day
- Keep the jar angled so water never collects
You want a clean, fresh smell. If you smell rot or see sliminess, it usually means you used too many seeds, did not drain fully, or skipped rinses.
Harvest and store
When sprouts look full and smell fresh:
- Rinse once more
- Drain extremely well
- Store in a container lined with a paper towel
- Keep cold and use within 3 to 5 days
Step by Step: Microgreens in 7 to 14 Days
1) Prep the tray
- Fill the holed tray with a thin, even layer of hydrated coco coir
- Press lightly to level the surface
2) Sow the seed
- Spread seeds densely, but not in thick piles
- Press gently for contact
3) Germinate under cover
- Cover with another tray or blackout lid
- Add gentle weight if you like more uniform germination
- Check daily and mist only if the surface dries
4) Move to light
When you see an even carpet of sprouts:
- Move under the lights
- Keep the light close enough to prevent stretching
5) Switch to bottom watering
Once roots reach the tray bottom:
- Add water to the lower tray
- Let the roots pull it up
- Keep the canopy as dry as possible
6) Harvest
Harvest when cotyledons are open, or when the first true leaves begin to show.
- Cut just above the medium.
- Harvest dry if you plan to store
- Store in a container lined with a dry towel
Storage That Keeps Greens Crisp
Sprouts
- Paper towel-lined container
- Change the towel if it gets wet
- Use for 3 to 5 days
Microgreens
- Store dry
- Do not crush them in the container
- Keep them cold, ideally 2 to 4°C
- Place them away from the freezer cold spots in the fridge
Common Problems and Fixes
Sprouts smell bad or turn slimy
- Use fewer seeds per jar
- Rinse more consistently
- Drain harder and keep the jar angled
- Start fresh with a cleaned jar and lid
White fuzz on microgreens
Often, it is root hairs. Mist lightly.
- If it disappears, it is the root hairs
- If it spreads and smells off, reduce watering and increase airflow
Leggy microgreens
- Bring the light closer
- Move to light sooner after germination
- Make sure the tray gets even coverage
Patchy germination
- Press seeds for better contact
- Level the medium
- Keep moisture steady during the first days
A Weekly Rhythm That Feels Effortless
Sprouts
Start a new jar every 5 days so your next batch is ready as the last one finishes.
Microgreens
Sow one to two trays once per week. After two or three cycles, you will know exactly how fast your household eats a tray.