
Growing microgreens for pets is one of the easiest ways to add fresh, real nutrition to your home. These tiny greens grow on a tray in one to two weeks and can support the health of dogs, cats, pet birds, chickens, goats and pigs. Instead of relying only on dry kibble or bagged feed, you can clip a handful of living greens and share them with every animal you care for.
In this guide, you will learn how to choose safe seeds, set up simple trays and grow pet-friendly microgreens that fit naturally into daily feeding routines. By the end, you will know how to grow microgreens for pets.
What Microgreens Are and Why They Benefit Pets
Microgreens are simply young edible plants that are harvested very early in their growth. They come from the same seeds you would use for full-grown vegetables and herbs, but you harvest them when they have the first set of true leaves and tender stems. At this stage, you eat the stems and leaves and leave the roots in the growing tray.
They are different from sprouts. Sprouts are eaten only a few days after the seed starts to wake up. With sprouts, you eat the seed, the tiny root and the first shoot, usually grown in water or a simple jar. Baby greens are the more familiar salad-sized leaves. Those are allowed to grow for a longer time and are usually harvested by cutting only the leaves. Microgreens sit in the middle. They stand taller than sprouts, have more flavour and texture, but still grow much faster than baby leaves or mature vegetables.
For pets and people, the big advantage is the density of nutrition. Research on microgreens shows that wide varieties contain roughly four to forty per cent higher levels of certain vitamins and minerals compared to the fully grown vegetable from the same seed. That means a small handful of microgreens can deliver a noticeable amount of nutrients without a large volume of food.
Some specific examples help bring this to life. Pea microgreens can contain about seven times the vitamin C of blueberries and around eight times the folic acid of bean sprouts. That is a serious boost in a very small amount of fresh green matter. Members of the broccoli family are also famous. Young broccoli microgreens contain natural plant compounds called glucosinolates. These compounds help the body defend itself and have been studied for their role in protecting cells.
For pets, this concentrated nutrition can support many parts of the body. Fresh greens support the gut, add vitamins that are often lower in dry feeds, and encourage natural foraging behaviour. Dogs get crunchy, fresh toppers on their meals. Birds get a tray of living greens to explore instead of only dry seed. Chickens, goats and pigs get bright green feed even in winter when the pasture is poor. When you learn how to grow microgreens for pets, you are essentially learning how to create a mini salad garden that works in every season on a shelf or window.
Because you harvest them so young, they also grow very quickly. Many mixes for microgreens can be cut in about eight to fourteen days. That short growing window means you can keep a constant cycle going for your pets without needing much space or time.
🌿 Recommended Microgreens Supplies |
Are Microgreens Safe for Pets
The first question many people ask is simple. Are microgreens safe for pets? In general, microgreens are safe as a small fresh addition to the diet of many animals, including dogs, cats, pet birds, chickens, goats and pigs. The key is choosing the right seeds, cleanly growing them and introducing them slowly.
Seed choice matters more than most beginners realise. Seeds for microgreens and sprouts are grown and handled with food use in mind. They are not coated with pesticides or treated with chemicals that are meant for crops that will stay in the field for months. When you are planning microgreens for dogs, microgreens for pet birds or microgreens for pigs, look for seed labelled specifically for microgreens or sprouting, and choose organic when you can. These seeds are grown and cleaned under stricter food safety rules and often show a germination rate of ninety per cent or higher. Fresh seed with high germination reduces the number of dead seeds rotting in your trays.
Some plants are not suitable at the microgreen stage. The nightshade family is the big group to avoid. That includes tomato, pepper, eggplant and potato. The young seedlings from these plants contain alkaloids that can be toxic when eaten in quantity. These plants are raised for their fruits, not for their early leaves, so they do not belong in a pet-safe microgreen garden.
Clean growing habits are another part of safety. Microgreens are grown thickly and stay moist, so they can develop mould if conditions are poor. It helps to know the difference between mould and healthy root hairs. Root hairs form a short, fuzzy halo close to the root where it touches the media. They do not wipe off easily. Mould usually appears on the surface of the media and creeps up the stem, looks more like cotton and often smells musty. If you see mould on a tray meant for pets, it is best to compost the whole tray and start again.
Water quality also plays a role. Any water that is safe for you to drink is usually safe for microgreens. Many growers use tap water or filtered drinking water. If your tap water has strong odours or you do not like the taste, filtered or bottled water may be a better choice.
Finally, every animal is an individual. When you first add microgreens for pets, start with a small amount. For dogs, that may mean a teaspoon of chopped greens on a meal. For a parrot, it may be a pinch mixed into the usual chop. For a flock of chickens, it may be a small handful scattered in the run. Watch stool, behaviour and appetite. If everything looks normal, you can gradually increase the amount over a few days.
If a pet has a medical condition or a very sensitive gut, it is sensible to check with a vet before you make large changes. As long as you treat microgreens as a fresh extra rather than a complete feed and you avoid unsafe species, they can become a safe habit in your home.
🌿 Recommended Microgreens Supplies |
Best Microgreens for Different Pets
Not all microgreens taste or behave the same. Some are mild and sweet, others are peppery or strong. When you plan microgreens for pets, it helps to match the plant to the species and to the way you want to use it.
The broccoli family is a natural place to start. Many microgreen mixes for people and animals are based on this group. Typical blends include broccoli, kale, cabbage, kohlrabi and arugula. These plants tend to germinate quickly, often in three to five days, and can be harvested within about eight to fourteen days. They give a rich green colour and a savoury taste that works for humans, dogs, chickens, goats and pigs. For dogs and cats, it is better to start with small amounts because brassicas can cause gas in some animals if you add a lot at once.
Pea microgreens are another favourite. Peas produce thick, crisp shoots that taste like fresh pea pods. They are often well accepted by children and by nervous pets because the taste is mild and slightly sweet. Pea shoots also have the impressive nutrient profile mentioned earlier, with high vitamin C and folate. That makes them a good choice when you want to boost microgreens for dogs, chickens or goats without adding strong flavours.
Sunflower microgreens supply a different texture, with thicker stems and a nutty taste. They contain useful minerals such as calcium, iron and magnesium. These greens are suitable for many animals, including poultry and herd animals, when introduced slowly.
For pet birds, a special mention goes to chia microgreens. Chia seeds are famous for their ability to absorb water and swell. When grown as microgreens, they provide a living mat of fine stems and leaves packed with calcium and other micronutrients. Calcium is especially important for birds, particularly for egg-laying hens and parrots that need strong bones and egg shells.
Cats have slightly different needs. They are obligate carnivores, but they still often seek out green plants. Cat grass blends are grown from grasses such as wheat, oat, barley and rye. These grasses are gentle on the stomach and can help cats manage hairballs and support digestion. Offering a pot of grass microgreens for cats gives them something safe to chew instead of your houseplants.
Some microgreens are better kept for people or used with care. Very hot mustard blends may be too strong for many pets. As mentioned, seedlings from the nightshade family are not suitable at all. When in doubt, stick to well-known edible greens such as salad mixes, peas, sunflower, chia and grass mixes.
By choosing a small set of reliable varieties, you can cover many needs at once. A single salad mix tray can feed you, your dogs, your chickens and even your goats and pigs. A dedicated chia tray can focus on microgreens for pet birds. A pot of wheatgrass can live by the window for your cats.
Supplies You Need to Start Growing Indoors
One of the strengths of microgreens for pets is that you can grow them indoors with very simple tools. You do not need a garden or a greenhouse. A shelf, a table or a bright windowsill is often enough.
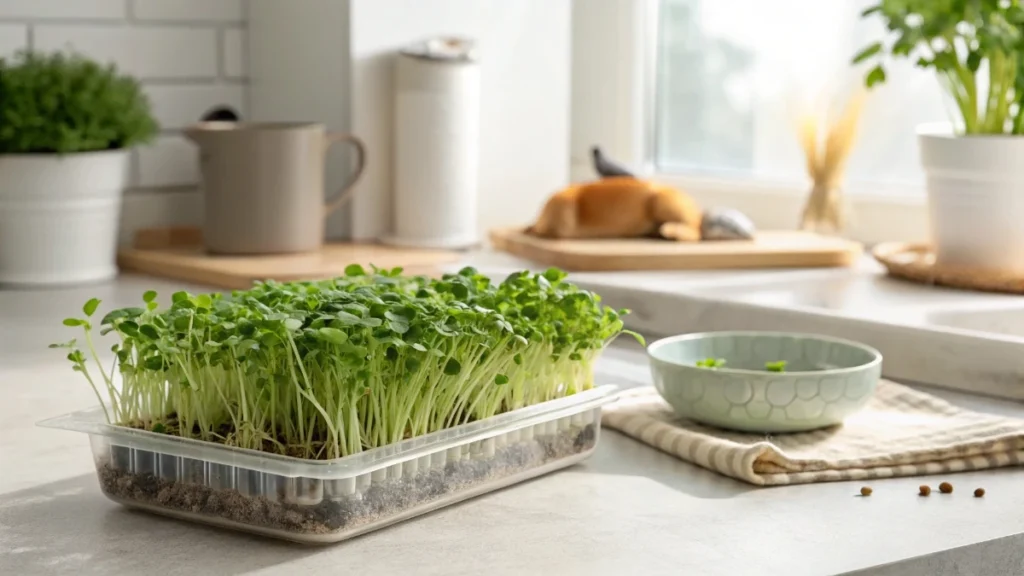
Start with containers. Shallow trays with a depth of about two to three and a half inches work well. They should be made from food-safe material and cleaned before use. Many growers like standard ten-by-twenty trays because they are easy to find and fit well under simple light bars. Some trays have drainage holes, and some are solid. When you use trays with holes, you can place them inside a solid tray to hold water for bottom watering. If you are just starting or growing small batches for one or two pets, you can even reuse clear salad boxes, ceramic baking dishes or glass containers as long as you clean them thoroughly.
Next, choose a growing medium. A common choice is a seed starting mix. This is usually a blend of peat moss or coconut coir with ingredients such as vermiculite and perlite. These mixes hold water well and give roots something soft to grow through. Some people like coconut coir discs that expand when you add warm water. Others use hemp or bamboo mat pads instead of loose media, especially when growing microgreens for birds indoors.
The quality of your seeds is central. Look for seed packets or bulk bags that clearly state the variety and that they are intended for microgreens or sprouting. Fresh seeds with a germination rate of around ninety per cent or higher help you avoid bare patches and rotting seed in your trays. Many seeds stay viable for about five years when stored in airtight containers in a cool place such as a fridge. That means you can buy in bulk once you know which microgreens your pets enjoy.
Light is another part of the setup. Microgreens do not need the intense light that fruiting plants require. A bright south or east-facing window often works. If your home is shaded or your winters are long, a basic LED grow light bar placed above your trays can make growth more even and prevent leggy stems. In the early germination stage, most microgreens are kept in the dark anyway, so you only need the light once they have sprouted and started to grow upward.
You will also need a way to water gently. Many people use a small spray bottle to mist the surface during the first days while the seeds are still sitting on top of the media. Once the roots are established, you can pour water into the lower tray and let the plants drink from below. Clean scissors or a small knife will serve as your harvesting tool.
With these simple supplies, you can build a flexible microgreens setup that supports pets and people at the same time. A couple of trays can supply microgreens for dogs, cats, birds and livestock without turning your home into a full-scale farm.
Step-by-Step Growing Microgreens in Soil for Pets
Once you have your trays, media and seeds ready, it is time to grow. This basic soil method works well for salad mixes, brassicas, peas, sunflowers and many other greens that suit pets.
Preparing the tray
Fill your tray with seed starting mix or another suitable media. The depth of the media can be around one to two inches. Moisten it with clean water before you add seeds. The mix should feel damp when you squeeze a handful, but not dripping. Some growers go one step further and gently compress the media. One simple way is to place another tray on top and weigh it down with heavy objects for a day or two. This settles the surface so it is firm rather than fluffy. Firm media gives young roots something solid to grip, so the microgreens grow straight and stable instead of falling over.
Sowing the seeds
Scatter seeds evenly over the surface. You can use a spoon or place the seeds in an empty spice jar and shake them gently over the tray. Aim for an even layer where seeds sit close together but are not piled on top of each other. For a standard ten-by-twenty tray, a common rate for small salad mixes is around ten grams of seed. Larger seeds like peas and sunflowers need more space. The exact number is not critical, but avoid extreme crowding because that traps moisture and encourages mould.
Once the seeds are in place, you can lightly press them into the surface with your hand or the back of a clean tray. Some varieties appreciate a very thin sprinkle of media over the top. Many brassicas and salad mixes grow well with only a light cover or none at all.
The blackout stage
After sowing the mist the tray so the top layer is evenly damp. Then add a cover. This can be another tray placed on top, a sheet of clear plastic wrap or a humidity dome. The aim is to keep moisture in and light out. In this stage, the seeds are encouraged to send roots down and shoots up in search of light. During this time, check the moisture twice a day. If the surface looks dry, mist again.
Most microgreens will germinate within a few days. You will see pale stems and folded seed leaves pushing upward against the cover. Keeping them in darkness for a short while, even after germination, helps build stronger, taller stems, which are easier to harvest later.
Switching to bottom watering
When the young plants are a centimetre or two tall, and you can see roots reaching the drainage holes, it is time to change how you water. Remove the blackout cover and place the tray with holes inside a solid tray if it is not already there. Pour a shallow layer of water into the lower tray. The roots will pull moisture up from below, which keeps the foliage dry and reduces the chance of mould.
From this point on, give your microgreens bright light. A sunny window or a simple grow light above the tray is usually enough. As the plants green up, you will see the true leaves form after the first seed leaves.
Harvest time
Most salad mixes and brassica microgreens are ready to harvest between eight and fourteen days after sowing. Some fast mixes can be cut in about eight days. You can taste a few stems to judge the flavour. When the microgreens look full and fresh, and you see the first true leaves, you can harvest.
Use clean scissors or a small knife to cut the stems just above the media. For pets, you can feed some greens right away. The rest can go into a clean container in the fridge. Microgreens are very fresh food and usually keep well for about five days if they are dry and cool. If you are growing mainly for animals such as chickens, many people simply take the whole tray outside and let the flock graze it down in one session.
By repeating this simple cycle every week or two, you can keep a steady flow of microgreens for pets in your home. Once you are comfortable with the basic soil method, you can explore special approaches such as chia on a paper towel for birds or extra deep pea trays for heavy feeders like chickens, goats and pigs.
How to Grow Chia Microgreens Without Soil for Pet Birds
Chia microgreens deserve their own method because they behave differently from most other seeds. Chia absorbs water quickly, swells, and forms a soft gel around each seed. This makes it poorly suited for soaking but perfect for an on-soil method that sits on top of a simple paper towel layer. Pet birds respond well to chia greens because they offer a concentrated source of calcium and small plant compounds that support healthy bones, feathers, and general vitality. Chia greens also bring a pleasant texture that encourages natural foraging.
Why Chia Microgreens Are Ideal for Pet Birds
Birds need steady calcium intake, especially species that lay eggs or parrots that form strong skeletal structures. Chia microgreens supply a gentle, plant-based form of calcium that the body uses well. They grow into a thick, carpet-like mat that birds love to nibble. Because the stems are fine and the leaves are soft, pet birds from small finches to medium parrots can eat them easily without struggling to break tough fibres.
This method produces clean greens without loose soil. That reduces mess and makes it safer around cages or bird rooms where soil spills are not ideal. It also makes harvesting simple because you cut clean stems from a dry surface rather than digging through media.
Setting Up the Paper Towel Tray
Start with a shallow tray that has drainage holes in the base. The holes do not need to be large, but they should allow roots to reach through once they have grown. Place this tray inside a second tray that does not have holes. This creates a clean setup for bottom watering later.
Line the top tray with a plain white paper towel. Avoid dyed or patterned paper towels because bright colours or added scents are not meant for growing food. Cut the sheet so it fits flat and reaches the edges of the tray. Mist the paper towel lightly so the surface becomes damp. This helps keep the chia seeds in place.
Sprinkle organic chia seeds over the damp surface. You do not need a heavy layer. Aim for an even blanket where most of the paper towel is covered, but the seeds are not stacked on top of each other. If you place too many seeds together, they gel up and form clumps that do not grow into healthy roots. Spread the seeds gently with a spoon if they form uneven piles.
Mist them again so the seeds absorb moisture. The surface should look glistening rather than soaked. Chia seeds swell rapidly, so a little water goes a long way.
The Blackout Period
Once the surface is evenly damp and the seeds are in place, create a dark environment. Cover the tray with another empty tray turned upside down or with a simple lid that allows a small amount of air flow. Darkness encourages the stems to grow tall as they search for light. Without this step, they tend to stay short and spread sideways, which makes harvesting more difficult.
Keep the tray in a dark cupboard or on a shelf where no direct light reaches it. Mist the top lightly twice a day. The seeds must remain moist, or they will not sprout evenly. Because chia forms a gel when wet, you will notice the surface becomes thicker. That is normal.
This stage usually lasts around five days. By that point, the young stems will lift the cover slightly and appear pale yellow or cream because they have not yet met the light.
Switching to Bottom Watering and Light
When you can see roots pushing through the drainage holes, it is time to change how you water. Remove the cover and add a shallow layer of water to the solid bottom tray. The roots will draw water upward. This keeps the foliage dry and helps prevent mould.
Move the tray to a bright area with indirect light. A sunny windowsill works well. The stems will turn from yellow to green within a day or two as they start producing chlorophyll in response to the light. Keep the bottom tray topped up with a small amount of water, and do not let the roots dry out completely.
Harvesting and Feeding
Chia microgreens are often ready to harvest soon after moving into light. When the leaves have turned green and the stems hold themselves upright, cut a handful of greens with clean scissors. You can offer chopped pieces in your bird’s fresh food mix or place a small clump of the greens in a dish for foraging. Many birds enjoy exploring the living mat, so you can even offer a section of the tray for supervised play.
Any unused greens can be kept in the fridge for a few days in a clean container. They stay fresher if kept dry, so avoid washing until just before feeding.
When the tray begins to look tired, or the stems start to wilt, compost the old paper towel and start a new batch. Because chia greens grow quickly, you can keep a fresh supply for your birds with very little effort.
Feeding Microgreens to Different Pets
Microgreens fit into many feeding routines. Their tender texture and high nutrient density make them easy to add to meals or serve as fresh snacks. Because they are harvested young, they are mild enough for most pets when introduced slowly. Below are species-specific notes to help you use microgreens for dogs, pet birds, cats, chickens, goats and pigs most naturally and safely.
Dogs
Microgreens for dogs work best as a small, fresh addition to the normal diet rather than a large portion of the meal. Many dogs enjoy the taste of broccoli family greens, pea shoots and sunflower greens. These options bring vitamins and minerals that support overall wellness.
Start with a small teaspoon of chopped greens mixed into the regular food. Watch stool quality and energy levels. Dogs with sensitive digestion may need a slower introduction. Brassica plants such as broccoli and kale can cause gas if given too quickly or in large amounts, so work up gradually.
The mild sweetness of pea shoots often makes them a favourite. Dogs that already eat eggs or cooked vegetables usually accept microgreens without hesitation. Microgreens for dogs can be fed a few times a week or daily in small amounts as a topper.
Pet Birds
Microgreens for pet birds add variety to a seed-heavy diet. Birds enjoy exploring fresh greens, and the fine stems of chia and salad mixes are easy for them to grasp and chew. Chia microgreens are especially valued because they are rich in calcium, which is important for egg-laying hens and parrots with active lifestyles.
Mix a pinch of chopped greens into the usual fresh chop. Offer a small section of a microgreen mat for enrichment. Birds often show interest in nibbling the tender stems directly from the tray. Keep trays clean and avoid any signs of mould.
Cats
Cats occasionally seek fresh greens even though their main diet is animal-based. Cat grass microgreens satisfy that natural behaviour. These grasses help with digestion and may make hairball management easier. A small pot of wheatgrass, oat grass or barley grass placed near a window gives cats a safe option that stops them from chewing houseplants.
Trim the grass when it reaches three inches to keep it tender. Replace the tray every two or three weeks when the grass becomes coarse or tired.
Chickens and Backyard Poultry
Microgreens for chickens offer a quick-growing source of fresh greens, especially during colder months or when birds are confined to runs. A standard ten-by-twenty tray seeded with around ten grams of salad mix can yield roughly five to six ounces of fresh greens. This is enough to give a small flock a bright, nutritious treat.
Chickens enjoy brassica greens, pea shoots and sunflower greens. You can scatter chopped greens on the ground or place the entire tray in the run for the birds to graze on. Microgreens also help diversify the diet when fresh pasture is limited.
Goats and Sheep
These animals appreciate a handful of fresh greens now and then. Microgreens for goats can add variety to winter feed when hay is dry, and pasture is not available. Pea shoots and salad mixes with broccoli and kale work well. Introduce them slowly because rumen balance is important. Use small handfuls mixed with regular feed.
Microgreens for Pigs
Pigs enjoy fresh greens and benefit from the vitamins and minerals microgreens provide. Microgreens for pigs are best used as a supplement to grain or formulated feeds. Salad mixes with kale, cabbage, broccoli, arugula and kohlrabi grow quickly and provide a mild flavor pigs usually enjoy.
Chop the greens and mix them into the regular feed or offer them separately as a fresh snack. Start with modest amounts and see how your pigs respond. Microgreens do not replace regular feed but serve as a healthy addition.
Harvesting, Storing and Maintaining a Continuous Supply
Good harvesting habits keep microgreens fresh and safe for pets. Use clean scissors to cut the greens just above the growing surface. For delicate varieties like chia microgreens, cut gently so the stems stay intact.
If you plan to feed microgreens immediately, there is no need to wash them. If you want to store them, wash them right before use rather than washing ahead of time. Washing too early adds moisture, which shortens their shelf life. Place the harvested greens in a container with small air holes or use a loose bag. They usually stay fresh for up to about five days in the fridge.
To keep a regular supply, start new trays every few days. Fast varieties like broccoli, kale, arugula and chia do well with weekly sowing. Slower types, such as sunflower or pea shoots, may need a slightly longer interval. Adjust your schedule based on how much your pets eat.
When you compost old trays and start new ones regularly, you always have a fresh batch coming up. This rhythm keeps microgreens for pets simple and reliable.