

Starting a microgreens business can feel confusing because most advice is scattered. One person talks about lights. Another talks about selling. Another talks about trays. You end up buying stuff before you even know who you are selling to.
This guide is a clear step-by-step plan you can follow like a checklist. It takes you from zero to your first sale and then into a simple weekly system.
Step 1: Choose Your Selling Style First
Before you buy anything, decide how you will sell. This choice shapes your pack size, your pricing, and how much you need to grow.
Direct to customer
This is the easiest starting path. You sell small packs to local buyers such as neighbors, friends, family, gym members, and people in local WhatsApp or Facebook groups. It gives fast feedback and faster cash flow.
Restaurants and cafes
This path can be strong once you are consistent. It usually means fewer customers but larger orders. It also requires reliability. If you miss a week, you can lose trust quickly.
A practical beginner approach is to start with direct buyers for your first two to four weeks, then add one or two restaurant clients after your routine is stable.
Step 2: Build a Simple Setup That Produces Weekly
You do not need a farm. You need a clean system that works every week.
Starter setup essentials
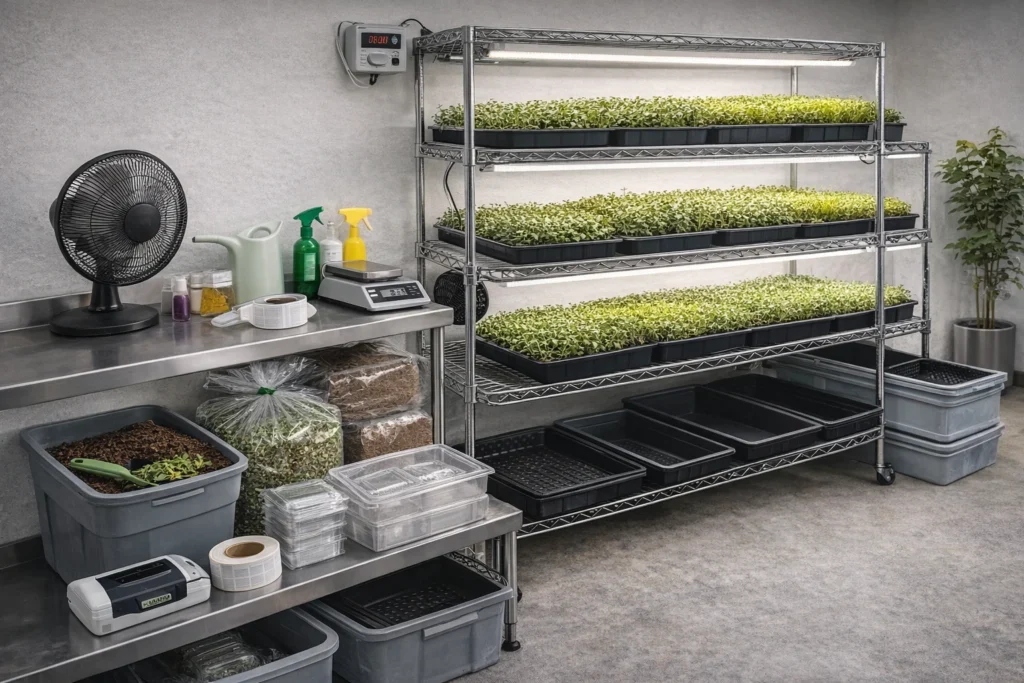
- A 4 or 5-shelf metal rack
- Standard 10 by 20 trays, with some trays having holes and some without
- LED lights that cover each shelf evenly
- A timer so the lights run automatically
- A small fan for airflow
- A sprayer or a gentle watering can
- Growing medium such as coco coir or a clean soil mix
- Seeds focused on best sellers
- Food-safe containers and simple labels
Keep it tidy and ventilated. Cleanliness and airflow protect your crop and your reputation.
Step 3: Choose Microgreens That Sell Fast
For a microgreens business, the goal is repeat sales. Start with varieties that grow reliably and move quickly.
Beginner best sellers
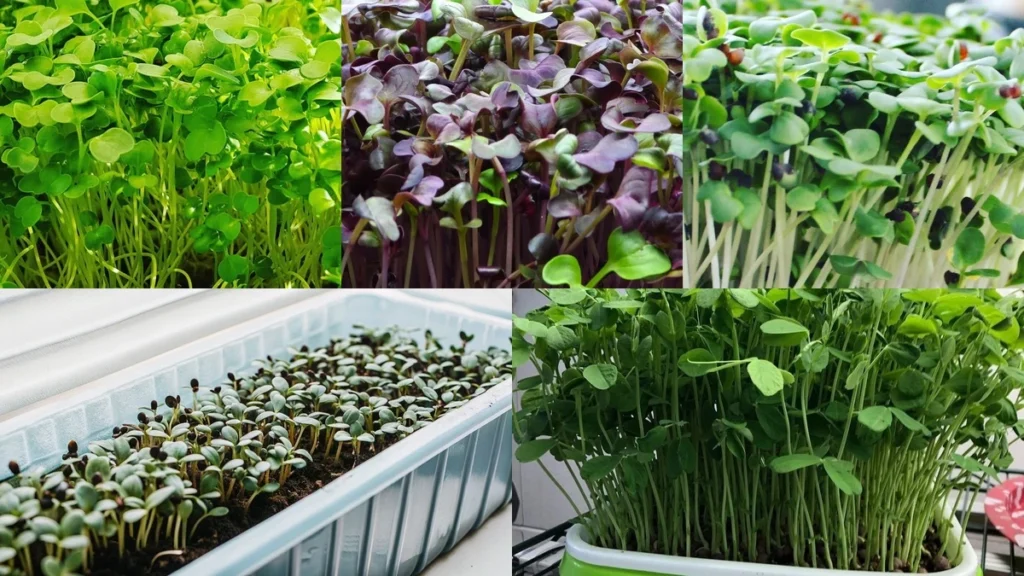
- Sunflower for high yield and crunch
- Pea shoots for sweetness and broad appeal
- Radish for speed and color
- Broccoli for health-focused buyers
- Mustard for strong flavor and mixes
Start with three to five varieties. Master them. Add specialty varieties later when your sales are steady.
Step 4: Set a Weekly Production Schedule
Consistency is what turns microgreens into income.
A simple schedule that works
Sow on Sunday and Wednesday.
Harvest and pack on Friday or Saturday morning.
This schedule creates a steady rhythm. While one batch is under lights, another is germinating, and another is almost ready to harvest.
Step 5: Follow a Repeatable Growing Method
You do not need complex techniques. You need a routine you can repeat.
Tray workflow
Preparation
Clean your trays and tools. Add an even layer of medium. Moisten lightly so it feels damp but not muddy.
Sowing
Spread seeds evenly. Press gently. Mist lightly.
Early stage
Cover if your variety benefits from it. Check moisture daily. Keep things moist but never soaked.
Light phase
Move trays under lights. Use a timer for a consistent light schedule. Keep airflow running daily. Water carefully. Bottom watering often reduces moisture on the surface and can help prevent problems.
Harvest
Harvest when greens are dry. Cut cleanly above the medium. Pack immediately.
🌿 Recommended Microgreens Supplies |
Step 6: Standardize Your Pack Size and Pricing
A beginner mistake is changing the pack size every week. Standardization protects profit and makes selling easier.
Choose pack sizes
Most beginners do well with two formats.
- A small clamshell for home buyers
- A larger clamshell or bulk option for higher volume buyers
Simple pricing rule
Price each pack at three to five times your direct cost. Direct cost includes seed, medium, and packaging. This gives room for waste, time, and growth.
A simple offer that sells
Offer three choices.
- One pack at regular price
- A bundle, such as three packs, with a small discount
- A weekly subscription with the best value
Subscriptions reduce uncertainty and help you plan production.
Step 7: Get Your First Customers Before Harvest Day
Do not wait until harvest day to start selling. Start selling while trays are growing.
Fast customer plan
- Write a short message describing the freshness and weekly harvest
- Send it to thirty to sixty local contacts
- Offer a first harvest deal to encourage trial
- Collect pre-orders for a specific harvest day
- Confirm orders the day before harvest
Pre-orders reduce waste and give you confidence to scale.
Step 8: Harvest Pack and Deliver Like a Pro
People buy microgreens with their eyes and their trust.
Packing habits that increase repeat buyers
Pack dry greens, not wet greens. Use clean containers. Add a label with the variety and harvest date, plus your contact information. Deliver as fresh as possible and store cool when you can.
If you can truly do it, the phrase harvested within 24 hours is a strong trust builder.
Step 9: Track Three Numbers Every Week
You do not need complex spreadsheets to start. Track these three numbers.
- Trays grown per week
- Packs sold per week
- Waste and unsold product
Your goal is simple. Reduce waste by growing based on demand, not hope.
Step 10: Scale Without Chaos
Scaling works best when you follow one rule.
The safe scaling rule
Increase production only after you sell out for two weeks in a row, and you have repeat buyers or subscriptions.
How to scale in small steps
Increase by two to four trays per week. Add one steady business client. Add one more best-selling variety. Improve labeling and packaging. Keep quality high and routines consistent.
Common Beginner Mistakes and Fixes
Growing too many varieties
Fix: start with the three to five best sellers.
Selling after harvest instead of before
Fix: collect pre orders weekly.
Overwatering
Fix: water less, improve airflow, and consider bottom watering.
No schedule
Fix: keep sow days and harvest days consistent.
Weak presentation
Fix: clean packing and a harvest date label instantly builds confidence.
Quick Starter Checklist
- Choose your sales channel
- Build one rack setup
- Pick best selling varieties
- Set a weekly sow and harvest schedule
- Take pre-orders before harvest day
- Pack dry and label with harvest date
- Track trays, sales, and waste
- Scale only after consistent sell-outs
FAQs
How soon can I make my first sale
Many beginners can sell within two to three weeks because most varieties harvest in seven to fourteen days.
Do I need a big room
No. One rack can fit in a small corner if it is clean and ventilated.
What is the easiest variety to start with
Sunflower and pea shoots are usually the easiest and most popular combination for beginners.
What if I cannot sell everything
Reduce trays next cycle and push subscriptions. Consistent sell-outs matter more than growing more.