
Starting a microgreens indoor growing setup doesn’t require a huge space or expensive tools. With just a few affordable materials and a little planning, you can grow nutrient-rich microgreens at home year-round.
This guide walks you through the best ideas for creating a simple but efficient indoor microgreens growing system, including shelving, lighting, airflow, and watering methods.
Many home growers use compact setups that cost under two thousand dollars and harvest up to sixty trays a week. Some even generate over $1,000 in weekly revenue.
Whether you’re growing for your own kitchen or thinking of selling locally, these microgreens setup tips will help you grow smarter from day one 🌱💡📦
Key Factors for Successful Indoor Microgreens Growth
Growing microgreens indoors successfully comes down to maintaining control over a few critical environmental conditions. These factors don’t require overly technical systems, but they do need consistent attention. Light, humidity, temperature, airflow, and watering method each influence how fast and how well microgreens grow.
Light is one of the first things to consider. Microgreens don’t need intense full-spectrum lighting like fruiting plants, but they still require adequate brightness to avoid legginess and weak stems. Some indoor setups use simple fluorescent tubes, which are inexpensive and widely available. Others may opt for LED fixtures, which offer a more targeted light spectrum and are energy-efficient. Light exposure directly impacts the speed of crop development. In systems using higher-quality lights, it’s possible to turn crops over every four days instead of the more typical seven, allowing for double the yield in the same space.
Humidity also plays a critical role in indoor microgreen farming. If the air is too moist, mold can become a persistent problem. In a tightly packed indoor room with trays being watered daily, humidity can rise quickly. Effective setups often maintain relative humidity around 39 to 40 percent. A dehumidifier that runs constantly can help maintain this level. Bottom watering, discussed later, can also help reduce excess humidity in the air since it limits surface evaporation from wet soil or medium.
Temperature affects growth rate and crop quality. Indoor microgreens generally thrive at temperatures between 70 and 78 degrees Fahrenheit. In some regions, temperature control is more about cooling than heating, especially in insulated or enclosed grow rooms. For example, an air conditioner set at 78 degrees can be sufficient for year-round production in warm climates. In colder seasons, supplemental heating might be needed, although it’s not always necessary in well-insulated environments.
Airflow is another piece of the puzzle. With multiple trays of wet growing medium stacked in a small space, stagnant air creates an ideal environment for mold and mildew. Adding a fan to the grow room can help circulate air and prevent these issues. In some customized setups, ventilation fans are mounted directly on the sides of the grow racks. These may be paired with wire or cable grooves for cleaner wiring and improved airflow design.
Watering strategy influences both humidity and plant health. While top watering can be simpler, it also increases moisture levels in the air and encourages mold growth. Bottom watering, on the other hand, allows moisture to reach the roots without wetting the foliage. This method is highly effective in small spaces where airflow and humidity control are a concern.
When these conditions are kept in balance, microgreens can grow quickly, reliably, and without common issues like rot or mold.
Types of Indoor Microgreens Setups
A. DIY Wooden Microgreens Shelf
One approach to building an indoor grow space for microgreens involves crafting a custom wooden shelf system. This kind of setup is ideal for growers who want an organized space that also looks polished enough to keep inside a home.
The frame can be built using ¾-inch maple plywood, which offers a sturdy base while still being easy to cut and work with. Large plywood sheets can be cut down to size with a circular saw, and precise shelf supports are usually shaped using a table saw. Clean wire management is an important part of this design. Making grooves in the wood allows the power cables for fans and lights to be tucked inside the structure, keeping things neat and safe.
The shelf can be assembled using pocket screws for strong joints, especially where visible surfaces matter. Wood screws can be used underneath, where appearance is less of a concern. The edges of the wood can be finished with edge banding using a heat gun to give a more polished look. A finish of Danish oil followed by a coat of polyurethane adds water resistance, which is helpful for any accidental spills during watering.
Each shelf can be fitted with grow lights. These are installed with simple brackets or screws and connected to power through hidden cable channels. Ventilation fans can be mounted on the side walls. Even without drilling ventilation holes directly into the side walls, fans can pull air through small gaps created with rubber stoppers, allowing for quiet and effective airflow.
Mobility can be added by mounting casters to the bottom. It’s important to choose a size that clears any wiring or plugs under the shelf. If the clearance is too low, as in the case of smaller two-inch casters, it may be necessary to upgrade to three-inch ones fora better fit.
This kind of setup is best for personal use, although a few trays of microgreens per cycle can still yield fresh greens for a family or small community.
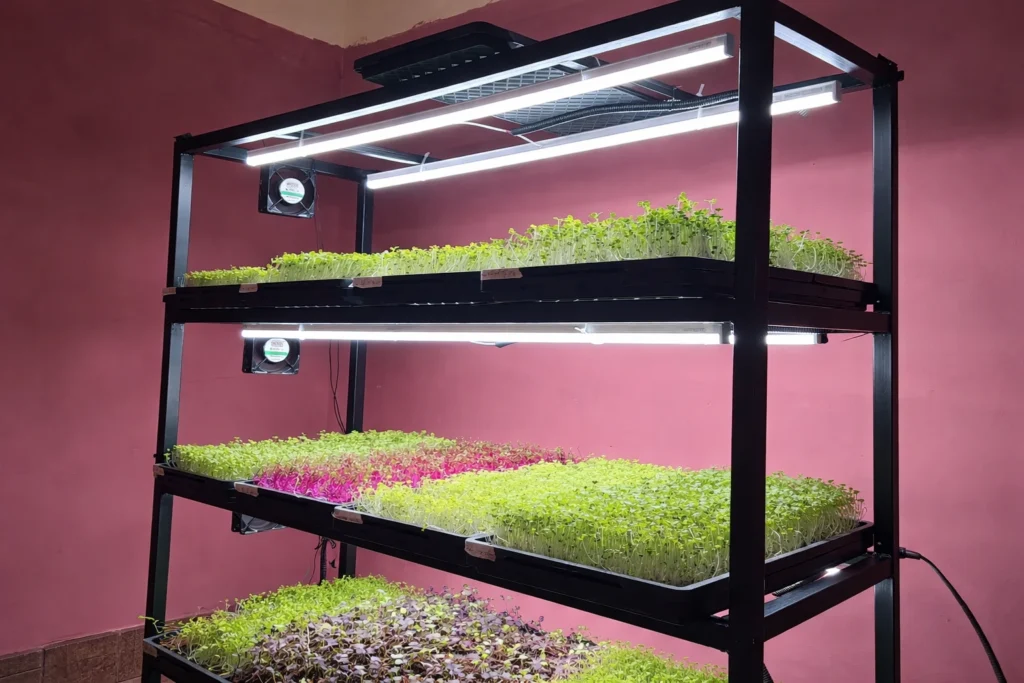
B. Lean Commercial Setup with Steel Racks
Another popular method for growing microgreens indoors involves using freestanding metal shelving units. These are the same wire racks often found in restaurant kitchens or storage rooms and can be purchased at major retail stores.
This setup uses three racks, each with five levels, which allows for a total of 60 growing trays to be active at once. There’s room for expansion as well. If each tray generates approximately $20 in revenue, the full system can bring in about $1,200 weekly. With improved lighting and heating, that number can potentially double.
The lighting used in this setup is very cost-effective. Fluorescent T12 light fixtures are mounted over each level, and one light fixture covers up to four trays. While this isn’t the most optimal lighting setup, it’s effective enough for microgreens, particularly those harvested in their foliage stage. These lights cost around $15, including the bulbs and ballast.
The system also includes a dehumidifier that runs nonstop. Rather than relying on a built-in reservoir, a hose is attached to drain the water directly into a nearby sink. This allows the dehumidifier to operate continuously without manual emptying, which is especially important for a consistent humidity level.
Watering is handled through bottom trays. These are durable, reusable trays that fit standard 10×20 growing flats and allow water to be poured into the base. This encourages roots to draw up moisture without wetting the leaves, reducing the chance of mold.
A simple oscillating fan is positioned in the room to keep air moving between the racks. The system is set up in a space roughly twelve feet by twelve feet, and even with that compact footprint, the production potential is high. With light and climate management in place, microgreens can be turned over every four days, effectively doubling the harvest within the same space.
This kind of layout is suitable for growers looking to earn a consistent weekly income from microgreens without investing in large infrastructure.
🌿 Recommended Microgreens Supplies |
Lighting Options: What Works Best Indoors
The choice of lighting can have a significant effect on both the growth quality and the speed of microgreens production. Several types of lighting can be used indoors, each with its own strengths and limitations.
The most affordable option includes T12 fluorescent tubes housed in simple ballast fixtures. These are widely available at home improvement stores and can be purchased for as little as $15 per unit. While not ideal for long-term crop development, they are sufficient for short-cycle greens that are harvested in the seedling or early leaf stage.
These fluorescents primarily emit blue-spectrum light, which supports foliar growth. However, their narrow light range makes them less effective for any crop that requires fruiting or flowering. They also have lower energy efficiency and shorter lifespans compared to LEDs.
LEDs are quickly becoming a popular choice for indoor growers. With costs dropping in recent years, LEDs now offer an affordable solution with better energy performance and a broader light spectrum. Some growers are able to find LED fixtures for as little as $20 each. Higher-end brands like SunBlaster provide a full spectrum that’s more suitable for nursery production and longer-term growth. Although they may cost around $50 per unit, the quality of light and the energy savings over time can justify the initial investment.
Lighting intensity and placement also impact the turnaround time for microgreens. With proper lighting, trays can be turned over every four days instead of seven, especially when paired with adequate temperature control. This means growers can produce more yield in the same square footage simply by improving the lighting setup.
For best results, lighting should be suspended just a few inches above the growing trays to maximize efficiency without wasting light or overheating the seedlings.
Watering Strategies
Watering microgreens indoors is more than just a routine task. The method you choose influences plant health, humidity levels in the grow space, and the risk of mold or disease.
There are two main methods: top watering and bottom watering. Top watering is the traditional way to irrigate trays by spraying or pouring water directly onto the growing surface. While simple, this method increases the amount of moisture in the air, particularly in small, enclosed spaces. Wet foliage also leads to higher transpiration rates, which raises humidity and the risk of fungal problems.
Bottom watering offers a more controlled and cleaner alternative. Trays are set into shallow reservoirs, and water is added to the base. Roots absorb moisture through capillary action, keeping the leaves and stems dry. This approach reduces the risk of mold and mildew significantly. It also supports more even moisture distribution throughout the growing medium.
For bottom watering, purpose-built trays are available that are designed to hold standard microgreen flats. One example includes trays with a slight front gap, which allows for easy pouring and even water coverage. These trays fit three microgreen flats side by side, and they can be reused for multiple cycles.
This method is especially useful in indoor environments where airflow and humidity control are priorities. It also saves time and water, as less is lost to evaporation or runoff.
Choosing the right watering method can make the difference between a smooth harvest cycle and a crop loss due to mold. For growers using stacked systems or tight spaces, bottom watering is often the most effective and reliable choice.
Importance of Air Circulation and Ventilation
Air circulation is one of thoften-overlookeded yet essential aspects of a successful indoor microgreens setup. Without proper airflow, microgreens are prone to mold, mildew, and other issues that can compromise the quality of the crop or even lead to full tray loss.
Stagnant air, especially in tightly stacked or enclosed growing areas, creates microclimates. These are pockets of warm, humid air that sit around the trays and promote fungal growth. This issue becomes more severe when using overhead lighting, which emits heat that rises and collects on shelves. Even low-wattage LED lights produce enough warmth to raise the temperature in confined areas.
To combat this, indoor systems often use small 120 mm fans installed directly on the sides of shelving units. These fans push the warm air away from the lights and help regulate shelf temperature, preventing heat from lingering in one place. Some growers choose to mount these fans using rubber stoppers instead of drilling vent holes, which allows the fan to be offset from the side panel slightly. This subtle spacing increases air draw without compromising the shelf’s appearance or structural integrity.
In open room environments, a single oscillating fan may be sufficient to move air between racks and maintain circulation. But in enclosed systems such as grow tents or built-in cabinets, individual fans per shelf ensure better airflow across all levels.
Besides preventing mold, airflow also helps strengthen plant stems by creating gentle resistance. This simulates natural wind movement and results in sturdier, healthier microgreens.
Airflow also plays a part in controlling humidity. When combined with a dehumidifier, fans help distribute dry air evenly, making it easier to keep relative humidity in the ideal 40–50 percent range. Without proper airflow, even a good dehumidifier can leave certain corners of the grow area damp and problematic.
In setups where space is tight and trays are watered regularly, even small improvements in airflow can have a noticeable effect on plant health and overall success.
Humidity and Temperature Control
Humidity and temperature directly affect how microgreens develop indoors. These two environmental factors influence germination, disease resistance, and growth rate. Without some level of control over both, indoor growing can become unpredictable and inconsistent.
Humidity needs to be balanced carefully. While seeds and sprouts do benefit from some moisture in the air during germination, excessive humidity leads to mold and mildew, especially in dense plantings. For indoor microgreens, the sweet spot for relative humidity is usually around 40 percent. In spaces where trays are densely packed and watered daily, humidity can spike easily. Even slight increases can lead to rapid fungal growth.
One effective strategy to maintain consistent humidity is using a dehumidifier that runs continuously. In professional setups, the dehumidifier is often connected via hose to a nearby drain or sink, so there’s no need to empty a reservoir by hand. This also ensures that the unit never shuts off mid-cycle, which helps keep conditions stable.
Temperature is equally important. Most microgreens prefer to grow at room temperature, but the exact range can vary depending on the crop. A general target of 70 to 78 degrees Fahrenheit supports fast, healthy growth for common varieties like radish, broccoli, and sunflower. In warm climates or well-insulated grow rooms, an air conditioner may be needed to prevent overheating. Some growers keep their air conditioning set to 78 degrees, which provides a consistent environment without excessive cooling.
In colder seasons, supplemental heating might be considered, but microgreens tend to tolerate slight fluctuations as long as light and moisture are controlled. What’s more important is avoiding sharp temperature shifts. Rapid heating and cooling can stress young plants, slowing growth or affecting flavor and texture.
Together, maintaining balanced humidity and stable temperatures not only supports faster growth but also reduces crop loss. These controls help ensure that each tray develops predictably, making it easier to manage production schedules and deliver consistent results.
Choosing the Right Shelving System
The shelving system forms the backbone of any indoor microgreens setup. It determines how many trays can be grown at once, how airflow and lighting are managed, and how accessible the system is for watering and harvesting. There are generally two main shelving options to choose from: metal wire racks and custom-built wooden shelves.
Metal wire racks are a common choice due to their flexibility and adjustability. These shelves can be bought as kits and reconfigured depending on the grower’s needs. For example, shelf heights can be adjusted to allow 10 to 11 inches of vertical space, which is ideal for most microgreens. The shelves are held in place using plastic clips, which are tapped into position with a rubber mallet. Once set, the shelves can be secured and leveled using a standard bubble level to ensure water doesn’t pool unevenly.
Wire racks are compatible with multiple types of lighting. Three LED shop lights, each about 20 watts, are often installed per shelf for microgreens. These lights can be zip-tied or screwed directly onto the metal frame. For taller crops like peas or sunflowers, the top shelf can be set higher to accommodate vertical growth.
The bottom shelf can be reserved for larger systems like Deep Water Culture (DWC) setups or pepper plants, which need more headroom. In this configuration, brighter grow lights such as 54-watt units may be used on the lowest level to provide the intensity needed for more demanding plants.
Cable management is another advantage of metal racks. Growers often mount all cords and power strips along a single side of the frame. Zip ties are used to organize cables, and the excess length is trimmed for safety and neatness. An extension cord with USB slots can power both lights and fans, and it’s usually mounted high to avoid water spills.
Wooden shelves, on the other hand, are often built by hand for a more polished look. These shelves are made from ¾-inch plywood and finished with Danish oil or polyurethane for water protection. One unique feature of custom wood builds is the ability to carve wire grooves or compartments into the structure itself, making cable management nearly invisible.
Casters can be added to both types of shelves, but size matters. Two-inch wheels may not provide enough clearance for plug connections or uneven flooring. Upgrading to three-inch casters allows for better mobility and reduces the risk of damaging cables when the unit is rolled.
Whether choosing wood or wire, the right shelving system depends on scale, space, and how much customization the grower is comfortable handling.
Definitely, what a splendid site and revealing posts, I definitely will bookmark your site.All the Best!