
Too much fresh basil and no idea what to do with it before it wilts? There’s a super simple way to keep all that flavor locked in without needing a fancy dehydrator or waiting hours.
All you need is a microwave and a few minutes. This method is quick, mess-free, and perfect for turning extra basil into a shelf-ready staple that lasts for months. You’ll still get that deep, herby aroma every time you pop open the jar.
No waste, no stress, and no special tools required. Just grab your basil, follow a few easy steps, and you’re good to go. It’s the kitchen shortcut you’ll actually want to use 🌿👌🔥
Why Dehydrate Basil?
Basil is one of the most commonly grown herbs, both in backyard gardens and small-scale indoor systems like vertical hydroponic towers. It grows quickly, especially in warm climates or controlled environments, and often produces more leaves than a household can use fresh. When left unharvested for too long, basil plants begin to flower. This flowering stage signals the plant to start seed production, which significantly reduces the concentration of aromatic oils in the leaves. The result is a noticeable decline in both flavor and aroma.
Instead of letting the herb go to waste or lose its flavor, preserving it by drying becomes a practical option. Drying basil at home is an effective way to make use of the excess harvest. It allows the herb to be stored long-term without refrigeration. Once dried, basil can be used throughout the year in cooking without needing to purchase it again. Storing dried basil is also space-efficient, making it ideal for people with limited pantry or freezer space.
While traditional methods of drying herbs, such as using dehydrators, ovens, or air drying, can take several hours or days, the microwave method stands out for its speed and simplicity. With this approach, basil can go from fresh to dry in as little as two minutes. This makes it particularly useful when there’s a small harvest to process or when time is limited.
Drying basil also retains much of the herb’s flavor if done correctly. Though fresh basil has a stronger aroma, dried basil provides a reliable, ready-to-use alternative when fresh basil is not available. Home-dried basil also avoids additives or preservatives that may be present in commercially dried herbs.
Tools and Materials Needed
To dehydrate basil using a microwave, the materials needed are minimal and often already available in most kitchens. The first requirement is fresh basil. This can be any variety, such as Genovese, lemon basil, or Thai basil. The quality of the dried product heavily depends on the freshness of the leaves. Use leaves that are vibrant in color, free of holes or dark spots, and harvested before the plant begins to flower.
A microwave-safe plate is essential for the process. A paper plate is commonly used since it doesn’t retain too much heat and is disposable, which simplifies cleanup. The plate should be covered with paper towels. Not all paper towels are suitable for use in the microwave, so it’s important to check that the brand being used does not carry any warning labels about microwave safety. Certain types of paper towels, especially those with prints or chemical treatments, may ignite or release fumes when microwaved.
Two layers of paper towels are generally used. One line the plate and absorbs the moisture released from the leaves during heating. The second covers the top of the basil to ensure even drying and to prevent the leaves from curling too much. This method helps create a gentle, enclosed environment that promotes even dehydration without scorching the herb.
Once the basil is dried, a clean, airtight container is needed for storage. A glass jar with a tight-fitting lid is ideal. Glass helps preserve the herb’s color and aroma over time and prevents exposure to humidity. Some people prefer to crush or grind the leaves before storing, while others keep them whole to retain more flavor and aroma. If grinding is preferred, a mortar and pestle or a small spice blender can be used.
Pre-Dehydration Preparation
Before drying basil in the microwave, proper preparation is key to a high-quality result. Start with harvesting. The best time to pick basil is in the morning after the dew has dried but before the sun becomes too strong. This is when the plant’s essential oil content is at its peak. If the basil plant is beginning to flower, that is a sign it’s time to harvest quickly. Flowering redirects the plant’s energy away from the leaves, and the flavor starts to deteriorate.
Once harvested, rinse the leaves under cool running water to remove dirt, insects, and any garden debris. Washing is important even if the basil is grown indoors, as dust and airborne particles can still accumulate on the surface. After rinsing, gently shake off the excess water.
Drying the leaves before microwaving is crucial. Any water left on the surface of the leaves can cause uneven drying or result in steam pockets that might scorch the basil. There are two effective approaches to drying the rinsed basil. One is to lay the leaves in a single layer on a clean paper towel and leave them to air dry for about an hour. This is useful if time permits. The second method is faster and involves gently pressing the basil between clean, dry kitchen towels to remove surface moisture. This approach works well when you’re short on time and want to get the basil into the microwave right away.
It’s also a good time to sort the leaves. Discard any that are damaged, yellowed, or wilted. Use only the healthiest leaves for drying. This step ensures that only clean, fresh, and high-flavor leaves are preserved, improving both the quality and shelf life of the final product.
Microwave Dehydration Process
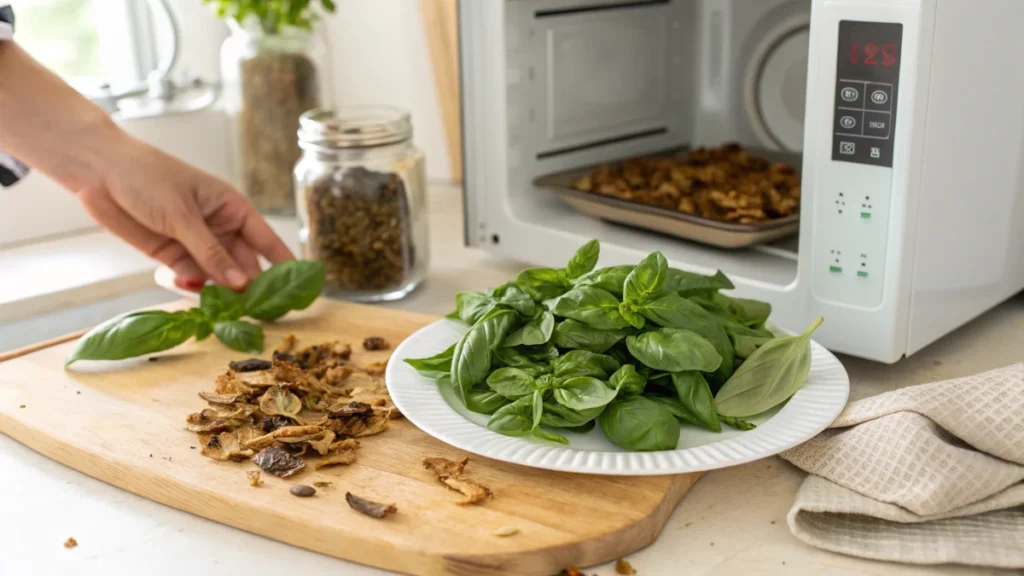
The actual process of drying basil in the microwave is simple but requires attention to detail to avoid over-drying or burning the leaves. Begin by placing a clean, microwave-safe paper plate on a flat surface. Lay a paper towel on the plate and spread the prepared basil leaves in a single layer. Avoid overlapping the leaves, as this can trap moisture and cause uneven drying. Once the layer is complete, cover the basil with another paper towel to help retain heat and absorb moisture during microwaving.
Set the microwave to full power and heat the basil in 30-second intervals. After the first 30 seconds, check the texture of the leaves. If they are still soft or bendable, they contain moisture and need more time. Return the plate to the microwave and repeat in 30-second intervals.
Most small batches of basil take between 1.5 tand2 minutes to dry completely. It’s common for some leaves to be done at the 90-second mark while others may need a full two minutes, depending on their initial moisture level and size. Throughout the process, monitor closely. Once the leaves feel dry and crumble easily when pinched, they are ready.
It’s better to err on the side of caution and dry in shorter increments rather than risk overcooking. Basil that becomes overly dry will lose its green color and develop a bitter taste. After the leaves are finished, allow them to cool completely on the plate before transferring to storage. At this stage, they can be left whole, crushed lightly, or ground to a fine powder, depending on personal preference.
This method not only speeds up the drying process butalso allows for small, manageable batches. That makes it perfect for home gardeners or anyone with a few basil stems left over from cooking.
Storage of Dried Basil
After drying basil in the microwave, proper storage is essential to preserve its flavor and color for the long term. Once the basil leaves have cooled to room temperature, they should feel crisp and crumble easily between your fingers. It’s important to wait until they’ve completely cooled before transferring them, as even a small amount of residual warmth can cause condensation inside a container, which could lead to mold.
You can choose whether to keep the leaves whole or crush them before storing. Some prefer to store the dried basil whole and crush only when needed to help retain more flavor. Others choose to crush or even grind the dried leaves into a powder using a mortar and pestle or a small blender. This powder form is more concentrated and convenient for sprinkling into dishes. The method of storage depends on how you intend to use the basil later, but the preservation principle remains the same.
Airtight glass jars are ideal containers. Clear Mason jars or spice jars with tight-sealing lids protect the dried basil from moisture and air, which are the two main causes of flavor loss and spoilage. If possible, store the jars in a dark, cool place such as a cabinet or pantry. Avoid direct sunlight, which can fade the basil’s color and reduce its potency over time.
In one example, someone reported using basil that was dried and stored a year ago, and it still retained its flavor and aroma as if it had just been preserved. This points to the effectiveness of airtight storage in extending the usability of dried herbs.
Labeling jars with the date of drying is also a helpful habit. While properly stored dried basil can last a year or more, using it within 12 months gives the best results in terms of aroma and taste.
Usage & Shelf Life
Dried basil is incredibly versatile in the kitchen. It pairs well with tomato-based sauces, pasta dishes, soups, stews, salad dressings, pizza, and even roasted vegetables. When cooking with dried basil, it’s usually added earlier in the cooking process to give it time to rehydrate and release its full flavor. Unlike fresh basil, which is often added at the end of a dish to preserve its delicate nature, dried basil is more resilient to heat.
The flavor of dried basil is different from that of fresh basil. It’s slightly more concentrated and has a warmer, slightly earthy tone. This makes it better suited to long-cooking dishes rather than raw applications. If you’re using it in place of fresh basil, a general rule is to use about one-third of the amount. For example, if a recipe calls for one tablespoon of fresh basil, one teaspoon of dried basil is usually sufficient.
As for how long it lasts, dried basil maintains its best quality for about 12 months if stored properly. After a year, the flavor may begin to fade, although it’s still safe to use. Some users have found that their home-dried basil remained flavorful even after a full year when stored in sealed glass jars away from light and moisture. Crushing the basil only when needed helps preserve the essential oils that give the herb its characteristic taste.
For those who enjoy making spice blends, dried basil can also be combined with oregano, thyme, rosemary, and other dried herbs to create custom herb mixes for Italian or Mediterranean dishes.
Safety & Practical Tips
Microwaving herbs for drying is generally safe, but there are a few precautions to follow. Not all paper towels are designed to go in the microwave. Some brands include warnings on the packaging that specify they are not microwave-safe. These towels may contain materials or coatings that can overheat, smolder, or even catch fire under microwave heat. Before using any paper towel in the process, check that the packaging does not contain such warnings.
When heating the basil, it’s important to stick with short intervals. Running the microwave continuously for a full two minutes can over-dry or scorch the leaves, especially if the microwave has a high wattage. That’s why using 30-second intervals and checking after each one is the safer approach. This gives you better control over the drying process and reduces the chance of overheating the leaves or the paper towel.
It’s also best to work in small batches. Overcrowding the plate can lead to uneven drying, with some leaves turning brittle while others stay soft. Single-layer placement ensures that each leaf is exposed to enough heat and airflow to dry consistently. If you’re drying a larger harvest, prepare two or three batches and rotate them through the microwave one at a time.
Finally, let everything cool completely before handling. Not only does this prevent burns, but it also reduces the chance of condensation forming in storage containers. Proper cooling helps ensure the basil stays dry, crisp, and safe for long-term use.