
Ready to grow microgreens indoors with reliable results and real flavor? This guide shows the best way to grow microgreens in a small space using simple tools, steady light, and clean watering.
You will learn the exact tray setup, the ideal seed density, how to use a short blackout phase for uniform sprouting, and why bottom watering keeps stems strong and mold away.
We compare seed starting mix with jute mats, share timing for fast varieties like radish and broccoli, and explain harvest cues you can trust in seven to fourteen days. With clear steps and proven tips, you can raise crisp, nutrient-rich greens year-round on a shelf, counter, or windowsill.
What you need. The essential indoor setup
Trays and watering
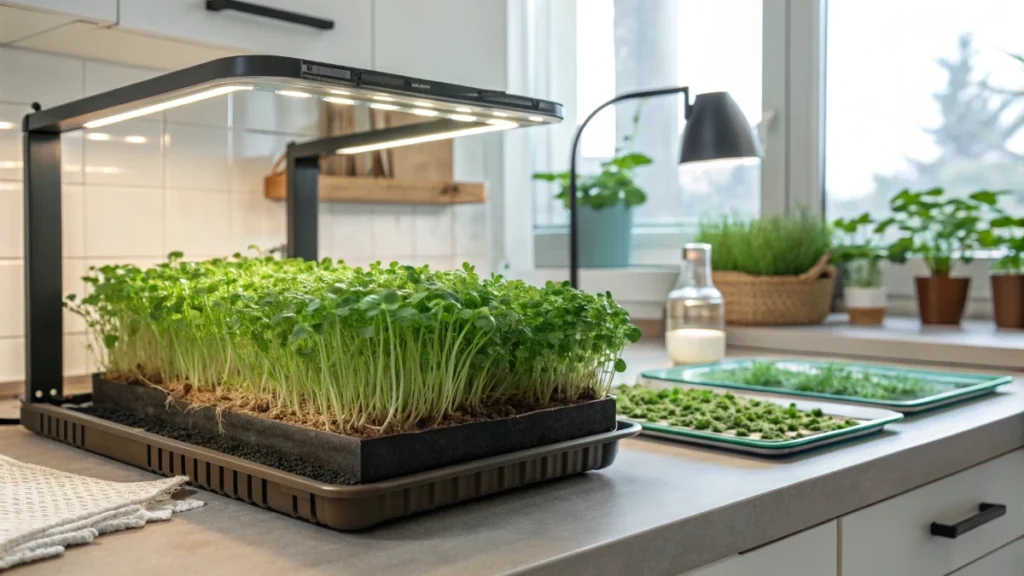
Use a tray with holes nested inside a tray without holes. The holed tray holds the medium and plants. The solid tray below lets you water from the bottom without wetting leaves. A depth of one to two inches is enough because roots are shallow. Many home growers prefer ten-by-ten trays for flexible batch sizes. A standard ten-by-twenty tray works well for families. Five-by-five trays suit variety testing and small kitchens.
Bottom watering is the core practice. Add water to the solid tray, let the medium wick moisture for five to ten minutes, then pour off any excess. This method keeps stems dry, which reduces disease pressure and helps seedlings stay upright.
Growing medium options
Soil or seed starting mix is the most forgiving option. Seed starting blends such as Pro Mix or Espoma are lightweight, sterile, and hold moisture while draining well. Coco coir or peat-based mixes are clean and consistent. If you grow beyond the micro stage into baby greens on inert media, plan to add a mild liquid feed after germination.
Soilless mats are popular for kitchens because harvests are very clean. Jute mats are biodegradable, hold a lot of water, and roll straight into the compost when you finish a tray. Cotton-like pads work nicely in recirculating channels. Whatever you choose, fully moisten the medium before sowing.
Light
Sunlight in a south-facing window can work with six to eight hours of direct light. Artificial light gives more predictable results. Set grow lights for twelve to fourteen hours on a simple plug timer. Several growers ran a daily cycle of twelve on and twelve off. Place lights close enough to prevent stretching but far enough to avoid heat stress. When seedlings first come out of blackout, bright light greens them up within a day.
Tools and small extras
A spray bottle helps when you need to mist newly seeded trays. A second tray or a soil press flattens the surface for even contact. Weights such as bricks or canned goods keep seeds pressed to the medium during the dark phase. A small clip fan improves airflow. Clean scissors or a sharp knife produce tidy harvests. Labels keep varieties and sow dates straight so you can track timing.
🌿 Recommended Microgreens Supplies |
Picking the right seeds
Start with types that germinate quickly and taste great fresh. Radish, arugula, mustard, broccoli, kale, bok choy, and red cabbage are reliable. Pea shoots bring crunch and tendrils that look beautiful on plates. Lettuce and cabbage deliver mild flavors for sandwiches. Beets and Swiss chard add color along with earthy notes.
Large seeds often benefit from soaking to speed up and even out sprouting. Peas and sunflowers are common examples. A soak window of about four to twelve hours works well. Drain thoroughly before sowing so extra water does not pool on the tray. Small seeds such as brassicas do not need a soak.
For cost efficiency, buy seed in larger bags. Several growers compared tiny garden packets with bulk sizes and showed that one-pound bags of broccoli or sunflowers drastically reduce the cost per tray. Do not worry about seed age as much as you might in the garden. Because you sow densely, even seed that is a few years old can produce full coverage.
Density and uniformity matter. A practical rule for a ten-by-ten tray is about one tablespoon of small seed and about three tablespoons of large seed. Cover the surface evenly without piling. Single-variety trays mature uniformly, which simplifies harvest and storage. Mixed trays look beautiful and taste complex, but expect staggered readiness across the mat.
Step by step. The proven indoor method
Prepare and level the medium
Fill the holed tray with about one inch of pre-moistened seed starting mix or coco-based blend. Level the surface. Do not compress the medium because roots need air.
Seed generously and set contact.
Evenly broadcast seed to near full coverage. Press seeds gently into the surface for solid contact. Do not bury them. Leaving seed on the surface produces clean greens at harvest with no grit and no extra washing.
Mist thoroughly one time to satisfy early moisture needs. In a mat system, fully saturate the mat before seeding so seeds do not skate when they get wet.
Create the dark phase.
Place a second tray directly on top and add weight. Bricks, cans, or any heavy pantry item work. This dark-weighted phase lasts roughly two to six days, depending on the crop. Weight keeps the environment humid, pushes roots downward, and makes stems sturdier. Lettuce is an exception and prefers a clear dome with light for germination.
When you see significant emergence and the seedlings start to lift the top tray, it is time to change the cover. Remove the weight. If the canopy is still very short, flip the top tray upside down and use it as a blackout dome for a day or two. That short stretch phase gives easy cutting height without sacrificing quality.
Move to light and begin the daily rhythm.
Place trays under lights for twelve to fourteen hours each day. Give the first post-germination watering right away. As leaves knit into a canopy, switch to bottom watering only and avoid overhead spraying. Check trays daily. The medium should be moist but never waterlogged. Drain any standing water after five to ten minutes.
Run a small fan for a few hours to keep air moving. Airflow strengthens stems and helps surfaces dry between waterings, which reduces mold risk.
Judge maturity and harvest cleanly.
Cut when plants reach about two to three inches tall or when the first true leaves appear on brassicas. Pea shoots are ideal when tendrils form. Use clean scissors or a sharp knife and cut just above the medium. Lift small handfuls as you cut to keep the harvest even. Pack greens dry. Dry greens keep their snap and store better in the fridge.
🌿 Recommended Microgreens Supplies |
Hydro option. Growing without soil
A mat-based method is tidy, fast, and efficient in a kitchen. Jute is a strong choice because it holds more water than many pads and breaks down fully in the compost. Cut the mat to fit a ten-by-twenty or a ten-by-ten tray with a slight gap at the edges so corners do not curl. Before sowing, saturate the mat completely. Press water or a mild nutrient solution into the fibers until there are no dry patches. Full saturation prevents seed drift and gives even wicking during the dark phase.
Broadcast seed evenly over the wet mat. Cover the tray with a black dome and keep it near seventy two degrees if possible. Many growers see radish and broccoli lifting the dome by day three or four, while peas often need an extra day. Once sprouts stand up, move the tray under lights and begin bottom watering. With mats, it is common to water once or twice a day because there is no soil reservoir. Keep the mat moist but not floating.
Harvest is very clean on the mats. Lift a tuft and snip above the surface. There is no soil to remove, which means you can pack greens dry and avoid bruising. That simple change can extend storage life by a few days. After harvests,t roll the used jute and compost it or feed it to chickens if you keep them. For growers with a small hydro system, there is a step beyond trays. Start on jute in trays for germination, then set the mat into a nutrient film channel. The constant flow handles moisture for you until harvest.
This approach does not remove the need for airflow and cleanliness. Keep trays and lids washed between cycles. Use a fan to lower the humidity on leaf surfaces. If you ever see a small fuzzy spot, treat it quickly and adjust watering to keep standing water away from stems. When you dial in saturation, light, and airflow, mats produce very consistent, grit-free greens that store well and fit busy kitchens.
Light temperature and watering targets
Strong light is the engine that keeps stems short and sturdy. A bright south window with six to eight hours of direct light can work. Consistent artificial light is easier to manage. Set grow lights on a timer for twelve to fourteen hours each day and give plants a clear night period. Keep fixtures close enough to prevent stretching without producing heat on the canopy. When trays come out of the dark phase, the first full day under lights usually turns pale seedlings a healthy green.
Room temperature near seventy to seventy five degrees Fahrenheit keeps growth steady. A warm control room at about seventy two degrees brought quick sprouting in several examples. Cooler rooms slow germination, and drier winter air can make the media dry faster. Check moisture more often during cold snaps or very sunny days.
Watering style changes as plants develop. During the dark phase, moisture comes from the pre-moistened medium and one thorough mist at sowing. As soon as the trays go under the lights, give the first drink. When leaves knit into a canopy, switch to bottom watering and keep foliage dry. Add water to the solid tray for five to ten minutes,s then drain the excess. In soil or seed starting mix, this rhythm is often every one to two days. On jute and other mats, a light refill once or twice daily keeps fibers evenly moist without floating the mat. Always aim for moist, not sogg,y and never leave standing water overnight.
When to harvest each type
Radish is usually the first to the plate. Expect ready height around day seven to day ten with a bright flavor that wakes up sandwiches and bowls.
Broccoli and kale follow close behind. Many growers cut between day ten and day fourteen when the first true leaves appear. These brassicas are valued for their mild flavor and the presence of sulforaphane, which is widely studied.
Mustard and arugula grow fast and bring spice. Plan on day eight to day twelve, depending on light and room warmth.
Pea shoots reward patience. Wait until tendrils appear and stems reach a satisfying bite. Most kitchens cut between day nine and day fourteen. If you leave one or two lower leaves, you may see one or two more cuts.
Lettuce and cabbage are mild and tender. They often take roughly twelve to sixteen days, but repay the wait with easy eating in wraps and salads.
Beet and Swiss chard add color and an earthy note. They germinate a little slower and are often timed in the second week for cutting.
If seed hulls cling to leaves, give the tray one more day. As leaves expand, the hulls usually fall on their own.
Storing and reusing
Clean harvests store best. Cut just above the medium so no grit rides along. Do not wash before storage because extra moisture shortens shelf life. Place greens in an airtight box or clamshell with a paper towel to catch condensation. Most home fridges keep them in good shape for three to five days. A few growers reported seven to ten days when the crop was very dry and grown on clean mats.
The used medium still has value. Soil mixes and root mats can go to the compost. Jute rolls directly into the bin and breaks down quickly. Chickens enjoy leftover mats and trimmings. Trays and domes should be washed and dried between cycles. A quick sanitizing rinse keeps the next crop clean.
Some varieties offer a second act. Pea shoots often push new growth if you cut above a node. A few growers reported a second cut from broccoli. Radish is usually a single-cut crop. Plan your kitchen flow around this pattern and start new trays each week so the fridge never runs empty.
Preventing mold and solving common issues
Airflow and dry leaves are your best friends. A small fan running a few hours a day keeps surfaces dry and stems strong. Bottom watering prevents splashes on tender stems and lowers disease pressure. If you spot a small fuzzy patch, treat it directly and adjust your routine. A simple spray made from two tablespoons of hydrogen peroxide mixed into one cup of water works well on small areas. Reduce standing water and keep the fan moving air across the shelves.
Root hairs often worry beginners. Fine white fuzz on young roots is normal during early growth. True mold spreads across the surface and looks cottony on the medium rather than just on root tips.
Uneven sprouting usually points to dry spots or light seeding. Make sure the weight covers corner to corner during the dark phase and that the medium was fully moist at sowing. Large seeds such as peas respond well to a soak of four to twelve hours, which evens the start.
Yellow leaves signal a simple need for light. Move trays under the fixture as soon as they lift the lid and keep the daily light window open long enough. Leggy stems can be corrected by bringing the fixture a little closer and sticking to the blackout schedule for the next batch.
Fungus gnats hitchhike in outdoor soil. Use sterile indoor mixes or pasteurize any garden soil before bringing it inside. Yellow sticky cards help break a cycle if you see adults. Clean gear and steady habits make the next cycle easier than the last.
Cost and yield snapshot
Running the numbers helps justify a weekly routine. One clear example placed a ten-by-twenty mat tray at four dollars and sixty six cents in direct inputs, with about one dollar and seventy one cents for the jute sheet and about two dollars and ninety-five cents for seed. The harvest filled two clamshells of a little over three ounces each. Sold at eight dollars per box, that tray brought sixteen dollars before overhead for a margin of a little above eleven dollars. Home kitchens will not price boxes, but the math still shows why this crop feels abundant for the cost.
Bulk seed brings costs down sharply. One comparison showed that a pound of broccoli seed contains an enormous number of seeds and makes dozens of trays for a fraction of the price of small garden packets. A simple rule for sowing is one tablespoon of small seed or three tablespoons of large seed in a ten-by-ten tray. That amount produces full coverage without waste. Pair those rates with a weekly schedule, and a family can keep greens on the table at a very friendly cost.
Lights on timers, bottom watering, and a fan add pennies per day. Clean harvests that do not require washing also reduce waste because stored greens last longer. When you finish a tray, you can compost or feed the remains to backyard birds and feel good about the circle.