
Growing microgreens can feel like the easiest thing in the world until your tray turns patchy, mold creeps in, or your greens come out weak and leggy. The truth is, small missteps can sneak in and ruin your harvest before you know it. The good news? Most of these problems are easy to fix once you know what to look out for.
From seed choices to watering habits and lighting tricks, getting the basics right makes all the difference. If your microgreens aren’t living up to the hype, you’re probably just missing a few key steps. Let’s get those trays lush, full, and thriving like they’re supposed to
1. Choosing the Wrong Growing Medium
A healthy microgreen crop starts with the right foundation, which is its growing medium. One of the most frequent missteps is using regular garden soil or unsterilized potting mix.
Why This Is a Problem
While traditional soils may work for mature plants, they’re risky for microgreens. These soils often harbor pathogens, weed seeds, and insect larvae. Because microgreens are consumed raw and at a very early stage, any contact with contaminated soil can pose serious health risks. The most common issue is the development of fungal diseases like damping off, which thrive in the warm, moist environment ideal for seed germination.
The Science Behind It
Conventional soils are rich in organic matter and microbial life, including harmful pathogens such as Pythium and Fusarium. These organisms can infect microgreen seedlings, causing rot at the soil line and rapid plant collapse. Additionally, garden soil may introduce pests like fungus gnats into your indoor space. It’s important to understand that microgreens rely almost entirely on the nutrients stored in their seed leaves (cotyledons) during the early stages of growth. As such, they don’t need additional nutrients or microbial input from the soil.
Best Practices
Opt for a sterile, inert medium like coconut coir, which offers excellent moisture retention and aeration without harboring harmful microbes. When using coconut coir, make sure it has a low salt content, as some products may be contaminated by exposure to saltwater during processing. Other good alternatives include hemp mats and hydroponic growing pads, which provide a clean, reliable base for growth without introducing unnecessary complications.
2. Incorrect Watering Methods
Watering may seem simple, but it’s often mishandled, either by applying too much or too little, leading to a host of problems.
Why This Is a Problem
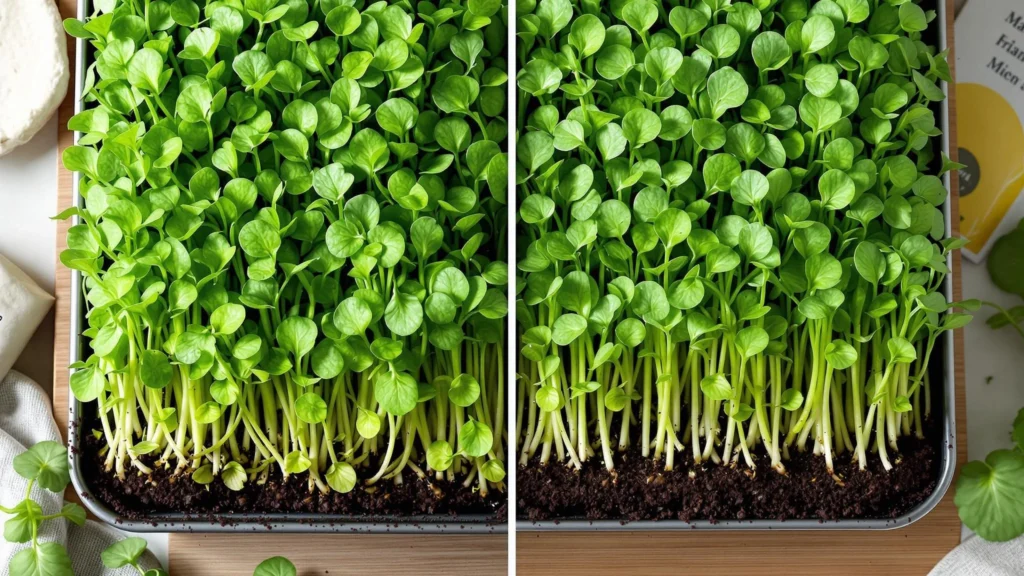
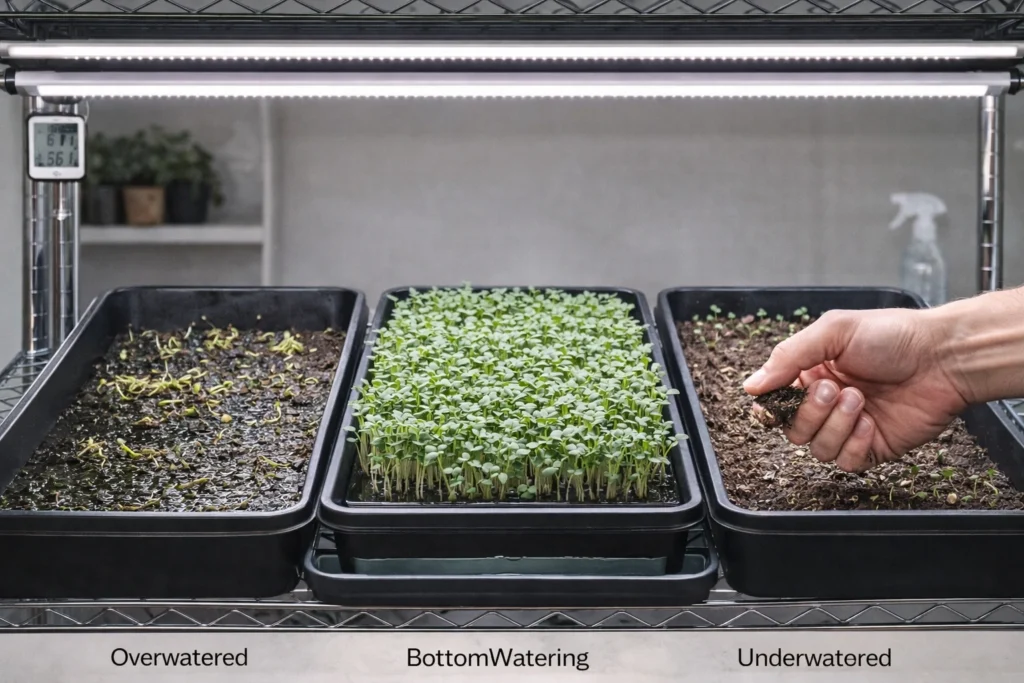
Overwatering saturates the growing medium, creating an oxygen-deprived environment that encourages root rot and fungal diseases. Underwatering, on the other hand, deprives seedlings of the moisture they need for basic metabolic processes, resulting in wilting and poor development.
The Science Behind It
Excess water displaces air in the growing medium, leading to anaerobic conditions that damage root systems. This promotes the growth of harmful fungi such as Botrytis and Pythium, both of which can destroy seedlings quickly. In contrast, underwatering limits turgor pressure, the internal pressure that keeps plant cells rigid and upright, causing plants to droop, yellow, and eventually die.
Best Practices
Use the bottom watering technique: place water in a tray beneath your microgreens so moisture can be drawn up through capillary action. This keeps the foliage dry and reduces mold risk. Watering every other day is usually sufficient, depending on humidity and temperature. To check moisture levels, gently squeeze the growing medium—if a few drops emerge, it’s adequately hydrated. For large seeds like peas or sunflowers, soaking them for 12–24 hours before planting can promote even germination.
3. Inadequate Light Exposure
Light is vital to microgreen growth, but many growers underestimate its importance or use improper lighting setups.
Why This Is a Problem
Without sufficient light, whether in duration, intensity, or quality, microgreens grow tall and pale in search of light, a condition known as etiolation. This results in weak stems, small leaves, and lower nutritional value.
The Science Behind It
Photosynthesis requires adequate light to produce glucose, the plant’s main energy source. In poor lighting, microgreens stretch unnaturally, lose color, and develop poorly. The result is a harvest that’s visually and nutritionally inferior.
Best Practices
- Duration: Microgreens need 12–16 hours of light daily. Using a timer ensures consistency.
- Light Quality: While sunlight can work, LED grow lights are ideal. They offer full-spectrum light tailored to photosynthesis, without overheating the plants.
- Placement: Keep the lights 6–12 inches above the canopy. Too far, and the light will be insufficient; too close, and you risk heat damage.
- Natural Light Tips: Beware of tinted windows that block UV light. If you notice pale or leggy growth, consider supplementing with artificial lighting.
- Tray Rotation: If relying on natural light, rotate trays regularly to prevent uneven growth.
4. Lack of Air Circulation
Good airflow is essential for preventing disease and encouraging strong, healthy plants, yet it’s often overlooked.
Why This Is a Problem
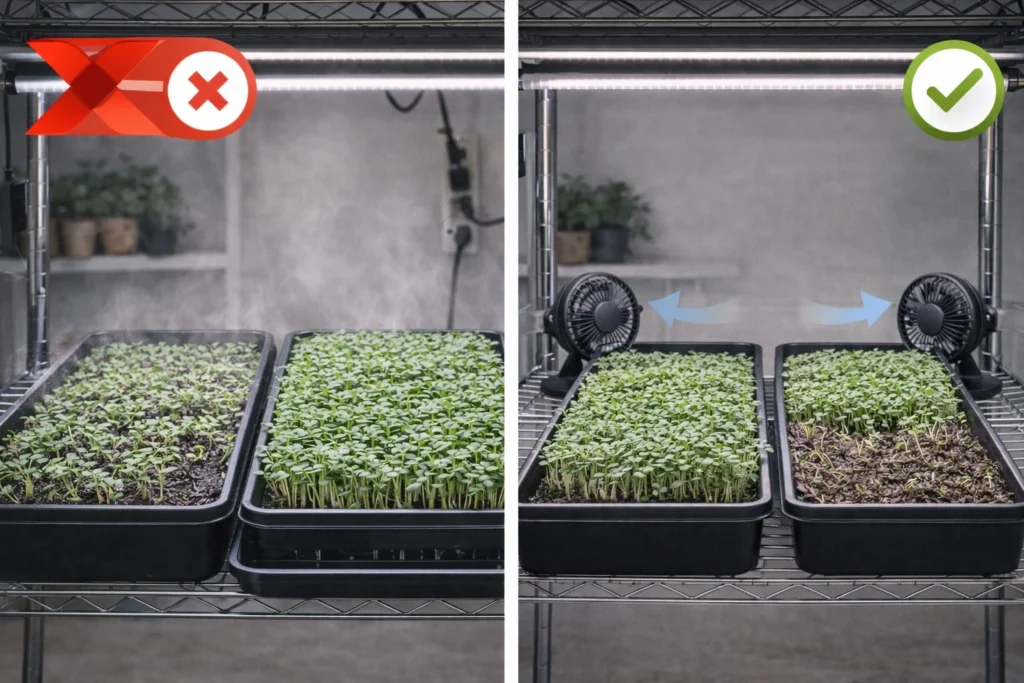
Stagnant, humid air around the microgreens can create an environment ripe for mold and fungal diseases such as Botrytis (gray mold) and powdery mildew.
The Science Behind It
Poor airflow traps humidity and allows pathogens to thrive. It also impairs transpiration—the process by which plants move water and nutrients from roots to leaves. Insufficient airflow reduces this vital function and can limit photosynthesis by creating localized CO₂ deficiencies.
Best Practices
- Use a Fan: A small oscillating or stationary fan placed near your trays can dramatically improve airflow. Even a USB fan will suffice for small grow setups.
- Ventilate the Room: Open windows or run a room fan to ensure fresh air exchange.
- Spacing Matters: Avoid overcrowding your trays. Leave space between them to allow air to move freely, reducing pockets of humidity and minimizing the risk of mold.
5. Skipping the Blackout or Germination Phase and Not Applying Weight
Many beginners make the mistake of exposing seeds to light immediately after sowing, bypassing the blackout or germination phase.
Why This Is a Problem
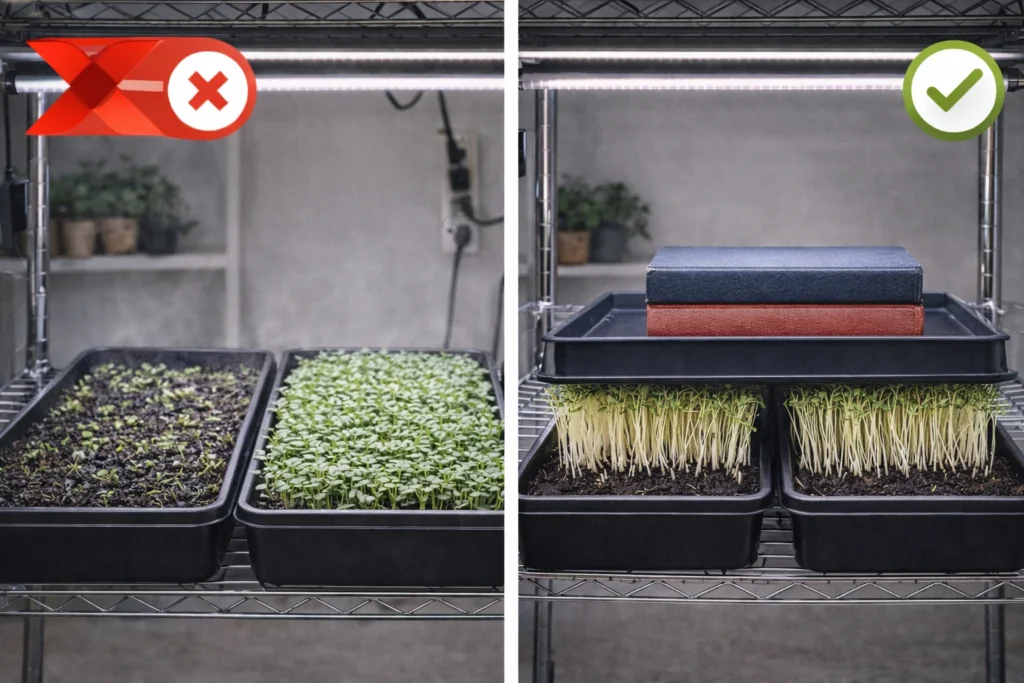
Introducing light too early prevents seeds from germinating uniformly. Without the initial dark period and gentle weight, seeds may fail to make proper contact with the growing medium, resulting in patchy sprouting and weak growth. This can lead to microgreens that are uneven, fragile, and lacking in density.
The Science Behind It
The blackout phase recreates natural soil conditions by providing darkness and humidity. During this phase, plants undergo a process known as skotomorphogenesis, where energy is directed toward developing a strong root system instead of elongating stems. This results in better nutrient and water uptake once light is introduced. Applying a light weight helps press the seeds into the growing medium, ensuring even moisture contact and stimulating stronger stem development as seedlings push upward. One grower describes this process by saying that darkness “helps the roots grow deeper, which in turn helps the plants grow strong and straight.” The effort seedlings expend to lift the weight also encourages a more vigorous and uniform crop.
Best Practices
After evenly distributing seeds on your growing medium, cover them with another tray or a blackout dome. Apply a light but firm weight, such as books, bricks, or a tray filled with water. The weight should range from a few pounds to up to ten pounds, depending on the size of the tray and seed type. This blackout phase typically lasts two to four days or until seedlings are about half an inch to one inch tall and begin pushing up the cover. At that point, remove the weight and expose the tray to light. This method ensures stronger roots, more uniform growth, and a fuller harvest.
6. Choosing Complex Seed Varieties as a Beginner
Starting with difficult microgreen varieties can quickly frustrate new growers.
Why This Is a Problem
Many beginners attempt to grow seeds that have longer germination periods or require special care, such as pre-soaking or strict light conditions. This often results in uneven growth, mold issues, or complete crop failure.
The Science Behind It
Some seeds are much more demanding. For example, herbs like basil and cilantro take about two weeks to grow compared to the standard seven days for simpler varieties. Basil seeds can develop a gelatinous coating when misted, which confuses many new growers. Sunflowers are especially prone to mold and need precise soaking times and good airflow. Corn microgreens must grow entirely in darkness to maintain their sweet yellow color and flavor. Exposure to light turns them green and grassy in taste. A grower warns that “if they start seeing the light and they start going from that yellow color to more of a green, they’re going to start tasting like grass.”
Best Practices
To build confidence and see early success, new growers should choose microgreens that are easy to grow, quick to germinate, and tolerant of small mistakes. Ideal options include:
- Radish — Germinates in two to three days and is ready to harvest in about five to seven days
- Broccoli, Kale, Arugula, Cabbage — These brassicas grow quickly and uniformly with little fuss
- Mustard Greens — Hardy, fast-growing, and flavorful
These varieties provide a reliable foundation for learning. Once you are comfortable with the basics, you can begin experimenting with more complex types by researching their specific needs in advance.
7. Using Low Quality or Improperly Stored Seed
Seed quality plays a vital role in the success of your microgreen crop.
Why This Is a Problem
Old or poorly stored seeds can result in low germination rates, weak seedlings, or even total crop failure. Additionally, seeds not intended for microgreen use may contain harmful pathogens that pose a health risk when eaten raw.
The Science Behind It
Seed viability refers to how many seeds in a batch are capable of sprouting. Seed vigor measures how quickly and strongly they grow. Both qualities degrade over time, especially when seeds are exposed to heat, moisture, or light. This breakdown reduces energy reserves and damages cells, leading to slower and less uniform growth. Furthermore, seeds not tested for pathogens may harbor bacteria like E. coli or Salmonella. One grower emphasizes the importance of quality by stating, “You want to make sure your seeds are pathogen tested.” These safety concerns are especially critical for crops consumed raw.
Best Practices
- Buy from trusted suppliers who offer seeds specifically for microgreens and provide testing for germination rates and pathogens
- Store seeds properly in airtight containers kept in cool, dry, and dark environments. Refrigeration or freezing can extend shelf life for long-term storage
- Use seeds within six to twelve months for best results. For older seeds, perform a simple test by placing a few on a damp paper towel inside a plastic bag and checking how many sprout after a few days
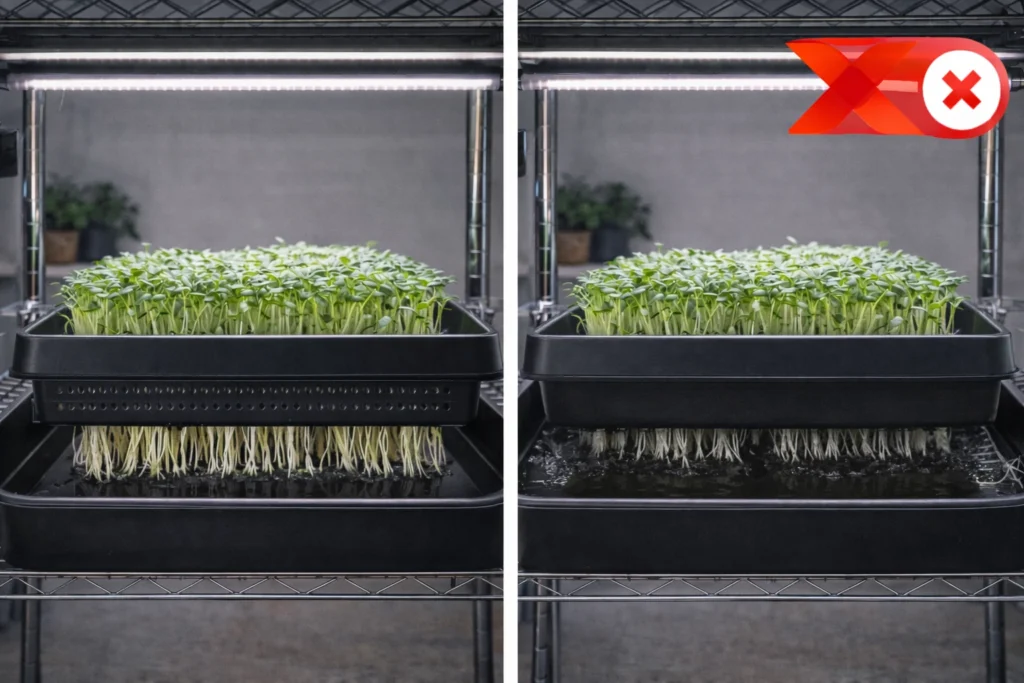
8. Neglecting Tray Design and Drainage
Your choice of trays has a direct effect on root health and moisture control.
Why This Is a Problem
Using trays without drainage or skipping a two-tier system traps excess water at the bottom. This creates conditions that encourage mold, root rot, and other issues due to poor oxygen flow.
The Science Behind It
When water cannot drain, it pools in the growing medium, reducing oxygen and allowing harmful pathogens to thrive. This can quickly lead to damping off and stunted plants. In contrast, a two-tray system allows proper drainage and supports bottom watering. The top tray contains the growing medium and has drainage holes, while the lower tray collects excess water. This setup prevents water from sitting directly at the roots and allows the medium to absorb only what it needs. One grower notes that using this system “significantly reduces your risk of mold.” Placing trays on a flat surface also ensures water is evenly distributed, avoiding dry patches or oversaturation.
Best Practices
- Use trays with ample drainage holes designed specifically for microgreen growing.
- Adopt atwo-trayy setup by placing your drainage tray inside a solid bottom tray. This makes bottom watering easy and keeps your growing area clean.
- Ensure trays sit on a level surface so that water spreads evenly and supports consistent germination and growth across the entire crop
🌿 Recommended Microgreens Supplies |