
Growing microgreens at home is one of the easiest ways to enjoy fresh, nutrient-packed greens year-round. While seeds and light are important, the real secret is choosing the right containers for microgreens. You do not need expensive trays or kits to start.
Everyday household items such as glass jars, takeout trays, food storage tubs, and even frozen dinner containers can be repurposed into practical growing systems.
These DIY containers are not only cost-effective but also eco-friendly, reducing waste while providing continuous harvests.
With a little creativity, you can transform common kitchen items into productive microgreen gardens. In this guide, we explore the best container ideas, practical tips, and savings you can achieve by reusing simple materials at home.
Why Containers Matter for Microgreens
When you are learning how to grow microgreens at home, one of the first questions is what type of container to use. The truth is that microgreens do not need deep pots. A shallow layer of medium, around half an inch to three-quarters of an inch, is more than enough for strong root growth. Choosing the right containers for microgreens helps manage water, airflow, and light.
There are two main approaches to watering. Containers with holes work best for soil or coco coir. You can place the planting tray inside a solid tray, so water drains through and collects below. The second approach is soil-free. In a glass jar with clay pebbles, you keep a small pool of water at the bottom. Just half an inch of solution is enough, and the clay pebbles hold moisture even when the surface looks dry.
Food safety is important since you will be eating the greens fresh. Takeout bowls, frozen dinner trays, and other food packaging are already food-grade, which makes them safe to reuse. Covers are another important part of the container system. A flipped lid, a solid tray, or a dark cover keeps seeds in the dark for the first few days until they germinate.
The size and shape of the container also matter. Small containers give you portion-sized harvests that you can cut fresh at the table, while larger trays produce more volume but may lead to waste if not eaten quickly. By matching container size to your household needs, you save money and reduce spoilage.
🌿 Recommended Microgreens Supplies |
Everyday DIY Container Ideas
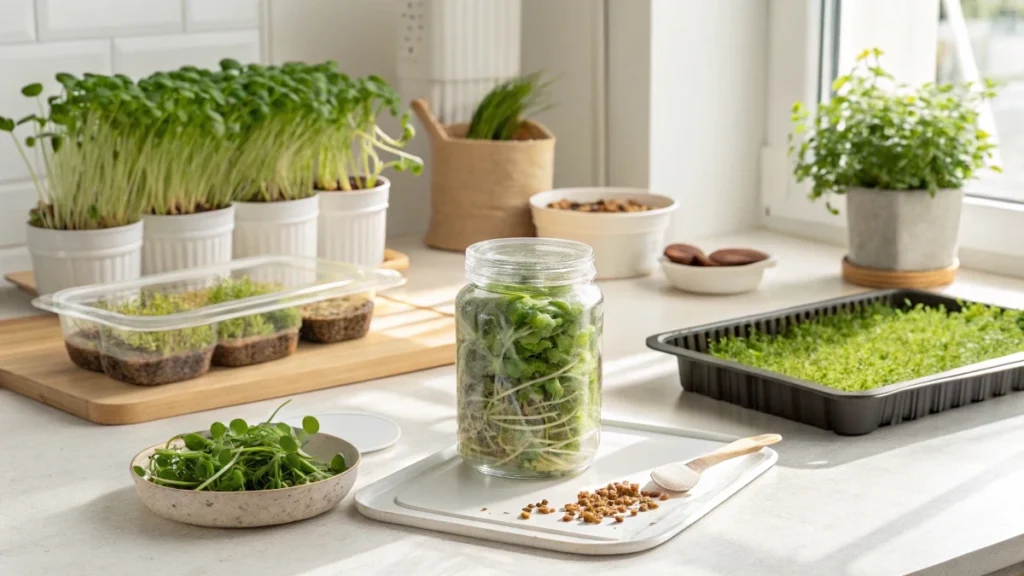
Glass jars with clay pebbles
Glass jars are an excellent option for anyone who wants reusable containers for microgreens. Instead of soil, you fill the bottom with rinsed clay pebbles and add a small amount of nutrient solution. Seeds are sprinkled on top and misted with water. For the first few days, keep the jars covered to block out light.
Once the roots anchor into the clay, remove the lids and maintain a thin layer of water at the bottom. A turkey baster makes it easy to add more water without disturbing the plants. The pebbles hold onto moisture so the roots can drink even when the water seems low. You may notice a little algae forming on the sides, but this is harmless during short growth cycles of seven to fourteen days.
When it is time to harvest, simply pull out the plants, rinse the clay pebbles, and reuse them. Some growers sterilize the pebbles with boiling water or hydrogen peroxide, but often a good rinse and dry in the sun is enough.
Plastic takeout trays
Recycled takeout trays are one of the most popular containers for microgreens. They are free, food-safe, and stack easily. To prepare, drill or cut holes in one tray for drainage and place it inside a solid tray to catch the water. Fill the top tray with pre-moistened peat moss about three-quarters of an inch deep.
Microgreen seeds are tiny, so spreading them evenly can be tricky. An old spice shaker works well for scattering them across the surface. To improve seed-to-soil contact, place another tray on top with a couple of small weights for the first three days. Keep them in a dark place until they sprout. By day three, remove the cover and put the trays under a light.
In about seven to nine days, the greens reach one to one and a quarter inches tall and are ready to harvest. If watered occasionally, the tray can continue producing for another week, which stretches your harvest without any extra cost.
Old food containers with coconut coir
Shallow food containers, like deli trays or yogurt tubs, can be paired with coconut coir instead of soil. Coir is clean, lightweight, and perfect for short growth cycles. Spread a dense layer of seeds across the surface. Planting thickly supports the stems and creates a uniform canopy, while sparse planting results in thin, weak growth.
Keep the surface moist by misting once or twice a day. Because the seeds sit on top of the coir rather than beneath it, they dry out faster and need regular attention. Within four days, you will see sprouts forming. By day seven to ten, you will have a dense carpet of greens.
Brassicas such as kohlrabi, broccoli, radish, mustard, and arugula do especially well. Pea shoots are another favorite since they are sweet and crunchy. A single tray can produce enough to sell for around five dollars at a local restaurant, showing how cost-effective this method can be even when using recycled containers.
Miscellaneous everyday containers
Almost any shallow food-grade container can be adapted for growing. Frozen dinner trays sometimes come with strainers that fit inside, creating a ready-made watering system. Rubbermaid take-alongs with inserts allow you to cut slits for wicks and grow on pads or soil. KFC bowls, butter tubs, milk jugs cut in half, and even wide coffee jars have all been used successfully.
Wicks are particularly useful with these containers. A simple cotton lamp wick can pull water from a bottom reservoir up into the soil or grow mat, keeping everything evenly moist. Hemp grow pads or even paper towels can serve as a base for seeds. Early on, mist twice a day until roots establish, then water from the bottom.
The benefit of these small containers is flexibility. You can grow a perfect portion to place on the dinner table and harvest directly, avoiding the waste that sometimes comes with larger trays.
Cost and Savings Breakdown
Buying specialized trays can cost between ten and twenty dollars each, which adds up if you want multiple trays in rotation. By reusing what you already have in the kitchen, the container cost is zero. Glass jars picked up at discount stores can cost as little as fifty cents each and will last for years.
The savings are even clearer when you look atthe yield. A recycled food container filled with coco coir can produce a tray of greens in seven to ten days. That tray, if sold, could bring around five dollars. At home, it provides a week’s worth of fresh greens for salads and sandwiches. When combined with free or very cheap containers, the only ongoing expenses are seeds and a small amount of medium or nutrients.
If you maintain a rotation of three or four containers, you can have fresh harvests every week for almost no equipment cost. Over the course of a year, this adds up to significant savings compared to buying microgreens from the store.
Practical Tips for DIY Container Success
To get the best results from DIY containers for microgreens, start with cleanliness. Always rinse and sanitize containers before reuse. With clay pebbles, soak them in water and rub off the old roots, then let them dry in the sun or sterilize them if you prefer.
Cover seeds during germination. A lid, a flipped tray, or a black cover helps keep humidity in and light out for the first few days. Seeds germinate better with consistent moisture, so mist them daily at this stage. Once roots are visible, switch to bottom watering. In jars, maintain half an inch of water at the bottom. In wick systems, check that the wick is wet and drawing water properly.
Light plays a major role in how fast your microgreens grow. A sunny window is fine for small harvests, but if you want fuller trays or to grow into baby greens, invest in basic grow lights. Airflow also matters. A small fan nearby helps prevent mold and keeps stems strong.
Always sow seeds thickly for best results. Dense planting creates support and produces a lush canopy, while thin sowing leads to scattered growth. And remember that seed freshness makes a difference. Old seed lots may have poor germination, as seen in some cabbage trials, while fresh seeds sprout vigorously.
You may notice green growth on the surface in some containers. This is usually algae, not mold, and it does not affect short growth cycles. With proper watering and light, your microgreens will still thrive.
Pros and Cons of DIY Containers
There are clear advantages to using everyday containers for microgreens. They are free or very cheap, they reduce waste by reusing items that might otherwise be thrown out, and they can be customized for small or large harvests. Portion-sized trays make it easy to cut exactly what you need for one meal.
On the other hand, not every container will last through many cycles. Some plastics warp or crack over time. Sizes are not uniform, which makes stacking harder. A few containers require modifications, such as cutting holes or inserting wicks. And while algae may appear in some setups, it is mostly cosmetic and not harmful.
Overall, the benefits outweigh the drawbacks. With a little creativity and regular cleaning, containers for microgreens made from household items can save you money while giving you a steady supply of fresh, nutritious greens.