
Want a DIY microgreens setup at home that is easy, fast, and budget-friendly? This step-by-step guide shows two proven ways to grow greens on a kitchen counter using plain water and everyday containers. One method uses a window screen stretched over a shallow tray so seeds touch moisture without soil.
The other turns a takeout lid into a self-watering planter with a paper towel wick and a thin layer of seed starting mix.
Expect germination in 2 to 3 days when kept warm near 78°F or about 25 to 26°C, light on day 4 or 5, and harvest in 5 to 7 days for radish and mustard and 7 to 10 days for broccoli and kale.
What you will learn and who this is for
You will learn two simple ways to grow microgreens at home with supplies you already have. One uses a small piece of window screen stretched across a shallow container, so seeds rest on a moist surface without soil. The other turns a takeout container into a self-watering tray using a paper towel wick and a thin layer of seed-starting mix. Both approaches rely on plain water at the beginning, and both fit on a kitchen counter.
This guide is for beginners and busy home cooks who want fresh greens in a week. It also suits classrooms because thebuildingss use safe materials and predictable daily checks. Expect clear timing for germination and harvest, along with examples of seed types, including radish, Mammoth Red Rock cabbage, broccoli, and mustard.
Timeline and key numbers
Most seed types begin to sprout in two to three days when kept warm and covered. A comfortable indoor temperature around seventy eight degrees Fahrenheit or about twenty-five to twenty six degrees Celsius supports quick and even starts. Uncover around day four or day five and give bright light from a sunny window or a basic light made for plants.
Fast growers such as radish and mustard are usually ready to clip in about five to seven days from sowing when cotyledons are open and stems feel firm. Brassicas such as broccoli and kale typically take seven to ten days. In both setups, the goal is steady moisture without flooding. The screen method keeps the underside of the mesh wet so every seed touches moisture. The self-watering method keeps the media evenly damp by wicking water up from the base.
Core supplies
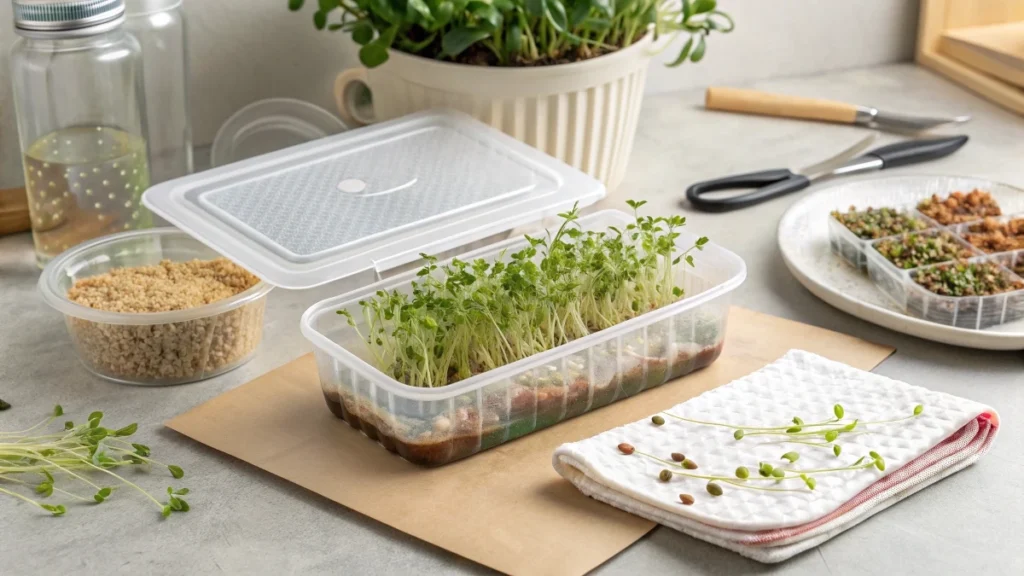
Shallow containers that hold water are the foundation. Reused food tubs and takeout clamshells work well. For the no-soil approach, you need a piece of old window screen cut a little larger than the container opening, along with a rubber band or a hair tie to hold it tight. The screen can be fiberglass or plastic as long as it is clean.
For the self-watering approach, use a lid that can flip over and sit inside the base. Cut two straight slots in the lid. Fold a paper towel into a strip three to four layers thick and slide it through both slots so two to three inches hang below. This wick sits in the water reservoir and pulls moisture upward by capillary action. Add a fine seed starting mix on top of the lid above the wick zone.
Useful extras include a small spray bottle to pre-dampen the surface during setup and a gentle fan to keep air moving after the seedlings are uncovered. A blackout cover helps at the start. A cereal bowl or a lightly moistened sheet of foil set loosely on top works well. Seed choices that match the methods include radish, Mammoth Red Rock cabbage, broccoli mustard, and sunflower for sprouting. Begin with plain water in the base. At the microgreen stage, additional nutrients are not required.
🌿 Recommended Microgreens Supplies |
Method A: No soil screen bridge overview
The mesh acts like a small bridge that stays wet from the water below. Cut the screen so it overlaps the rim a little and secure it so it is taut. Fill the container with water until the underside of the mesh is wet everywhere. The surface should glisten, but seeds should not sit in puddles.
Spread seeds in a single layer across the wet screen. Even spacing matters because every seed needs contact with moisture to begin growth. For the first few days, keep the setup covered and warm. Once sprouts appear, move to bright indirect light. Top up the water as needed so the mesh never dries out. Harvest radish and mustard around one week, and broccoli or cabbage within seven to ten days. Cleanup is easy because there is no growing media to discard.
Method B self-watering takeout overview
The flipped lid becomes a shallow tray that rests inside the base filled with water. Two straight slots in the lid allow a paper towel strip to pass through. Three to four layers of towels create a reliable wick. Leave two to three inches hanging below the lid so the wick stays submerged. Place the lid on the base and watch the towel darken as it absorbs water.
On top of the lid above the wick area, sprinkle a thin, even layer of seed starting mix and break up any clumps. Pre-dampen by letting the wick moisten the surface or by a light mist. Sow seeds evenly across this area and avoid crowding, which can invite mildew. Finish with a very light dusting of mix to help keep the surface clean while moisture rises from below. Cover the tray and keep it warm for the first two or three days. Move to bright light on day four or day five and keep the reservoir filled so the wick never runs dry.
Method A step-by-step
Cut the mesh so it overlaps the rim by a small margin. Secure it tightly with a rubber band or hair tie. Fill the container with water until the underside of the screen is evenly wet. The top of the mesh should be moist but not flooded.
Spread seeds in a single layer. Aim for light and even coverage so each seed touches moisture. Cover the setup to create darkness and place it in a warm spot near normal room temperature. Check once daily during the first two to three days. If the surface looks dry at the start, give a quick mist and replace the cover.
Around day four or day five, remove the cover and move the tray to a bright window or under a basic plant light. Keep the water level steady. The underside of the mesh should always be wet. Begin gentle airflow if you have a small fan. Harvest fast crops like radish and mustard between day five and day seven. Harvest broccoli and cabbage between days seven and ten. Rinse the mesh and container after harvest, and you are ready for the next round.
Method B step by step
Flip the takeout lid so the inner rim faces upward and can rest inside the base. With adult help, if needed, cut two straight slots. Fold a paper towel into a snug strip and slide it through both slots so two to three inches hang below the lid. Set the lid on the base filled with plain water so the wick touches the water at all times.
Sprinkle a thin layer of fine seed starting mix on the lid above the wick zone. Pre-dampen by letting the wick moisten the surface or by a light mist. Sow seeds evenly across the damp surface without heavy piles. Add a very light dusting of the mix on top. Cover loosely with a small bowl or a lightly pressed sheet of damp foil. Keep the setup in a warm place for two or three days.
When seedlings begin to push up, remove the cover and move the tray to a bright location. Keep the base topped up so the wick remains saturated. Provide gentle airflow to discourage mildew. Harvest on the same windows as the mesh method. Compost the thin layer of mix after harvest and rinse the container for the next sowing.
Seven day care schedule you can follow
Days zero to two or three
Set up your chosen method and cover it. Keep it warm around seventy eight degrees Fahrenheit. Peek once daily. If the surface looks dry early on, give a light mist and replace the cover.
Days four to five
Uncover and move to bright light. Keep moisture steady. In the mesh method, the underside of the screen must stay wet. In the wick method, the paper towel should stay saturated, and the media should feel evenly damp rather than soggy. Start gentle airflow near the tray.
Days five to seven and up to day ten
Harvest fast crops such as radish and mustard when cotyledons are open, and stems are sturdy. Allow slower brassicas such as broccoli and kale to continue until about day seven to day ten. Cut just above the mesh or media surface with clean scissors. Refresh water and clean the container so the next batch can start right away.
This schedule balances warmth and darkness early on and strong light later with consistent moisture from below. It lines up with the natural needs of seeds and keeps the routine simple for home and classroom growers.
Moisture control and airflow made simple.
Moisture is the engine of both setups. In the mesh approach, the goal is constant contact between the wet underside of the screen and the seeds. Keep the water level high enough that the mesh stays wet everywhere, but not so high that seeds are sitting in pooled water. If the surface looks glossy with no puddles, you are in the right zone. In the self-watering takeout approach, the paper towel wick should remain visibly saturated so it can feed a thin layer of seed starting mix from below. A wick that has dried to a pale color needs more water in the base.
Airflow keeps the surface fresh once you uncover it. A small fan on a gentle setting moves air across the canopy, which helps the tiny stems dry between light mists and keeps humidity from lingering on the leaves. Start airflow as soon as you remove the blackout cover around day four or five. Keep it far enough away to avoid drying the surface too fast. In a dry room, you can mist once a day on the first day or two after uncovering while the roots dig in. If the canopy feels soggy, cut back on misting and rely on the wick or the wet mesh to supply most of the moisture.
The best moisture balance feels like a well-wrung sponge rather than a wet towel. In the mesh method, that means a screen that is always wet underneath with seeds that look plump and hydrated but not waterlogged. In the wick method, that means media that clumps slightly when pinched but does not release free water.
🌿 Recommended Microgreens Supplies |
Troubleshooting by what you see and smell
White fuzz hugging the root tips often looks alarming, but it is usually just root hairs. These appear right at the base of the stem and vanish as the plant gains size and airflow improves. Leave them be if there is no musty smell.
Gray fuzz with a stale or sour smell points to mold. The most common causes are heavy sowing, low airflow, and surfaces that stay too wet on top. Fix these by thinning your seeding pattern, starting gentle airflow, and keeping only a very light dusting of mix on top in the wick method. In both methods, confirm that water is feeding from below rather than pooling above the seeds. The takeout method helps here since the capillary wick keeps the upper layer moist while the surface can stay a little drier.
Slow or uneven sprouting usually traces back to temperature or early surface dryness. Seeds start fastest near seventy eight degrees Fahrenheit, which is about twenty-five to twenty six degrees Celsius. If the space feels chilly, move the tray to a warmer spot,t such as near a kitchen area that holds steady warmth. During the first two to three days, lift the cover once a day to check. If the top looks dry, give a quick light mist and replace the cover.
If stems grow tall and pale after uncovering, they need stronger light. Move closer to a bright window or place under a basic light designed for plants. Keep the base refilled so the mesh stays wet or the wick stays saturated.
Cost and waste notes for home and classroom
Both setups rely on containers you already have, which keeps costs low and reduces plastic waste. The mesh method uses a small piece of old window screen and a rubber band, which means you buy almost nothing beyond seeds. The takeout method uses three to four layers of paper towel and a very thin layer of seed starting mix. A single small bag can cover many rounds because the layer is shallow and the trays are small.
Water use is modest because both methods deliver moisture right where it is needed. Plain water is all you need for the microgreen stage. That means you are not buying nutrient mixes for this short cycle. Electricity needs are minimal. A small fan on the lowest setting and normal household lighting, or a simple grow light, are enough.
Cleanup is quick. The mesh method has no media to dispose of and simply needs a rinse. The takeout method creates a small amount of used mix that can be composted or added to outdoor soil. For group settings, these steps fit short class periods. Students can set up in one session and check once per day during the blackout window, then switch to light and airflow for the second half of the week.
Choosing the right method for you
Pick the mesh approach if you want the simplest cleanup and do not mind watching the water level closely. The key skill is keeping the mesh wet underneath without letting seeds sit in standing water. This method shines when you want zero media on the stems at harvest, and you can keep an eye on the reservoir.
Pick the self-watering takeout approach if you want a more forgiving moisture buffer. The paper towel wick is always pulling water up from the base, so the surface stays evenly damp. The thin top dusting of mix helps reduce surface issues and gives seeds a fine bed that holds humidity around them. This approach is ideal for first-time growers and for kids since it needs less frequent misting in the early days and fewer adjustments during the week.
Both methods produce similar harvest timing. Radish and mustard tend to be ready in about five to seven days. Broccoli and kale usually finish in about seven to ten days. Choose based on your comfort with water management and cleanup preference.
Optional next step after harvest
Once you are comfortable with weekly greens, you can try a simple water-based container for continued growth. The idea is to let roots hang into a mild nutrient solution while the leaves stay above the water line. A small collar can hold the stem at the lid so roots dangle freely. This is the same principle shown with the sweet potato example, where roots filled the reservoir, and leaves grew above. In that case, the leaves were used as a tender cooking green, which shows the range of edible foliage you can produce with the same root in the solution concept.
Start without nutrients while plants are tiny, then switch to a gentle nutrient solution as roots lengthen and foliage expands. Keep the container filled so roots do not dry out. Provide bright light and some airflow just as you did with microgreens. This step lets you move from quick harvests to ongoing leaf production using the same skills you learned with wicking and moisture control.
Seven day care schedule you can follow
Days zero to two or three
Set up the chosen method and cover it. Keep it warm near seventy eight degrees Fahrenheit. Check once daily and mist lightly only if the top looks dry.
Days four to five
Remove the cover and give strong window light or a simple plant light. Begin gentle airflow so the canopy dries between mists. Maintain water in the base so the mesh stays wet or the wick stays saturated.
Days five to seven and up to day ten
Clip fast crops like radish and mustard when cotyledons are open and stems feel sturdy. Allow slower brassicas such as broccoli and kale to continue to day seven through day ten. Clean the tray and repeat the cycle so you have a steady supply of fresh greens.