
Bring color and crunch to your holiday table with festive microgreens for Christmas salads. These tiny greens are harvested young for concentrated flavor and nutrients, making healthy holiday recipes effortless. Grow microgreens indoors in a sunny window or under a simple clip light.
Most sprout in 3 to 4 days and reach harvest in 7 to 10 days, so you can sow the week before Christmas and serve a fresh salad on the day.
Broccoli microgreens are valued for sulforaphane, while radish, arugula, and pea shoots add peppery bite, zip, and sweet crunch.
Homegrown trays cost pennies compared with store packs and keep well after harvest. Use them to build bright salads, finish soups, top canapés, and garnish sparkling drinks.
Why Microgreens Belong in Holiday Meals
Microgreens bring vibrant color and concentrated nutrition to a holiday menu. They are harvested very young, usually at a few centimeters tall, so flavors are intens,e and textures are tender. Experienced growers highlight two main strengths. First is the health side. Young brassicas such as broccoli can be rich in sulforaphane, and the earliest harvest stage concentrates vitamins, enzymes, and beneficial phytochemicals compared with mature vegetables. Second is the plate appeal. Radish mixes show pink to purple stems under crisp green leaves, red mustards deepen the red tones, and pea shoots add glossy green curls. That natural red and green palette matches seasonal plating without heavy garnishes.
Cost and freshness favor growing a tray at home. Shoppers often find retail packs expensive, while a small indoor tray uses pennies’ worth of seed and a handful of growing mix. You cut right before serving, so the greens stay crisp and aromatic. Timing also fits the season. Seeds typically sprout in about three to four days, and many varieties reach salad readiness in about seven to ten days, which makes it realistic to sow a week before Christmas and harvest in time for the meal.
Flavor and use during the holidays
Microgreens can anchor a salad and finish warm dishes. Home cooks often slide fried or scrambled eggs over a bed of greens for a brunch plate. Pea shoots take well to a quick sauté with garlic for a warm side. For most hot dishes, add the greens after you remove the pan from the heat. This keeps delicate leaves vibrant and helps preserve nutrients.
Nutrition compared with sprouts
Sprouts and microgreens are related but not the same. Sprouts grow only with water and are eaten whole within three to seven days. Microgreens grow in a medium or on a mesh tray, are harvested a little later, between seven and fourteen days, and you eat stems and leaves without the seed and root. Educators note that microgreens tend to be higher in vitamins, minerals, and antioxidants because they grow longer and begin photosynthesis, while sprouts often contain relatively more amino acids, pectins, and sugars. For a Christmas salad, the leafier profile of microgreens is usually the better fit.
Growing Microgreens Indoors During Winter
You can raise salad trays in a kitchen, conservatory, or on a small shelf. A sunny window is enough, and a simple clip light improves uniformity. Trays, coco coir, or a fine seed mix, and a mist bottle cover most needs.
A practical winter timeline
Day zero
Fill a shallow tray with a fine seed starting mix. Many growers prefer a blend of coco coir, worm castings, and vermiculite for fast germination and gentle nutrition. Sow densely to form a carpet. For a standard salad mix tray, about twenty five grams of seed is common, with some growers using up to twenty eight grams.
Days one to three
Mist the surface daily so it does not dry. Cover for even sprouting. One effective method uses a second tray on top with roughly fifteen pounds of weight for about three days. The weight keeps seeds in contact with the medium and improves uniformity.
Days three to four
Flip the cover to form a blackout dome so seedlings stretch. Roots should look bright white and healthy. Begin bottom watering by adding water to the catch tray so the medium wicks moisture from below.
Days four to nine
Move trays into the light. A bright windowsill works, and a small clip light set just above the canopy works even better. Raise the light as leaves develop. If the medium layer is thin, water more often since it dries faster. Some trays take half a cup at a time, checked as often as three times per day when growth is at its peak.
Days nine to ten
Harvest with clean snips just above the medium. One salad mix tray produced about five and a half ouncesont day ten. Store cut greens in a lidded container lined with a paper towel to absorb moisture. Stored this way, they keep well in the refrigerator for about ten days.
Setups that fit a kitchen
Trays and medium
Use a tray with drainage holes nested inside another tray for simple bottom watering. Coco coir is clean and even. A DIY seed mix of coco coir, worm castings, and vermiculite offers both structure and mild nutrition. Small containers also work, from fabric pots to deli tubs, provided you add drainage.
Light
A window is acceptable since harvest is early, even if seedlings become a bit leggy. A clip light placed close to the canopy and raised as the plants grow improves uniformity and color.
Hydro choices
There are two easy approaches. A mesh tray suspended over a reservoir lets roots dip into plain water and is enough to raise classic microgreens to the cotyledon stage. Compact lettuce units are another option. A typical unit contains about four liters of water, a small pump, a fan, built-in lighting, and twelve sponge cradles for seeds. If you add nutrients to a hydro tray to push greens toward baby leaf size, measure with care. Overuse of soluble fertilizer can lead to excess nitrate accumulation in leaves.
Propagator for larger salads
A heated propagator starts lettuce or salad leaves in moist compost. Seedlings are then moved into small pots and placed under grow lights to avoid legginess. This gives a steady flow of larger leaves to combine with microgreens in a Christmas bowl.
Watering and light routines that work
Before sprouting, keep the surface evenly moist with a fine mist. After sprouting, switch to bottom watering so stems stay dry and clean. Only water when the surface turns light brown. Keep a drip tray under the pots to catch excess. For light, keep a clip lamp close in the first days and raise it as leaves develop. If you rely only on a window, do not worry about a slight stretch because harvest comes quickly.
Managing indoor pests safely
Fungus gnats and aphids are common in warm rooms. Place yellow sticky traps near trays to monitor and reduce populations. If you see pests on leaves or the medium, use insecticidal soap labeled for edible crops. Growers report success spraying the soil surface and foliage, and appreciate that it can be used up to the day of harvest. Reapply weekly until the issue resolves.
🌿 Recommended Microgreens Supplies |
Best Microgreens for Christmas Salads
Choose for color, texture, and complementary flavors. The goal is a red and green palette with crisp leaves and a balance of sweet, nutty, and peppery notes.
Red and green contrast
Radish mixes deliver ruby to purple stems with a crisp bite. Red mustards bring warm burgundy tones and a gentle heat that pairs with creamy elements. Pea shoots offer sweet crunch and glossy green curls that look celebratory on the plate. Cress adds clean pepper flavor and bright green leaves. Lettuce baby leaves raised indoors add soft green volume.
Flavor notes and pairing ideas
Arugula microgreens grow quickly and bring a lively spice that lifts citrus dressings and soft cheeses. Broccoli microgreens provide a mild nutty taste that pairs well with lemon and toasted seeds. Radish gives a wasabi-like spark that brightens rich mains. Pea shoots are delicious raw for crunch and also take to a quick garlic sauté. Basil and mint in micro form add fragrance to salads and can cross over as garnishes for seasonal drinks.
Nutrition points to share
These trays are nutrient-dense for their size. Broccoli microgreens are known for high sulforaphane concentration relative to mature broccoli. Educators explain that microgreens tend to deliver more vitamins, minerals, and antioxidants than sprouts because they grow longer and photosynthesize, while sprouts skew toward amino acids, pectins, and sugars. Both have value, yet for a Christmas salad, the leafy nutrient profile of microgreens is ideal.
Creative Christmas Salad Ideas with Microgreens
These ideas use real kitchen methods and timeframes that match a holiday schedule. They highlight color, crunch, and freshness without long prep.
Classic Christmas microgreen salad
Combine radish microgreens, pea shoots, and arugula microgreens. Add halved indoor cherry tomatoes if you have them ripening on a windowsill. Dress at the table with a light pour of olive oil, a squeeze of lemon, and fresh cracked black pepper. The greens supply the character, so keep the dressing simple. Add a pinch of flaky salt and aspoonfuln of toasted sunflower seeds for crunch.
Make ahead note
Harvest on the day of serving for maximum snap. If you must prep earlier, snip and refrigerate in a lidded container lined with a paper towel, then dress right before eating. Stored this way, microgreens keep about ten days, so you can harvest on the twenty-third and serve through Christmas dinner.
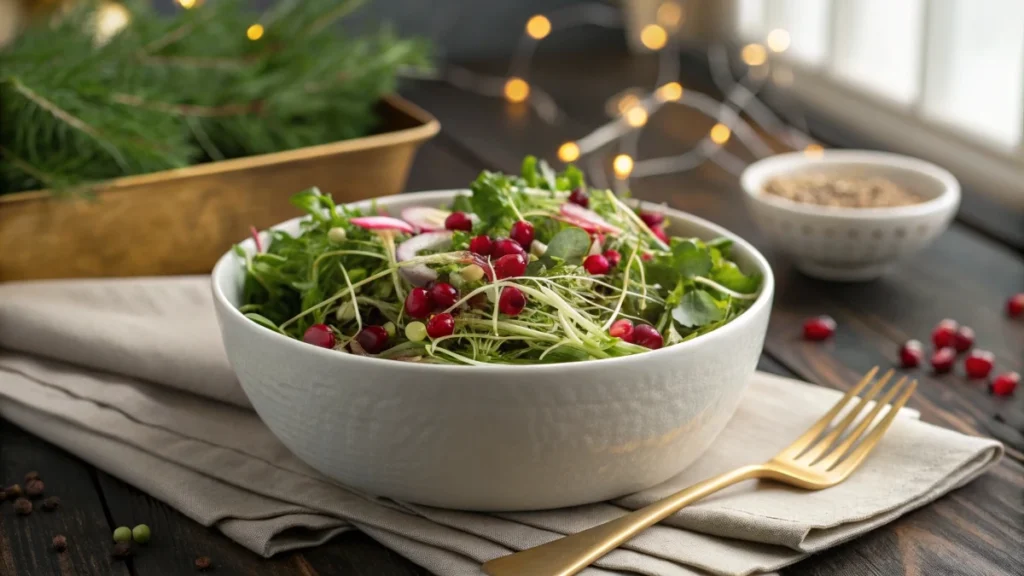
Pomegranate and broccoli microgreen bowl
Toss broccoli microgreens with a handful of cress and a few pea shoots. Scatter pomegranate arils for color and gentle sweetness. Finish with lemon and olive oil and a light grind of pepper. The nutty greens and bright fruit create a lively centerpiece salad.
Warm soup finished with microgreens
Serve roasted carrot soup or a light potato leek and top each bowl with a pinch of radish or arugula microgreens. Add them after the soup is ladled to preserve texture and nutrients. The same finish works for risotto and roasted root vegetables.
Cheese board and canapé accents
Use pea shoots and radish microgreens as edible decor on a cheese or charcuterie board. The color reads festive, and the greens refresh the palate between richer bites. For canapés, top small toasts with soft cheese and a tuft of microgreens for a fast starter.
Holiday drinks with herbal microgreens
Garnish sparkling water with citrus and a sprig of mint microgreens, or finish a light cocktail with basil microgreens. The aroma connects the drinks to agreen-themed menu without tough stems.
Family project timing
Give each child a small pot and a pinch of seed. Sowing takes only a few minutes. Wide varieties sprout in three to four days and are ready in about seven to ten days, which fits perfectly with the week leading into Christmas.
Yield and storage in practice
A salad tray sown with about twenty five to twenty eight grams of seed produced approximately five and a half ounces at harvest on day ten. After cutting, a paper towel in the storage container absorbs moisture and slows spoilage. Expect roughly a week and a half of quality in the refrigerator, which aligns well with a busy holiday week.
Making Microgreens a Holiday Experience
Plan a sow to serve the calendar.
Work backward from your celebration date. Most salad mixes are ready in about 7 to 10 days, with the first sprout signs in about 3 to 4 days. If you want greens for Christmas Eve, sow a dense tray the week before. Keep the surface evenly moist during the first three days, then switch to bottom watering once you see white roots. Move into bright light around day four and harvest on day nine or ten with clean snips.
Family-friendly project
Give each person a small pot and a pinch of seed. Sowing takes only a few minutes, and the quick turnaround keeps everyone engaged. Children see progress by midweek and can help mist the trays daily. You can show the difference between sprouts and microgreens side by side. Sprouts are soaked 6 to 12 hours, then rinsed and drained once or twice daily, and are ready in 3 to 7 days. Microgreens grow in a shallow tray and are cut above the medium in about 7 to 14 days.
Gift ideas that people actually use
Starter sets make meaningful presents in winter. A simple bundle includes seeds, a fine indoor mix based on coco coir with worm castings and vermiculite, shallow trays with and without holes, and a small pair of snips. Sticky traps are useful in winter rooms, and a clip-style grow light is an easy upgrade for darker kitchens. Some ready-made boxes even include two sticky traps and lightweight tools, so a first harvest is straightforward.
Small space setups that fit a kitchen
A nested tray pair makes watering easy. The inner tray has holes and sits inside a tray without holes, so you can water from below. If you prefer hydro, a compact countertop unit with about 4 liters of water and 12 sponge sites raises lettuce indoors with built-in light and gentle circulation. You can also use a mesh microgreen tray that suspends seeds over plain water, so roots dip into a reservoir. For a larger winter salad,s start seedlings in a heated propagator, then move them under a simple lamp to avoid legginess.
Food safety and quality without fuss
Before sprouting, mist daily so the top never dries. After sprouting, switch to bottom watering so stems stay dry and clean. Harvest with clean scissors just above the medium. Store cut greens in a lidded container lined with a paper towel, and you will usually get about 10 days of good quality in the refrigerator. Indoors, fungus gnats and aphids are common. Yellow sticky cards attract the gnats, and insecticidal soap knocks back outbreaks on contact and is labeled for edible crops right up to harvest. If you add soluble nutrients to a hydro tray to grow beyond classic micro size, measure carefully, since leafy greens can accumulate excess nitrates when over-fertilized.
Budget and yield planning for a crowd
A salad tray seeded at about 25 to 28 grams produced roughly 5.5 ounces at day ten in a typical kitchen setup. One or two trays will cover a family meal, and three trays will feed a larger gathering with extra for garnishes. Home trays cost pennies compared with store packs, and you harvest minutes before serving, so flavor and texture stay at their best. Expect thirstier trays to drink about a half cup at a time, and at peak growth,h some growers top up as often as three times in a day.
Key Takeaways
- Microgreens fit the season because they grow fast. Plan for 3 to 4 days to sprout and about 7 to 10 days to harvest for most salad mixes.
- Dense seeding delivers a full tray. Around 25 to 28 grams of a salad blend is a practical target for one standard tray.
- Usa e simple gear. A window works, and a clip light makesthe results more even. A nested tray pair makes bottom watering easy.
- For uniform germination, cover the trays at first. Some growers place a second tray on top with about 15 pounds of weight for roughly three days, then flip it for a short blackout before moving to light.
- Hydro options are kitchen-friendly. A countertop unit with about 4 liters of water and 12 sites raises indoor lettuce. A mesh microgreen tray over plain water is enough for classic cotyledon stage greens.
- Harvest and storage are straightforward. Cut just above the medium and store in a lidded box with a paper towel for about 10 days of quality in the refrigerator.
- Pests are manageable indoors. Yellow sticky cards monitor fungus gnats, and insecticidal soap can be used on edible plants up to the day of harvest.
- Finish hot dishes off the heat. Add microgreens to soups, eggs, rice, or roasted vegetables after cooking to preserve texture and nutrition.
- Know the difference between sprouts and microgreens. Sprouts are soaked, then rinsed and drained daily, and are eaten whole in 3 to 7 days. Microgreens grow in a medium or hydro tray and are cut in 7 to 14 days, with higher vitamin and antioxidant levels relative to sprouts.
- Holiday color and flavor come naturally. Radish mixes provide red and purple stems, pea shoots add bright green curls, red mustards bring a gentle spice, and broccoli microgreens contribute a mild nutty note with meaningful sulforaphane content.
🌿 Recommended Microgreens Supplies |