
Growing microgreens in a greenhouse is one of the most sustainable and profitable ways to produce fresh food year-round. Microgreens are young seedlings of vegetables and herbs that are harvested within one to two weeks, yet they contain up to forty percent more nutrition than their mature counterparts.
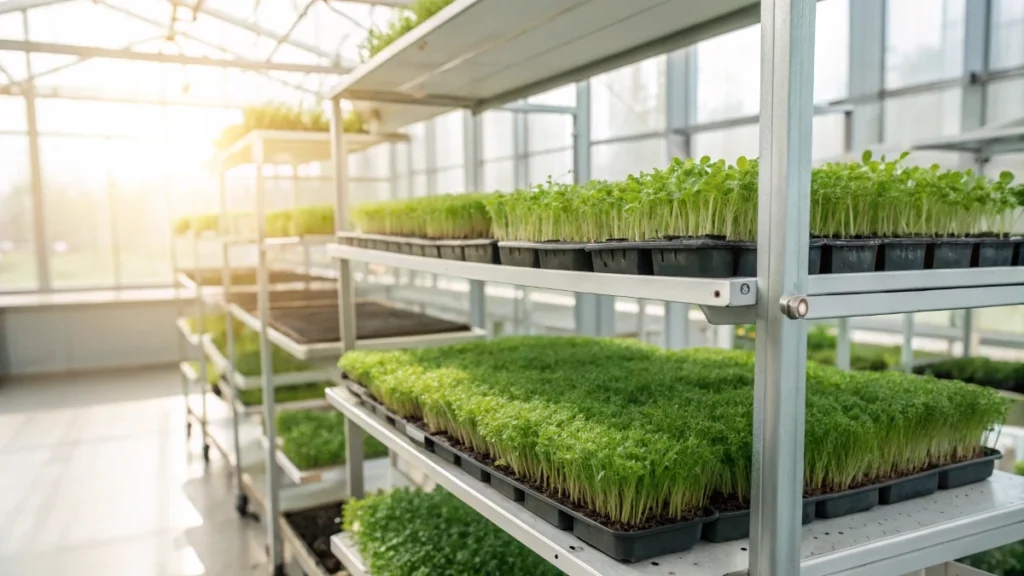
A greenhouse provides the perfect environment to grow these tiny plants with consistent light, humidity, and temperature control.
With efficient systems like drip irrigation and reusable trays, microgreens require very little space and up to ninety-five percent less water than conventional crops. Whether for home use, restaurants, or local markets, greenhouse microgreens offer a reliable source of healthy, flavorful greens even in urban or desert climates.
Why Grow Microgreens in a Greenhouse
Growing in a greenhouse lets you turn sunlight into steady production without paying for lights. It also gives you the space for real workflows like seeding benches, germination racks, wash and pack areas, and even a walk-in cooler. One farm running under two acres reports more than four hundred thousand in annual sales, with most of the production coming from protected structures. Microgreens thrive in this environment because the crop cycle is short and the flow from seeding to harvest can be organized.
There are times when the greenhouse works against you. During rain,n the relative humidity can spike near one hundred percent. Even with circulation fans moving air, plants can stay wet. One grower who runs a separate indoor room with a dehumidifier says this is the main reason they prefer indoor production in wet seasons. Wet canopies are hard to dry and difficult to pack. If your location has frequent rain during your harvest window, consider shifting harvests indoors or using specific drying tactics described later.
Think of the greenhouse as the backbone for scale and flow. Use it when you want weekly volumes, dedicated processing space, and the benefits of sunlight. Avoid relying on it during long humid stretches unless you have a firm plan for moisture control and post harvest drying.
🌿 Recommended Microgreens Supplies |
Greenhouse Types and Core Infrastructure
Structure and insulation
A practical build uses double poly film with a blower that inflates the space between layers. The trapped air acts as insulation and keeps heat loss down. One operation runs a six-kilowatt electric heater that is similar to a garage unit and reports it is enough even through very cold events. Five circulation fans are set to push air in a single direction to create a consistent cyclone pattern through the house. This pattern reduces pockets of stagnant air and helps drying.
Floors and layout flexibility
Poured concrete is easy to sanitize, but it locks your layout. Large pavers provide drainage and let you reconfigure shelving and work tables as your crop plan changes. One grower started with raised beds along a wall and later swapped them for more microgreens bench space after seeing light limitations.
Water and power distribution
A frost-free hydrant supplies water through schedule 40 PVC that tees to several hydrants inside the house and a shutoff outside. Quick couplers make it simple to connect hoses at multiple points. Wastewater from washing is collected and pumped to a drainage pit. Power is panelized with circuits for the heater, fans, lights, and specialized equipment. Lights and outlets on both sides of the structure keep the work efficient.
Cold storage that helps heat
A walk-in cooler next to the pack table shortens steps during packing. In winter, the cooler actually throws a bit of heat into the space,e which helps offset heating needs during work hours. It is a small but useful synergy in a protected house.
Environmental control for microgreens
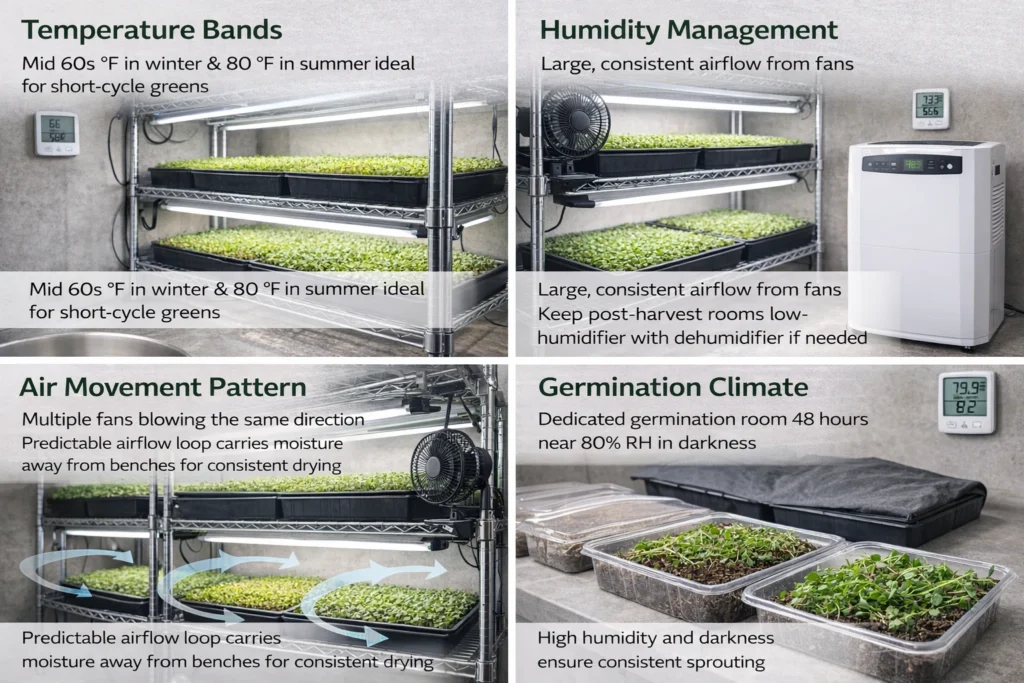
Temperature bands that work
Short-cycle greens do well with moderate air temperatures. A climate-controlled pod kept around the mid-sixties in winter and around eighty in summer grows consistent trays. Chilling irrigation water to about seventy degrees adds another layer of stability. Uniform water temperature keeps roots happier and avoids heat shocks during hot afternoons.
Humidity management
Humidity is the silent yield thief. On rainy days, the greenhouse can sit near saturation,n and fans alone may not dry canopies. Post-harvest rooms often run a dehumidifier around the clock to keep packed product dry. For live crops, use steady airflow from several circulation fans and avoid blocking air with tall piles of equipment. If humidity remains high, adjust harvest timing or move freshly cut product into a cooler sooner and use the hydro cooling step detailed below.
Air movement pattern
Multiple fans all blowingin the same direction create a predictable loop. This loop carries moisture away from benches, keeps temperatures even, and speeds surface drying after irrigation. Consistent airflow is especially important when benches are stacked vertically, and the upper tiers run warmer.
Germination climate
A dedicated germination room at about eighty percent relative humidity in the dark for roughly forty eight hours gives even sprouting. Some growers achieve similar pressure effects with weights on germination stacks in the main house. Both methods are in use. The key is consistent moisture and oxygen access during the first two days before trays go to light.
Production layouts and material flow
Single flow from entry to exit
The most efficient houses run one way. New soil or media enters near the potting bench. Trays are filled, seeded, labeled, and moved to a germination area. After germination, trays go to the grow benches. Harvest happens in place. Spent mats or soil ride the same path to a compost or chicken feed bin. Clean trays come back around to sun dry or go straight into washing and sanitation. This one-way path cuts cross traffic and saves time.
Moving product with minimal labor
A monorail trolley or a set of nursery carts on wheels transforms handling. One setup used a one hundred ten-foot rail with three trolleys and cost about three to four thousand dollars. Each trolley shelf comfortably holds five microgreen flats, compared with a single flat carried by hand. In practice, that is roughly five times the handling efficiency for every move from bench to bench. Another farm plans to replace the rail with multi-shelf nursery racks and a small ramp from the potting area so an entire rack can be rolled straight into the house. The idea is to reduce touches at every step.
Benches and capacity planning
Multi-tier benches expand capacity for spring peaks. One house can stage two hundred twelve flats across its shelving when fully occupied, though routine winter production is closer to one hundred flats per week. Overflow tiers are used only when the nursery starts sharing space with microgreens. Keep aisles wide enough for carts or trolleys and leave room near the cooler and pack table for two people during busy weeks.
Post-harvest in the same building
Bubbler, spinner, drying screen, pack table, scale, printer, and cooler can all fit along one wall. A dehumidifier runs in that zone to keep the finished product dry. The closer these stations sit to each other, the fewer steps you take with wet greens or cut product.
Media, trays, and sanitation standards
Soil mixes and clean mats
Two routes both work. Sifted soil mixes, such as a peat base with perlite and vermiculite, give a familiar feel and are easy to source. Sieving removes large particles and helps give a flat seedbed. Clean plant fiber mats, such as hem,p, avoid grit at harvest, and let you cut very low without soil bits in the product. One operation that uses mats feeds the spent root mat to chickens after harvest, which closes a loop.
Trays built for repeat use
Heavy food safe shallow trays are worth the investment. Some growers drill a small inlet at the top edge for a drip line and add small outlet holes at the opposite end for recapture. Trays are washed and sanitized after every run. A commercial washer speeds this work on busy weeks.
Seed sanitation and water safety
A three percent hydrogen peroxide dip or mist onthe seed before or after seeding reduces contamination risk. It off-gasses quickly and leaves no residue. Irrigation water safety matters too. A tank system with sediment filtration, pH adjustment, and ultraviolet treatment keeps water clean before it reaches trays. These steps support a food safety plan and reduce losses from algae or mold.
Sun dry and cooler dry
Clean trays can be sun-dried in the house before stacking. The finished product benefits from dry air as well. One grower uses a dehumidifier in the pack zone all winter. These small habits protect shelf life and quality.
Seeding methods and densities
Overseeding for a solid canopy
Microgreens are seeded densely compared to field crops. Spread seed evenly across the entire tray so stems form a uniform mat at harvest. Press lightly to ensure contact. If covering with media, use a very thin sprinkle through a colander so seedlings do not lift a heavy layer in one clump.
Practical numbers from working farms
Consistency comes from weighing the seed. A common number for radish is about forty grams per shallow tray. Farms that track yield per tray report typical radish harvests between roughly thirteen and sixteen ounces. Sunflowers often weigh between about eleven and seventeen ounces. Broccoli runs around seven to nine ounces. Peas are around ten to eleven ounces. These bands shift with season, seeding accuracy, and environment, which is why pre-weighing seed helps stabilize results.
Germination choices
Two approaches show good results. Some growers stack trays and place weights on top to mimic soil pressure until the seedlings push up. Others use a dedicated dark room at about eighty percent humidity for forty eight hours with no weights. The shared goal is even moisture and quick emergence. Once the trays lift or the two-day mark hits, uncover and move to light.
Home scale tweaks
At home, fill trays halfway with sifted compost, firm it flat, saturate the media, and mist after sowing. Cling film or a humidity dome keeps moisture in for the first few days. A windowsill can work, but expect leggier growth without strong lights. For a small space,s use a mister or a turkey baster to water so seeds are not displaced. Aim to cut at three to four inches tall, all of which for wide varieties is around two to three weeks in a cool room.
Clean harvest begins at seeding.
Seeding evenly to the edges prevents bald corners and reduces rot pockets. Keeping mats fully wetted before seeding is important. Some teams roll water into dry mats to remove initial hydrophobic behavior so later irrigations soak evenly. These small steps compound into uniform trays and cleaner cuts at harvest.
Irrigation methods and water efficiency
Precision watering systems
Microgreens respond best when irrigation is consistent and precise. A simple but powerful setup is drip irrigation with a line inserted into each tray. Water enters through a small hole near the top and exits through holes at the bottom, where it is collected and reused. This method supplies exactly what the crop needs without leaving pools on the tray surface. Compared with flood tables or hand watering, drip systems keep leaves dry, which limits mold pressure.
Water recycling and efficiency
One farm in the Las Vegas desert measures usage carefully. Each tray receives about two gallons of water during a cycle, but half of that drains and is returned to a holding tank. In practice, the crop consumes roughly one gallon of fresh water per tray. When you compare this with field crops or animal production, the difference is striking. A mature cow drinks thirty to forty gallons a day, while a tray of microgreens grows to harvest with only five gallons over a week. This level of efficiency is one reason vertical greenhouse systems are being promoted in food deserts.
Temperature and quality of water
Feeding plants with water cooled to seventy degrees helps regulate root zone temperature. Water also passes through sediment filters, UV sanitation, and sometimes even an oxygen injection system. These steps not only keep the irrigation safe but also help extendthe shelf life of the harvested greens by reducing exposure to harmful microbes.
Nutrient management in soilless systems
Growing without fertilizers
Most microgreens are harvested so young that they rely primarily on the stored energy inside the seed. For that reason, many farms do not use additional fertilizers. Water alone can be enough to produce healthy trays when the environment is right.
Trace minerals for added nutrition
Some growers enrich their water with fine rock dusts such as azomite, which contains over seventy trace minerals. When dissolved into drip irrigation, these minerals are available in small but useful amounts. Farmers report that this practice improves both nutrition and shelf life. Because the particles are very fine, they do not clog drip emitters.
Food safety and clean practices
Using clean mats or sanitized soil, filtering irrigation water, and applying diluted hydrogen peroxide for seed sterilization all contribute to a safe product. This approach replaces the need for synthetic fertilizers or chemical pesticides, making greenhouse microgreens both sustainable and safe for fresh eating.
Oxygenation and water treatment innovations
The role of oxygen in plant growth
Microgreens grow faster and resist disease when their root zones have access to high oxygen levels. Some farms take this seriously by injecting medical-grade oxygen into irrigation water. Special machines create nano bubbles that stay in solution longer than normal bubbles, keeping dissolved oxygen levels high.
Benefits beyond growth
This practice does more than speed growth. It lowers the risk of algae, mold, and bacterial contamination in the irrigation system. Water remains clear even after repeated recycling, which is unusual compared to typical recapture systems, where tanks often collect debris. As a result, greens stay cleaner and healthier throughout their short growth cycle.
Combining with other water treatments
Alongside oxygenation, many houses also use ultraviolet sanitation and temperature control of irrigation water. Together,r these steps make the water a powerful tool for consistent yields and extended shelf life.
Harvesting techniques and post-harvest handling
Timing of harvest
Different varieties mature at different rates. Radishes can be cut at seven days, while sunflowers, peas, and broccoli often take nine days. Harvesting at the right height gives the best flavor and nutrition. Cutting too early reduces weight, while cutting too late can result in tougher stems.
Hydro cooling before cutting
One method to improve shelf life is to move live trays into a forty-degree cooler for two hours before harvest. The cold encourages the plants to release excess moisture, similar to the natural cooling that happens at night outdoors. Once transpiration slows, the cut greens store far better. This step is rarely practiced in the industry, yet farms that use it report shelf lives of up to two weeks.
Cutting methods
Sharp knives or mechanical harvesters are used depending on volume. Mats allow harvesters to cut very close to the root line without pulling grit into the product. Each tray is cut cleanly, and the spent mats are sent to compost or animal feed.
Packaging and cold chain
Cut greens are packed into four or ten-ounce containers, sealed, and labeled with a two-week sell-by date. Maintaining a cold chain from harvest to delivery is essential. Once packed, greens go straight into a cooler at forty degrees and remain there until they reach the customer.
Storage and shelf life extension
Why microgreens spoil quickly
Because microgreens are harvested young and contain a lot of water, they are prone to spoilage if handled poorly. Condensation in packaging accelerates decay, which is why controlling moisture before and after cutting is so important.
Techniques that extend freshness
Hydro cooling, high oxygen irrigation, trace minerals, and proper cold storage all work together to extend shelf life. Greens treated with these steps can last two full weeks, which is longer than many bagged salads sold in grocery stores.
Real results from working farms
Producers who follow these practices report that their microgreens remain crisp and flavorful even after sitting in the fridge for fourteen days, provided the cold chain is not broken. This long shelf life is valuable for both restaurants and retail customers who may not use the product immediately.
Marketing, distribution, and community engagement
Selling to restaurants and distributors
Many farms choose to work with local distributors rather than handle deliveries themselves. This reduces the burden of running trucks and allows growers to focus on production. Restaurants and juice bars often buy in bulk, receiving regular weekly deliveries.
Reaching residents
Community members can also access fresh greens. Some farms let customers pick up directly from the greenhouse, while others deliver through creative methods like using a rideshare driver. Open hours for tours encourage locals to see the farm, learn about the process, and sample greens.
Building trust and awareness
One of the biggest challenges is simply letting people know the farm exists. In regions where most produce is shipped from far away, consumers may not believe local greens are available. Public tours, free samples, and partnerships with community groups help overcome this skepticism. By showing the cleanliness of the facility and the freshness of the product, farms build a loyal base of customers who appreciate truly local food.
Economic viability of greenhouse microgreens
Profit margins and production scale
Growing microgreens in a greenhouse can be highly profitable because of the quick crop cycle and relatively small footprint. A single flat can return an average net profit of fifteen dollars. When a grower produces one hundred flats each week, that equals about fifteen hundred dollars in profit. Scaling up to two hundred flats doubles the return to three thousand dollars per week. With maximum use of shelving, heating, and double rotations, some facilities have the capacity to reach six hundred flats weekly, which could generate nine thousand dollars in net profit.
Comparison with conventional farming
Traditional crops require months to mature and are vulnerable to pests and weather changes. In contrast, microgreens are ready in one to two weeks and can be harvested year-round in a controlled environment. They also use a fraction of the water compared to livestock or field crops. This rapid turnover and resource efficiency make them financially attractive even in regions with limited farmland.
Market potential and demand
The main limiting factor is not production capacity but the ability of the local market to absorb the volume. Restaurants, juice bars, and health-focused stores are the largest buyers. Retail packaging in four or ten-ounce sizes expands access to households. The balance between what a greenhouse can grow and what the community can consume determines the true earning potential.
Challenges and limitations
Market awareness and acceptance
One of the greatest obstacles is convincing people that local greenhouse farms exist. In cities like Las Vegas, where most produce is shipped in from California, residents are often skeptical of local claims. Farmers must invest time in education and outreach to show customers the freshness and value of microgreens grown nearby.
Operational hurdles
Running a greenhouse for microgreens requires strict management of humidity, temperature, and sanitation. While systems like drip irrigation, UV water treatment, and oxygen injection improve results, they also require investment in equipment and training. Any misstep in seeding density, water timing, or sanitation can lead to poor yields or crop loss.
Distribution and logistics
Handling deliveries can be a burden for small farms. While distributors take on this role, they also reduce the grower’s margin. Some farmers turn to creative solutions such as letting customers pick up directly at the farm or using rideshare services for home deliveries. Each option comes with trade-offs between cost, convenience, and control.
Seasonal and environmental concerns
Even with climate control, outside conditions can influence greenhouse operations. In cold climates, supplemental heating is necessary, while in hot deserts, managing cooling and humidity can be costly. These factors add to operational expenses that must be considered when calculating profitability.