
Growing microgreens in plastic containers is one of the simplest and most rewarding ways to bring fresh, nutrient-rich greens into your home.
These tiny plants pack up to 40 times more vitamins and minerals than their mature counterparts, making them a powerful addition to salads, sandwiches, and smoothies.
With just a few recycled containers, coconut coir, and basic lighting, you can start your own indoor microgreens garden for pennies a tray.
This guide walks you through every step—from choosing the right containers and seeds to harvesting crisp, flavorful greens in just seven days. Whether you’re a beginner or a home chef, growing microgreens at home has never been this easy or affordable.
Why Plastic Containers Are Perfect for Microgreens
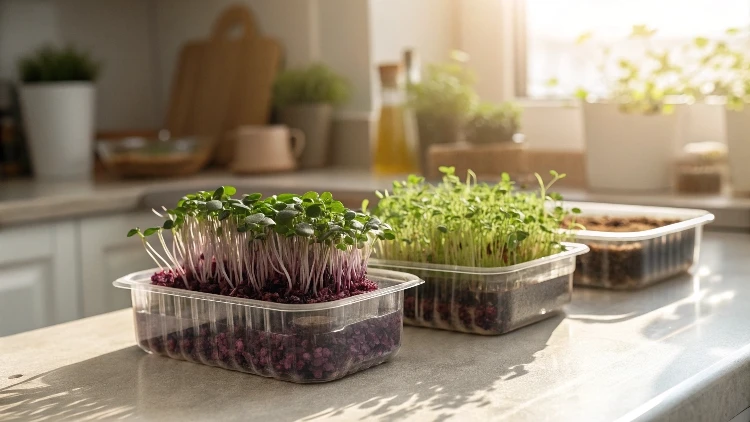
Growing microgreens in plastic containers is one of the easiest and most affordable ways to start indoor gardening. Microgreens have a short growth cycle of 7 to 10 days and shallow roots, so they don’t need deep trays or large pots. Reused plastic food containers provide the ideal shape and size for compact, upright growth.
Because these trays are lightweight, you can easily move them from kitchen counters to shelves under a grow light. They’re also simple to clean and reuse, making them a sustainable choice for year-round indoor growing. When paired with a second tray for bottom watering, plastic containers create a neat, mess-free setup that even beginners can manage.
Real Cost Advantage
Using recycled containers keeps your initial investment close to zero. A small tray of seeds and growing medium often costs around $1, while the harvest can easily be worth $4–$5 in fresh greens. With multiple trays on a shelf, you can create a weekly harvest cycle without extra equipment or high running costs.
What You Need to Start Growing Microgreens at Home
A home microgreens setup requires just a few simple materials — most of which you probably already have.
Essential Supplies
- Plastic containers or food tubs: Two bottoms and one lid make an ideal set.
- Drainage holes: Use a drill or heated skewer to create small holes for airflow and drainage.
- Growing medium: Coconut coir is best for indoor use since it’s clean, lightweight, and nutrient-neutral.
- Seeds: Brassicas like broccoli, mustard, kale, and radish grow quickly. Peas, sunflowers, and beet greens also thrive indoors.
- Lighting: A daylight LED bulb rated 5,000–6,000 Kelvin supports healthy color and strong stems.
- Watering tools: A spray bottle or mister for the first days and a spare tray for bottom watering.
This simple kit is all you need to grow vibrant microgreens in plastic containers — no fertilizers, no complicated systems, and no mess.
🌿 Recommended Microgreens Supplies |
Choosing and Preparing Containers for Microgreens
Short, shallow plastic containers give microgreens exactly what they need — moisture control and steady root support. Before planting, wash your containers with mild soap and rinse well.
Preparing Your Trays
Drill or poke small drainage holes evenly across the bottom. Stack the tray with holes inside a solid one to create a bottom-watering system. During growth, you’ll add water to the lower tray and let the top tray wick moisture upward. This keeps the greens clean and prevents mold.
A loose lid or second perforated tray can act as a humidity dome during germination, helping seeds sprout evenly during the first two to three days.
Best Growing Medium for Plastic Containers
Coconut coir is the top choice for growing microgreens indoors. It’s soft, sterile, and holds moisture without compacting. Since microgreens rely on stored energy in the seed for their short growth phase, coir’s low nutrient profile is perfect.
Hydrate the coir until it feels damp but not dripping — when squeezed, it should clump lightly without releasing water. Smooth the surface flat so seeds make full contact. Avoid heavy compost or fertilizer blends; they can stay too wet and slow germination.
Choosing the Right Seeds and Simple Prep
Seed selection shapes the color, flavor, and growth time of your microgreens. Broccoli, mustard, radish, and kale are popular for their quick growth and mild, peppery taste. Kohlrabi adds striking purple hues that chefs love, while pea shoots offer a sweet crunch.
When to Soak Seeds
Larger seeds like peas or sunflowers should soak for 6–8 hours to ensure uniform germination. Smaller seeds, such as brassicas and arugula, can be planted dry.
Seeding Density
For small trays, use about one-third cup of pea seeds or spread smaller seeds so the surface is fully covered but not piled. Dense planting encourages stems to support each other and produces a thick, upright crop.
🌿 Recommended Microgreens Supplies
These are the tools and supplies I personally recommend for growing healthy and flavorful microgreens at home.
As an Amazon Associate, I earn from qualifying purchases.
How to Sow Microgreens for Dense, Healthy Growth
Spread seeds evenly across the moist coir and gently press them into the surface for good contact. Mist the top thoroughly to settle them. The goal is even moisture and tight spacing, which leads to a full canopy instead of scattered sprouts.
After planting, drain any excess water. During the first three days, mist lightly once or twice a day to keep the top moist. When roots reach through the coir, switch to bottom watering by adding water to the tray below and letting it absorb upward. This technique keeps stems clean and prevents surface mold.
The Blackout and Weight Method — Do You Need It?
A light cover or blackout stage can help seeds germinate evenly, but weights are optional. For larger seeds like peas or sunflowers, a loose lid or second tray keeps moisture and darkness consistent during the first 48–72 hours.
Smaller seeds like broccoli, mustard, or radish grow perfectly fine without any weight. Just maintain humidity through gentle misting and good room temperature. By day two to day four, you’ll see the seedlings lifting the lid slightly — a sign they’re ready for light.
Light and daily care
Strong light keeps microgreens compact with vivid color. Aim for a daylight bulb in the five thousand to six thousand Kelvin range and keep it on for about sixteen hours each day. Place the light close enough that the canopy is bright without heat on the leaves. A simple timer holds the schedule steady so you do not miss cycles.
Moisture needs change throughout the week. In the first two to three days, check the surface morning and evening, and mist if it looks dry. Once roots anchor in the medium, shift to bottom watering by adding a shallow layer of water to the lower tray and letting the top tray wick it upward. Pour off any leftover water so roots do not sit in a bath. Gentle airflow helps the surface dry between waterings and keeps the stand clean.
How to read plant signals
Pale and stretched stems usually need more light or a closer fixture. Dull leaves that slump often need water. A sour smell points to standing water or poor airflow and calls for a reset of your watering routine.
Growth timeline you can rely on
Day zero is sowing on a level bed of moist coconut coir. Mist to settle seeds and cover lightly if you are using a lid.
By day two to day four, a uniform sprout should be visible across the tray. Remove any cover and place under the light for the full daily cycle. Begin bottom watering when the first roots show through the medium.
From day four through day seven, brassicas such as broccoli, mustard, radish, kale, cabbage, collard, and kohlrabi build height and open their first true leaves. Pea shoots track a similar pace and often reach a tender cut near the one-week mark.
By day seven, many trays are ready to harvest. If you want a slightly taller cut, add one or two days while keeping light and moisture steady. Aim for firm stems, bright leaves, and a dry surface.
Readiness cues
Brassicas show cotyledons with the first true leaves just forming. Pea tendrils begin to curl and taste sweet. The tray looks even from edge to edge, which makes harvesting simple.
Harvest and storage
Use clean scissors and cut just above the medium so fibers do not cling to stems. Harvest what you plan to eat that day, and let the rest continue to stand under light. This keeps flavor and texture at their best.
For batch storage, rinse gently if needed, spin or pat dry, and place in a breathable container in the refrigerator. Avoid sealing wet greens in an airtight box since trapped moisture shortens shelf life. Purple kohlrabi brings a striking color to bowls and plates. Pea shoots add a fresh snap to salads, sandwiches, and noodle dishes.
Safety and cleanliness
Wash plastic containers in warm, soapy water before first use and between cycles. Rinse well and allow to dry completely. Keep scissors, misters, and timers clean.
Store seed in a cool, dry place and handle with clean hands. Skim off loose seed hulls that collect in corners since they can hold moisture. Maintain light airflow around trays so surfaces dry between waterings. If a tray develops a persistent off smell, compost the medium, wash the plastic, and start again with fresh seed.
Troubleshooting common issues
Patchy germination often traces back to older seed or uneven moisture in the first days. If you are unsure about seed vigor, test a spoonful in a damp paper towel to confirm sprout rate.
Leggy growth with pale stems points to weak light or a fixture that sits too far away. Increase to a full sixteen-hour cycle and lower the light within a safe distance.
Fine fuzz at the base of stems is commonly root hair during high humidity and not a problem. Spreading gray or white growth on the medium paired with an off smell is mold. Improve airflow, stop misting once roots anchor, and rely on bottom watering.
Slow growth can result from a cool room. Most microgreens prefer comfortable room temperatures.
Soggy medium means the reservoir was overfilled or left standing. Offer water in shorter sessions and pour off the excess after wicking.
Cost, yield, and simple business math
Reusing plastic containers cut tray cost to nearly zero. Dollar store trays usually cost about one dollar and can be washed and reused. Coconut coir is economical when purchased in compressed blocks and expanded at home. Bulk seed reduces cost per tray and gives consistent density.
A dense brassica tray under a steady sixteen-hour light often reaches harvest in about seven days. Hobby sellers commonly price a small clamshell at around five dollars. With a few shelves and staggered sowings, a home grower can supply a weekly harvest for the kitchen and create a modest side income. The short cycle means fast feedback, so you can refine seeding rate, light distance, and timing quickly.
Variations and next steps
Pea shoots respond well to a one-third cup measure of seed per small tray and deliver a sweet, tender cut in roughly a week. Beet greens take a little longer but reward you with color along the veins. Purple kohlrabi offers a vivid accent that restaurants appreciate for plating.
Once a single tray feels routine, add a second and stagger sowing every two to three days to keep a continuous supply. Note your seed measure, room temperature, light distance, and harvest day for each crop. A timer for lights and a calm watering rhythm are usually all that is needed to maintain reliable results in a compact indoor setup.