
Ready to grow microgreens and baby greens in a small space. This guide shows how to build a microgreens tower garden from the reservoir up, choose clean starting methods, and hit reliable harvest timelines.
You will learn two seed starting paths, direct seeding into rockwool and a wicking tray for dense starts, then how to transplant into sites, set a pump on a timer, and keep nutrient solution clean. Practical examples include seed counts per cube and why short crops sit low while taller greens ride high.
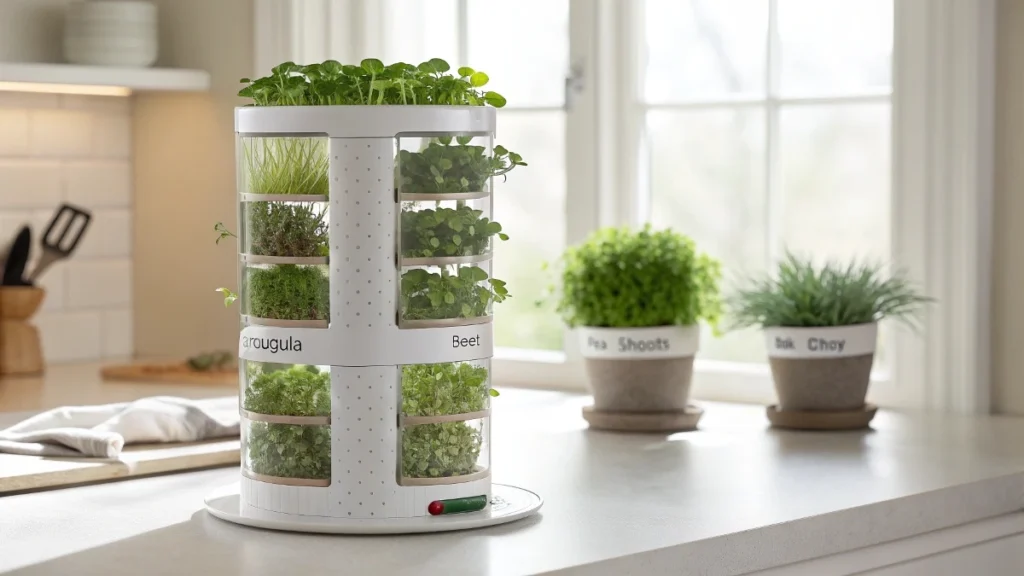
A consumer tower can provide sixteen microgreen sites, and a simple do-it-yourself column follows the same plan. Labeling and light placement tie it all together for reliable, steady yields.
What you are building and why
A microgreens tower garden is a vertical setup that lifts your greens off the counter and stacks them in a compact column with circulating water and nutrients. The goal is steady harvests of tender greens and herbs in a small footprint with clean roots and minimal mess. This format makes it easy to rotate crops and keep a few sites for quick microgreens while other sites hold young leafy vegetables or herbs.
The approach favors simple parts and repeatable steps. Seedlings either start directly in rockwool at the tower sites or they begin in a shallow wicking tray,s so you can select the strongest plants before transplanting. Using labeled sites and a basic log gives you clear timing. In one real example, the water spinach was almost ready to cut roughly two weeks after setup, while bok choy needed about two more weeks. If a few lettuce starts fail, you simply replace the blanks without interrupting the rest of the column.
A tower also protects your pump and plumbing when you start plants the right way. Growing starts in a clean medium or ona paper towel, which wicks leaves very little debris compared with soil plugs, so the circulation stays clear. When the solution ages, a drain line lets you refresh it without breaking down the column. The result is a calm workflow and dependable growth from seed to harvest.
System options and footprint
You can use a ready-made column or build your own. A consumer tower such as the Tower Garden Home provides sixteen dedicated spots that fit rockwool cubes for microgreens and baby greens. The Flex variant expands capacity and height for larger plantings. Both work in bright indoor light or a sunny outdoor corner.
A do-it-yourself column follows the same logic. You want a reservoir that holds the nutrient solution, a submersible pump that sends water to the top, a return path back to the reservoir, and a simple timer to automate wet and dry cycles. A separate drain lets you empty the reservoir when the solution gets old. Place the column where it gets reliable light. Keep taller plants higher and small compact plants lower so everything sees the sun and the big leaves do not shade the short ones.
Plan the footprint with access in mind. You will step in to check labels, lift out a cube, or swap a seedling. Keep the reservoir opening reachable so you can top up and test. Leave a little space for one or two shallow starter trays if you plan to raise seedlings before transplanting.
Bill of materials
Core structure
A tower body with pods or sites for cubes. A reservoir large enough for the column. A submersible pump matched to the column height. Flexible tubing for feed and return. A drain line for easy emptying. A portable timer to run the pump on intervals.
Growing media and small parts
Rockwool cubes that slide into the tower sites. Fine vermiculite for a thin top dressing on seeded cubes. Masking tape and a pen for clear labels with the crop name and the date. A notebook or a simple sheet where you log what you planted and when.
Starting gear two paths
Path A uses only rockwool and vermiculite in the tower. Path B uses shallow takeout containers as self-watering wicking trays. For the trays, you need paper towels folded into wicks, a light seed starting mix with peat or coco and perlite or vermiculite, a spray bottle with clean water, and a clear lid that acts as a humidity cover.
Seeds and crops
For fast greens and mixes, use arugula, pea, and beet along with mild and spicy baby green blends. The mild blend mentioned contains broccoli, kale,e kohlrabi, arugula, and red cabbage, and grows to about seven centimeters tall. For transplanting into the tower, use lettuce, bunching onion, water spinach, bok choy,y and celery.
Water and nutrients
Use a known clean source. Where tap water has chlorine, switch to stored water or a tested mix, so sprouts and roots are not stressed. A pre-mixed nutrient solution with known pH and EC makes early cycles more predictable. If you hold seedlings in trays longer than planned, you can feed at about half strength to carry them an extra week or two.
🌿 Recommended Microgreens Supplies |
Build and set up plumbing and placement.
Assemble the column and seat the reservoir where splashes cannot reach outlets or timers. Fit the pump in the reservoir and connect the feed line to the top of the tower. Connect a return path so water drains back to the reservoir after passing each site. Install a separate drain line or a quick disconnect so you can empty the reservoir without moving the tower.
Set the portable timer to run the pump in regular cycles. Exact intervals vary by environment and crop, but the idea is simple. Wet the media thoroughly, then allow a brief rest so roots can breathe before the next flow. Keep an eye on the first few days and adjust the interval if cubes look too dry or constantly soggy.
Fill the reservoir with your clean nutrient solution. If local water contains chlorine, avoid using it directly. Place the tower where it receives strong light. Put small or shrubby plants low and taller fast growers higher so leaves have room. Make sure each site is easy to reach for labeling and quick swaps.
Before planting, prepare labels with the crop and the date. This little step removes guesswork later and pairs nicely with a log. When you drain and refresh the reservoir,r note the date so you can track how long each batch runs.
Path A: Direct seeding microgreens in rockwool
Prepare cubes so they are evenly moist but not dripping. For pea microgreens, soak the seed for thirty minutes, then sow three to four seeds in each cube. For beet microgreens, sow seven to ten seeds per cube. For arugula, sow ten to fifteen seeds per cube. For a mild baby greens mix that contains broccoli, kale, kohlrabi, arugula, and red cabbage, place fifteen to twenty seeds in each cube. That mix reaches about seven centimeters tall at harvest.
After seeding, press the seed gently into the surface so each seed contacts moisture. Add a very thin layer of vermiculite. Wet the top so the vermiculite settles and starts wicking. Slide each cube into a tower site and place the matching label on or near the site. Record the date in your log.
Keep the reservoir topped up and watch for even moisture across all sites. In the first days, the surface should look damp but not waterlogged. As roots extend, you will see quicker growth. Pea and arugula usually show first, followed by beet. Harvest when leaves and height match your taste. The seed counts above are tuned to make a dense mat without crowding.
Path B: Start dense trays, then transplant using the wicking method.
Build the tray with parts you already have. Take a shallow takeout container and set a lid or an insert inside as a platform. Cut thin slots in the insert. Fold paper towels and thread them through so a tail hangs into the water space below. Aim for about one and a half inches of tail so the wick always touches water. Add clean water to the base, then wet the top surface.
Broadcast seed generously across the moist surface. One example used about two teaspoons of kale, which can be a couple of hundred seeds in a small tray. Cover the seed with a very light layer of seed starting mix. Mist until the surface is evenly damp. Place a clear lid over the tray to hold humidity.
Leave the cover on for three to four days. Once most seeds crack and show tiny stems, remove the cover and give bright light. The paper towel wicks keep the surface moist without heavy watering. Indoors, the reservoir often lasts until transplant time. If the room is hot or you are outside, check the level daily. When you need to hold seedlings longer, add a light feeding at about half strength either to the reservoir or with a gentle top watering. This extends the window by a week or two without pushing the seedlings too hard.
When roots knit into a thin mat and the first true leaves appear, the plants are ready. Lift out small clumps or break off tidy plugs and shake away any loose mix. The roots are clean, and there is very little debris, which protects your tower pump. Guide each clump into a tower site and make sure the roots reach the wet zone so they catch the flow quickly. Label each site and note the transplant date in your log.
This two-path approach gives you flexibility. Direct seeding is simple and fast for microgreens. Tray starting lets you select the strongest seedlings for the tower and keeps the plumbing clean. Both methods fit the same weekly rhythm, and both keep you on track for steady harvests in a compact space.
Transplanting to the tower
When seedlings are ready
Seedlings are ready when roots form a thin mat and the first true leaves appear. In a wicking tray, this usually happens after the cover has been off for several days and the plants have settled under bright light. In rockwool, you will see roots peeking from the sides, and the top growth will look steady rather than fragile.
How to place them in the sites
Lift small clumps from the tray or break off tidy rockwool plugs. Shake away any loose mix, so only clean roots remain. Slide each start into a tower site and guide the roots all the way down until they reach the wet zone. Contact with the flow is what prevents stalls during the first days in the column.
Arrange by plant height.
Put compact plants on the lower rings and taller or faster growers above them. Water spinach and bunching onions are good candidates for the upper rings because they stretch quickly. Bok choy and celery sit well in the middle. Lettuce and other short greens are comfortable lower down, where they avoid shade from large leaves above.
Label and log
Place a clear label at every site and write the transplant date in a simple log. This makes it easy to decide when to harvest and when to refresh a site without guessing.
First two weeks timeline and milestones
Days zero to four
Tray starts remain under a clear cover for three to four days until most seeds crack and push tiny stems. Direct-seeded rockwool cubes rest in their sites and should look evenly moist at the surface. The reservoir runs on the timer, so the cubes are wet and then briefly rest.
Around week one
Cubes show new root tips, and leaf color deepens. In trays, the cover is off, and the light is strong. Indoors, most trays do not need a refill yet because the wicks hold moisture steadily.
Around week two
Fast growers can be close to the first harvest. Water spinach was nearly ready in about two weeks in one example. Bok choy needed about two more weeks to reach a fuller size. It is normal for a few lettuce starts to fail during this window. Replace blanks promptly so the ring fills again and the light footprint is used well.
What to record
Note the date you removed the tray cover. Note the date of the first transplant to the tower. Record the first harvest date for each crop so future cycles are easier to plan.
Routine care and solution management
Refreshing the reservoir
Use the drain line to empty the reservoir when the solution ages. Refill with a clean mix that has a known pH and strength. Where tap water has chlorine, swap to stored or filtered water so roots are not stressed. Regular refresh keeps the taste and texture of greens consistent.
Timer and flow checks
Set the portable timer so the pump runs in steady cycles. Watch the first week to learn how your column behaves. If the cube tops dry too much, shorten the dry window. If they stay glossy and wet, lengthen them. The goal is a cycle that wets the media thoroughly and then lets air reach the roots.
Light and spacing
Rotate sites if a plant is shading a neighbor. Keep tall plants higher and short plants lower to prevent slow patches. Bright light encourages compact growth, so stems stay sturdy.
Records and labels
Keep labels simple with crop name and date. In the log, add seed counts used per cube for quick repeats. For microgreens, that is three to four peas per cube, seven to ten beet seeds per cube, ten to fifteen arugula seeds per cube, and fifteen to twenty seeds per cube for a mild baby greens mix that contains broccoli, kale, kohlrabi, arugula, and red cabbage, which grows to about seven centimeters tall.
Tray care indoors and outdoors
Indoors, a wicking tray often does not need refilling before transplant time. Outdoors, in heat, check daily because evaporation rises. If you need to hold seedlings longer than planned, add a light feeding at about half strength to the reservoir or with a gentle top watering. This carries plants for another week or two without pushing them too hard.
Troubleshooting
Seedling losses or stalls
If a few stars fail, replace them quickly so the ring stays full. Check that the roots in each site reach the wet flow. Confirm the timer is cycling as expected. If local water contains chlorine, switch to a clean source so young roots are not exposed to it.
Risk of pump clogs
Avoid heavy soil on roots. Tray starts growing on paper towel wicks with a light seed starting mix leave very little debris. Rockwool plugs are also clean. This keeps the circulation clear and reduces maintenance.
Leggy seedlings
If seedlings stretch and look pale, remove the cover after three to four days and move them closer to strong light. Air movement helps them stand upright. Aim for evenly moist rather than wet, so stems toughen.
Surface algae or slime in trays
Use only a very thin top dressing of seed starting mix. Keep the reservoir water level below the insert so the seed layer is moist but not submerged. Wipe lids between cycles to keep covers clear.
Moisture balance in cubes
Cube tops should glisten slightly after a cycle and then dry back to damp before the next cycle starts. If the tops stay wet, lengthen the rest window. If they crust or lighten in color, shorten the rest window.
Water quality questions
If growth is inconsistent without an obvious cause, rule out chlorinated water. A pre-mixed solution with a known pH and strength removes guesswork for the early stage and can steady growth across the column.
Example sixteen site planting map
Lower ring
Four sites with short or compact greens. Lettuce and arugula work well here. Use ten to fifteen arugula seeds per cube. If a lettuce start fails, replace it the moment you notice the gap.
Mid ring
Six sites with medium plants. Bok choy and celery fit here and enjoy the space. Keep a couple of sites for a mild baby greens mix at fifteen to twenty seeds per cube for quick harvests around seven centimeters tall.
Upper ring
Six sites with the fastest or tallest plants. Water spinach and bunching onions thrive in these positions. If you want peas for quick cuts, soak for thirty minutes and place three to four peas per cube in a few upper sites where airflow is strong.
Write the crop and the date on every site. In your log, mirror the map with the same site order and add the seed counts you used. This makes it easy to repeat a good run or adjust a single site next cycle without changing the whole column.