
Ready to grow bright, crunchy cabbage microgreens at home or for market? This guide shows you how to grow cabbage microgreens step by step, from seed rate to harvest, with pro tips for strong color and clean flavor.
Learn exact seeding for a ten-by-twenty tray, when to switch from misting to bottom watering, and how to harvest at one to one and a half inches for peak taste.
We cover Golden Acre, red cabbage, and white cabbage varieties, plus yields, storage, and shelf life. You will also find nutrition benefits that buyers value and recipes that sell. Start here to grow reliable, high-quality cabbage microgreens every week.
Why Grow Cabbage Microgreens
Cabbage microgreens offer one of the best combinations of ease, speed, nutrition, and profitability in the indoor gardening world. They grow evenly, tolerate denser seeding, and stay strong under moderate light. Growers appreciate how well they respond to simple care routines — even plain water can produce flavorful harvests.
From a practical standpoint, cabbage microgreens are also highly profitable. A single tray costs roughly $2 to $3 in seeds and medium but can return $25 to $30 in sales. This makes them a dependable option for home growers looking to supply local markets, restaurants, or subscription boxes.
Nutritional Strength
Red cabbage microgreens, in particular, are rich in anthocyanins, natural pigments linked to antioxidant and anti-inflammatory activity. They also contain high levels of vitamin C, vitamin K, and glucosinolates, compounds associated with supporting heart and immune health. Studies on Brassica sprouts show they can hold up to 40 times more nutrients than their mature versions.
Market Appeal
Chefs love cabbage microgreens for their visual contrast and shelf stability. The thick stems keep their structure after rinsing, and the glossy leaves resist wilting, which gives them a longer plate life than delicate greens like amaranth or basil microgreens.
Supplies You Will Need
Growing cabbage microgreens requires only basic tools. You’ll need:
- Two trays — one with drainage holes and one without.
- Coco coir or a coco-based compost for a clean, consistent growing medium.
- A spray bottle for misting seeds during germination.
- A bottom-watering setup to keep foliage dry once roots form.
- Weights such as a small brick (7–15 lbs) to press seeds into the medium during early germination.
- Grow lights (T5 or LED) placed close to the canopy for strong, even growth.
- Fans for gentle airflow that prevents mold.
Coco coir is particularly popular because it’s sterile, lightweight, and easy to hydrate. It lets you control exactly what goes into the crop, keeping your microgreens chemical-free.
🌿 Recommended Microgreens Supplies |
Preparing Your Work Area
Fill the tray with about one inch of moist coir and level the surface evenly, pressing down lightly to avoid air gaps. Smooth corners and edges so seeds don’t slip underneath. Label each tray with the crop name and sowing date using a dry-erase marker for easy tracking.
Step-by-Step Growing Guide
Step 1 – Prepare and Seed
After spreading the moist coir evenly, sprinkle 20–25 grams of cabbage seeds across the surface. The key is even coverage — crowded seeds will block airflow and slow growth. Mist thoroughly until the surface glistens. Cover the tray with another one and add your weight. This ensures firm contact between seed and medium, promoting even germination.
Step 2 – Weighted Germination (Days 1–3)
Keep trays in a dark, stable environment between 68°F and 75°F. Mist lightly once or twice daily to maintain surface moisture. As roots appear, check the bottom of the tray for white root tips. If roots begin poking through, add a small amount of water to the bottom tray to help the roots draw moisture without soaking the medium.
Step 3 – Blackout Phase (Days 4–5)
Once most seeds have germinated, remove the weight and flip the top tray to create a blackout dome. This encourages the stems to stretch upward. Keep the tray dark and humid, watering lightly from below to prevent drying. By the end of this phase, seedlings should be about an inch tall, pale yellow, and ready for light.
Step 4 – Light Phase (Days 6–10)
Move trays under grow lights for 12–16 hours daily. The pale stems will turn rich green or purple within 24 hours. Begin bottom watering using about ½ to 1 cup of water per tray daily, increasing to 1½–2 cups as the plants mature. Keep leaves dry to prevent disease. Gently brush your hand across the canopy once a day to remove seed hulls and encourage upright growth.
Step 5 – Harvest (Days 10–13)
When the microgreens reach 1 to 1.5 inches tall and cotyledons are fully open, they’re ready for harvest. Cut cleanly above the medium with a sharp knife or scissors. Harvest dry — watering beforehand can shorten shelf life. If the microgreens feel firm and slightly glossy, they’re at peak freshness.
Watering and Nutrients
Cabbage microgreens grow well with just filtered water, but nutrient testing shows that a light feeding can significantly improve yield. For instance:
- Plain water produced 255 g per tray.
- MaxiGro nutrient mix yielded 299 g.
- Master Blend reached 323 g.
- Ocean Solution (2-0-3) topped the list with 331 g per tray — about 30% higher yield.
The Ocean Solution formula gives a lush canopy with consistent growth and mild taste. Master Blend produces slightly deeper green leaves, while MaxiGro enhances purple pigmentation in red varieties. Water-only trays deliver stronger flavor, but yields are lower.
Best Practices
- Start nutrient feeding only after moving trays under the light.
- Bottom water every one to two days based on medium moisture.
- Keep roots bright white — dark or mushy roots mean overwatering.
- Stop watering 12 hours before harvest to dry the crop naturally.
This balanced approach keeps microgreens crisp, flavorful, and long-lasting, whether you grow for home use or commercial sale.
Ideal Conditions for Growth
Cabbage microgreens thrive in moderate warmth and gentle airflow. The optimal room temperature is 20–24°C (68–75°F), with humidity between 45–55%. Use lights placed close to the canopy to keep stems sturdy and leaves vibrant. Gentle fans keep air moving, reducing mold risk and helping the foliage dry after watering.
Pre-Harvest Drying and Storage
On the day before harvest, ensure good airflow and limit watering to promote drier leaves. After cutting, store microgreens in sealed containers at 3°C (38°F). When harvested dry, cabbage microgreens stay fresh for 7 to 10 days without losing their color or crispness.
Varieties of Cabbage Microgreens
Golden Acre
Golden Acre grows with thick, pale green stems and glossy cotyledons that look clean in retail packs. A standard ten-by-twenty tray seeded at about twenty grams regularly reaches around three hundred grams at harvest. One grower priced two-ounce cups at six dollars and routinely filled five cups from a single tray. Flavor is fresh and mild with less of the mature cabbage note, which helps with customer acceptance.
Stems feel sturdy, and leaves have a subtle waxy sheen that holds up during transport and plating. It responds well to a simple schedule of three days under weight, two days under a blackout dome, then light to finish. Keep the canopy dry on the final day with gentle fan airflow for longer storage.
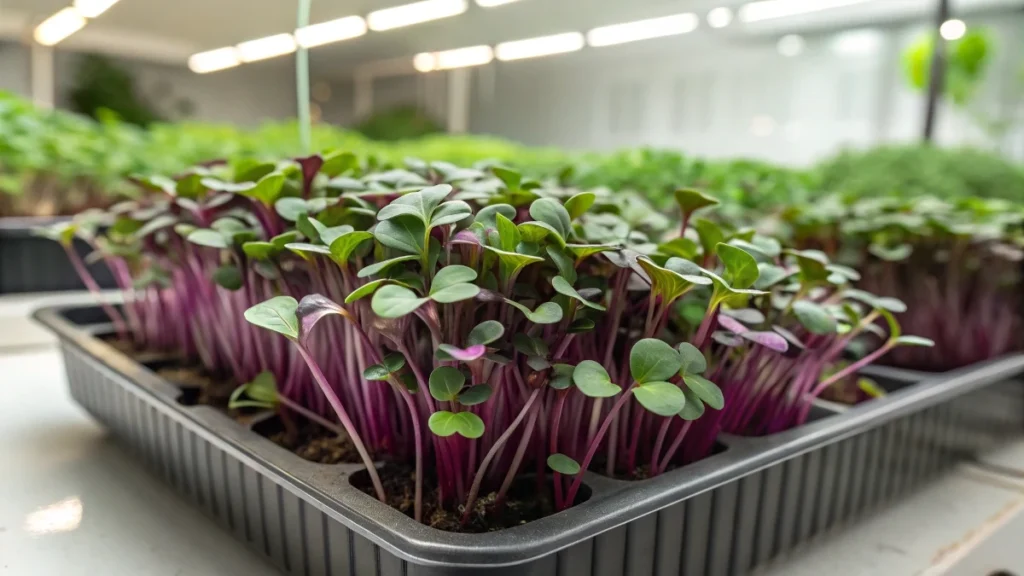
Red Acre
Red Acre is prized for its purple stems and green to purple cotyledons. It tolerates a slightly denser sow than broccoli, so you can stay in the twenty-gram range on a ten-by-twenty without crowding if the spread is even. A documented tray with twenty-one grams produced two hundred eighty-seven grams at harvest. Chefs prefer this crop before true leaves open at about one to one and a half inches tall. Keep foliage dry by bottom watering once the tray goes under lights. A gentle hand sweep across the canopy knocks off any hulls and improves presentation.
Mammoth Red Rock
Mammoth Red Rock shows rich purple veining that travels into the cotyledons, which makes it eye-catching on plates. For a small mesh sprouting tray, plan three cups of coco and about ten grams of seed, with an observed yield near eighty-four grams when harvested as true leaves just begin to show. This variety stretches nicely under a blackout dome, then colors up fast under light. A light hydrogen peroxide mist at sowing can help keep the medium surface clean in rooms that struggle with damping off.
White Cabbage types
White or pale green cabbage types behave like Golden Acre in structure, with light stems and soft green cotyledons. Expect a mild taste that works well in slaws and sandwich mixes. The same seeding and timeline used for Golden Acre applies here. Color contrast is lower than red types, so they shine in blends with radish or a touch of red cabbage for visual balance.
Yield, Packaging, and Profit Snapshot
A consistent ten-by-twenty workflow with twenty to twenty-five grams of seed produces roughly two hundred eighty to three hundred thirty grams per tray. On Golden Acre, several runs reached around three hundred grams, which translated into five retail containers at fifty-six grams each. At six dollars per container, that is about thirty dollars in sales from one tray. Direct costs for coco and seed commonly land near two to three dollars per tray before packaging. Trays that received a light nutrient during the light phase pushed toward the top of the yield range, while water-only runs sat lower but carried a more assertive flavor.
Pack directly into labeled cups as you harvest to save time. Weigh each cup to a target of fifty-six grams and avoid overfilling to maintain consistency. Harvest dry, seal promptly, and chill. Labels that note crop name and date help avoid mix-ups among similar brassicas.
Harvesting and Storage Tips
Cut high above the medium with a sharp knife so the coco does not ride into the product. If a little coriander appears, pick it off immediately so you do not need to wash the greens. On the day before harvest, keep fans running gently across the racks. On the morning of harvest, skip watering so leaves are bone dry. Fill and seal cups right at the bench to minimize handling. Store at about three degrees Celsius in airtight containers. When harvested dry and packed cold, cabbage microgreens hold for seven to ten days with color and texture intact.
After harvest, lift the root mat and look at the underside. Clean white roots indicate good water and air balance. Brown patches can hint at overwatering or poor airflow earlier in the cycle. This simple check helps you adjust watering on the next run.
Nutritional and Health Benefits
Red cabbage microgreens bring anthocyanins that give the purple tone and provide antioxidant activity. All cabbage microgreens supply vitamin C along with the characteristic glucosinolates of brassicas. In flavor tests across different feed plans, water-only trays showed the boldest classic brassica note, while trays fed lightly during the light phase tasted milder with a small pepper lift. That means you can tune your harvest toward a stronger flavor for home kitchens or toward a mild, approachable flavor for broader retail appeal.
Because these greens are cut young, the texture is tender, and the taste is clean. This stage pairs well with seafood, tacos, and grain bowls, where a fresh finish matters more than the deep-cooked flavor of mature cabbage.
Creative Ways to Use Cabbage Microgreens
Home cooking ideas
Layer a handful over grilled fish or shrimp tacos for color and crunch. Toss into a quick lemon and olive oil slaw for sandwiches. Add to a warm grain bowl with quinoa, avocado, and toasted seeds. Stir into a simple soup at the table so the greens keep their snap.
Chef notes
Harvest shorter before true leaves for tight cotyledons and uniform stems. Red types bring instant contrast to pale dishes like risotto or seared white fish. Golden Acre and white types add body to microgreen mixes without overpowering the plate. Combine with radish microgreens for a little heat and a deeper color story.
Recipes You Can Make Tonight
Bright Red Cabbage Microgreen Slaw
Combine two cups of red cabbage microgreens with thinly sliced cucumber and a spoonful of chopped dill. Whisk lemon juice with a little honey, olive oil, sea salt, and cracked pepper. Toss just before serving so the greens stay crisp. Works well on fish tacos or alongside grilled chicken.
Sausage buns with sauerkraut and cabbage microgreens
Butter brioche buns and toast until golden. Add mustard, a grilled sausage, a spoonful of sauerkraut, diced onion, and diced orange bell pepper. Crown with a full handful of cabbage microgreens. The fresh bite balances the richness and keeps the build light.
Five-minute power bowl
Fill a bowl with cooked quinoa, sliced avocado, roasted chickpeas, and a mound of cabbage microgreens. Dress with a quick vinaigrette of lime juice, sesame oil, soy or tamari, and a pinch of ginger. Sprinkle toasted sesame seeds on top. The greens bring crunch and a clean brassica note without bitterness.
Troubleshooting and Quality Control
Hair-like root fuzz is normal root hair and not mold. True mold looks webby and forms on the medium surface with an off smell. If you see short seedlings hidden under the canopy, reduce the seed rate slightly on the next run. One grower solved late bloomers by dropping from twenty-one grams to around seventeen to twenty grams on a ten-by-twenty.
If one end of the tray dries faster than the other, level the rack or tilt the tray while you pour so the drier side gets a bit more. Keep roots white by maintaining steady moisture during blackout and switching promptly to bottom watering once the tray moves under light. In rooms prone to surface issues, a very light hydrogen peroxide mist at sowing helps keep the top layer clean.
If flavor leans bitter, harvest a day earlier and aim for the window just as true leaves begin to appear. If the color looks pale, bring the lights a little closer and extend the light duration to twelve to sixteen hours. Keep airflow gentle but constant so the canopy dries quickly after each watering.