
Growing food at home has become more than a hobby; it is a way to connect with fresh nutrition every day. Among the many greens you can grow indoors, chickpea microgreens stand out for their simplicity, speed, and versatility.
These tender shoots sprout within a week, reaching harvest size in less than two, and they can be cultivated in small trays on a kitchen counter or windowsill. Packed with iron, calcium, protein, and antioxidants, they provide a nutrient lift that is far greater than their size suggests.
Whether enjoyed raw in a crisp salad, stirred quickly with spices, or blended into chutneys, chickpea microgreens bring both health and flavor to the table. With just a handful of pantry seeds and a little care, anyone can enjoy homegrown super-fresh greens throughout the year.
Why Chickpea Microgreens
Chickpea greens bring together three qualities that home growers love. They are quick to start, they fit easily into small indoor spaces, and they give you a tender harvest that slips into everyday meals without fuss. In several home trials, the first tiny shoots appeared around day three or day four after sowing. By about two weeks,s the greens reached roughly the height of a hand and in one account were close to five inches tall. You can cut them young for salads and stir-fry, es or let the plants continue and set fresh green chickpeas later in the season.
Cooks appreciate how flexible they are. The greens work as a fresh element in salads and bowls, and they hold up in warm dishes like curries and quistir-friesies with mustard greens or spinach. Growers also like that they start from common pantry seeds. Black chickpeas and white chickpeas both sprout well, and green chickpeas have shown especially lively growth in side-by-side trays.
On the nutrition front, the shared experiences point to rich levels of vitamins and minerals, with repeated mentions of iron and calcium. When paired with whole cooked chickpeas in a salad, the meal becomes naturally high in protein and fiber,r which helps with fullness and supports weight management goals.
Types of Chickpeas and Seed Choices
You have three main choices for chickpea greens, along with a close cousin often grown in the same trays.
Black chickpeas, also called kala chana, are easy to find and sprout reliably. Several growers used black chickpeas for full trays of greens and were happy with the result. White chickpeas, also called kabuli chana, behave similarly and are a fine choice when that is what you have in the kitchen. Green chickpea,s also called hara cha, stood out in repeated side-by-side comparisons. In three identical runs, the green chickpeas had the best performance among the chickpea types with stronger growth and more even stands.
Green peas were grown in the same experiments as a reference crop. They repeatedly showed the best overall vigor and tenderness under the same conditions. That does not make chickpea greens a poor choice. It simply sets expectations. If your goal is the tallest and most uniform shoots in the shortest time, the green peas tend to win. If you want the nuttier flavor of chickpea greens and the option to let some plants mature later than black, white, or green chickpeas are perfect.
All of these seeds can come straight from the grocery shelf. They are regular dry pantry legumes. Rinse to remove any dust, then soak for twelve to twenty-four hours. After soaking, the seeds swell to nearly double in size and sprout more consistently.
Step-by-Step Guide to Growing Chickpea Microgreens
Preparation
Select black, white, or green chickpeas. Rinse well to remove impurities. Soak the seeds for twelve to twenty-four hours. Soaking shortens the time to germination and gives a more even start. Some growers skip soaking and sow dry seeds directly on the medium. Both routes work. Soaking simply shifts more of the action into the first few days. After soaking the drain thoroughly before sowing.
Growing medium and containers
Two media showed up repeatedly. One is a soil style blend that combines cocopeat compost, a small amount of chicken manure,e and perlite for air space. The other is pure coconut coir. Coir is clean and holds water extremely well, which is why many people like it for greens. Remember that coir by itself does not provide nutrients. For short harvest windows, that is not a problem. If you plan to keep plants longer,r include compost in the mix.
Use shallow trays that nest together. The upper tray needs drainage holes. The lower tray holds water. Standarten-by-twenty trays are common, and smaller ten-by-ten trays work too. Press the growing medium to a level layer about one inch deep. A small block of wood helps firm the surface without compacting it too much.
Sowing and covering
Spread the chickpeas densely across the surface. You can scatter or set loose rows. Give the bed a thorough first watering so the moisture lasts through the first three days. Cover the seeds with about one inch of medium. This depth matters. As the seeds imbibe water, they expand and can lift themselves out of shallow coverings. Several growers saw seeds pop up and fixed it by adding more medium. Starting with a full inch prevents that problem.
Set an empty tray on top with the flat side facing down and add a weight such as a small paver. The weight keeps the surface firm while roots anchor and encourages sturdy upright shoots.
Watering and lighting
For the first three days,s keep the trays in the dark with the weight in place. The top watering from sowing should carry the bed through this stage. After day thr, we remove the weight. Flip the empty tray and place it as a loose lid for another three days of blackout. During and after the day th, three begin watering by filling the lower tray each day. This bottom watering keeps foliage clean and reduces mess at harvest. Some people add a mild liquid nutrient every other day when using coir, since coir on its own does not feed plants.
After the blackout, move the trays to light. A bright window, especially on the southern side,e works well. Simple LED shop lights placed close above the canopy are another reliable option. Continue to water the lower tray as needed so the medium stays evenly moist.
🌿 Recommended Microgreens Supplies |
Timeline you can follow
Day zero sow and wait, er then cover with one inch of medium and add weight.
Days one to three keep in the dark with weight on.
Day f: our removal of the weight. Keep a loose lid for blackout and start daily bottom watering.
Day seven, remove the lid and keep under bright light.
Days three to four first sprouts become visible.
Around day seven, the shoots are tender and ready if you like baby greens.
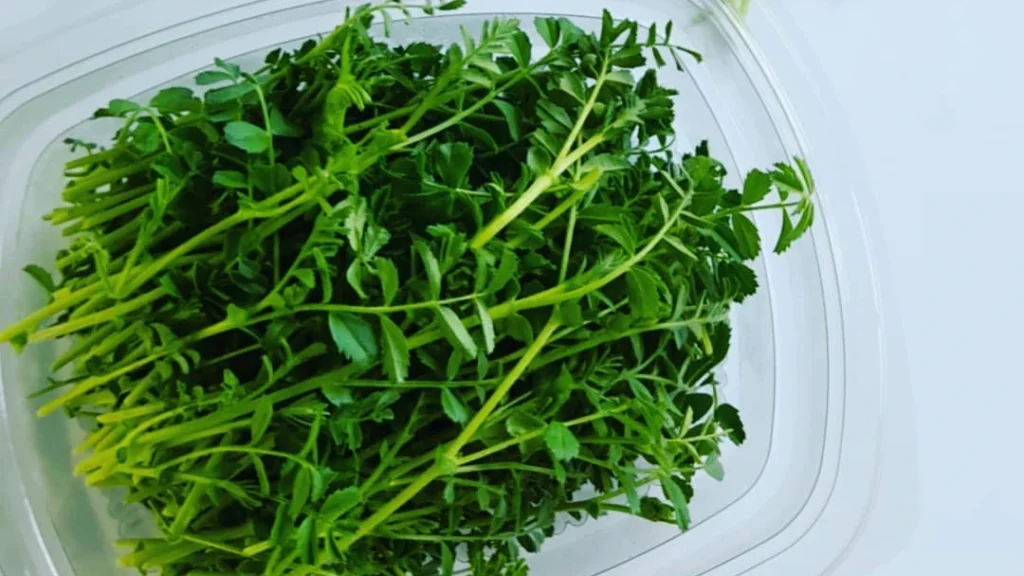
Around day fourteen, the stand reaches about a hand tall and makes a full harvest.
Harvesting and Storage
Harvest with a clean, sharp knife or scissors. Cut just above the medium so you avoid bringing fibers to the kitchen. Rinse the greens in fresh drinking water before using them. Many home growers prefer to harvest right before the meal, which gives the best texture and flavor. If you cut a full tray at once,e pat the greens dry carefully.
Keep the growing area tidy. Since the mediaare organicn, ic they can go straight to the compost bin after harvest. The plastic trays wash up easily and are ready for the next round. These small habits reduce waste and keep your setup ready for continuous cycles.
Health Benefits of Chickpea Microgreens
Home growers consistently describe these greens as richly nutritious. They point to a broad spread of vitamins and minerals with special attention to iron and calcium. The flavor is clean and slightly nutty, which makes it easy to add generous amounts to meals.
When you combine the greens with cooked chickpeas, as in the simple dinner salad,d the plate brings together protein from the whole chickpeas and a strong fiber content along with the fresh leafy elements. The salad method is straightforward. Soak whole chickpeas overnight. Pressure cook them for about fifteen to twenty minutes with a little salt. Toss with onion, cherry tomato,s fresh coriander, and a handful of greens. A dressing of cold-pressed olive oil, lemon juice,ce fresh black pepper, grated amla or a small amount of amla powder, garlic, garlic roasted cum, in sea salt, black salt, a splash of water, and apple cider vinegar makes the bowl bright and satisfying. People highlight the natural fullness from the protein and fiber, and the lively taste you get from mustard greens and other microgreens in the mix.
Cooks also drop the greens into quick stir-fries with spinach or mustard greens. Others blend a fresh mix with coriander, chili, and lemon for a simple chutney. In every case, the idea is the same. Use a generous handful of the fresh cut green,s so you get the vitamins, ns minerals, and antioxidant activity that are repeatedly cited by home growers. Several voices also connect these greens with everyday wellness, especially digestion and immunity. Wash the greens before eating as a basic kitchen precaution and enjoy them fresh for the best result.
Easy Recipes with Chickpea Microgreens
One of the most enjoyable aspects of growing chickpea microgreens at home is how versatile they are in the kitchen. They carry a mild nutty taste that blends well with familiar ingredients and can be used raw or cooked lightly. These recipes illustrate different ways you can use your harvest.
Chickpea Microgreen Salad for Weight Management
A light salad made with chickpeas and microgreens can be a complete meal. The process begins by soaking chickpeas overnight and boiling them until tender. Once cooled, they are combined with finely chopped onions, halved cherry tomatoes, fresh coriander leaves, and a few spoonfuls of sprouted mung dal flakes. The mung flakes provide crunch and additional protein. The salad becomes even more powerful with the addition of mustard microgreens or any chickpea microgreens freshly cut from your tray.
The dressing deserves equal attention. A small jar is used to shake together cold-pressed olive oil, the juice of a lemon, freshly ground black pepper, grated garlic, roasted cumin powder, sea salt, black salt, and a splash of water. One grated amla or a small amount of amla powder brings an extra layer of vitamin C, and a teaspoon of apple cider vinegar with the mother helps digestion. When poured over the mix of chickpeas, vegetables, and microgreens, the result is a refreshing dinner bowl that is filling without being heavy. People often note that this salad keeps hunger away for several hours because of its high protein and fiber content.
Stir-Fried Microgreens with Seasonal Greens
A second way to enjoy chickpea microgreens is to treat them as you would spinach or mustard greens. A warm pan with a touch of oil and cumin seed makes the base. Into this go chickpea microgreens along with another green, such as spinach or mustard leaves. A quick toss with a sprinkle of salt and chili creates a side dish that can be eaten with rice or flatbread. Because the greens are tender, they need only a few minutes of heat. Cooking them lightly keeps the flavor delicate and preserves much of the vitamin content.
Fresh Chutney or Dip
For a brighter, raw preparation, chickpea microgreens can be blended with coriander leaves, green chilies, garlic, and lemon juice. This creates a simple chutney that pairs with snacks or everyday meals. The microgreens add a distinctive earthy flavor and enhance the nutrient profile of the chutney. A small bowl of this preparation can elevate a plain meal by adding freshness and a burst of micronutrients.
Smoothie Boost
For those who prefer a modern approach, a handful of chickpea microgreens can be addedtoo a morning smoothie. Combined with fruits like apples ormangoeso, the microgreens provide antioxidants without overpowering the flavor. This is an easy way to slip them into daily life, especially for people who are not accustomed to eating greens at every meal.
The common thread in these recipes is that chickpea microgreens are adaptable. Whether raw in a salad, lightly cooked in a stir fry, blended into a chutney, or slipped into a smoothie, they deliver both taste and nutritional benefits without requiring complicated preparation.
Tips, Precautions, and Sustainability
When growing and eating chickpea microgreens at home, a few thoughtful habits ensure safety and sustainability.
The first principle is cleanliness. Seeds should be washed thoroughly before soaking to remove dust and impurities. Trays and containers must be food safe and washed between uses to avoid any buildup of bacteria. Watering should be done carefully. During the early days, moisture is important, but standing water left in trays for too long can encourage mold. Bottom watering, where water is added to the lower tray and absorbed upward, helps keep the surface clean and the stems dry.
Harvesting requires a sharp, clean knife or scissors. Cutting close to the medium prevents pulling up soil or fibers. Once harvested, the greens should be rinsed gently in fresh water before serving. This step is simple but ensures that any remaining particles are removed. While they can be stored in the refrigerator for a short period, the best flavor and texture are enjoyed when they are eaten the same day they are cut.
From a sustainability point of view, the growing media can be reused thoughtfully. Coconut coir and soil blends are organic and can be added to compost after harvest. This returns nutrients to the cycle rather than creating waste. The plastic trays used in most home setups are durable and can be washed and used repeatedly.
Pairing microgreen cultivation with other indoor plants enhances the home environment. Many growers mention combining trays of greens with easy indoor plants such as basil or tulsi. This creates a small indoor garden that not only provides food but also improves air quality and gives a sense of well-being.
Finally, moderation and variety are important. Chickpea microgreens can be eaten daily, but they should be part of a varied diet that includes other vegetables, fruits, and proteins. Combining them with whole cooked legumes, as in salads or with other leafy greens in stir fries, balances flavors and nutrients. These simple tips make chickpea microgreens not just an occasional novelty but a consistent, reliable addition to everyday living.