
Store-bought greens lose their freshness fast and often lack real flavor. Growing clover microgreens at home brings a burst of crisp, clean taste and a natural boost of nutrients right into your meals.
They take up barely any space, grow fast, and don’t need much more than a tray, water, and some light. In just a couple of weeks, you’ll have a fresh harvest of tender green shoots ready to enjoy.
With their mild flavor and satisfying crunch, clover microgreens make your food feel fresher and your body feel better. It’s a small daily upgrade that adds something special to every bite 🌿🥬✨
Nutritional Benefits of Clover Microgreens
Clover microgreens are a nutrient-rich addition to any diet. These young shoots are harvested within two weeks of germination, and during this early growth stage, they retain a high concentration of vitamins and beneficial compounds. Studies, including research backed by the USDA, have shown that microgreens can contain significantly more nutrients than their mature counterparts. In some cases, microgreens have been shown to carry up to 40 times more vitamins and antioxidants compared to fully grown vegetables.
Clover microgreens, in particular, are a natural source of vitamins A, C, K, and several B vitamins. They are also high in chlorophyll, which supports the body’s natural detoxification processes, and contain compounds that may aid in reducing inflammation and improving digestion. These microgreens are commonly used in smoothies, salads, and sandwiches due to their mild flavor and crisp texture, but what makes them more appealing nutritionally is their balance of essential micronutrients.
One practical insight that supports the nutritional impact of clover microgreens comes from a comparison between two growing methods. When clover was grown with a standard Epsom salt solution, the resulting greens had a lighter color and smaller leaf size. In contrast, when grown with a nutrient solution like MaxiGro, the microgreens displayed a deeper green shade and noticeably larger leaves. The deeper color suggests a higher chlorophyll content, which is often associated with better nutrient uptake and photosynthetic activity. In the trial, the yield from the MaxiGro-fed clover reached 201 grams, while the Epsom salt group produced 177 grams. The difference in color, size, and overall appearance aligns with the assumption that properly nourished microgreens may offer improved nutritional quality.
Incorporating clover microgreens into meals provides more than just visual appeal. The concentrated nutritional content supports immune health, skin regeneration, and cellular repair, making them a smart addition to everyday meals.
Materials You’ll Need
To successfully grow clover microgreens at home, you’ll need a few basic materials that help provide the right environment for germination, growth, and harvesting. These items are relatively easy to find and can often be reused for future crops.
Start with a set of seed trays. You will need two trays for each grow setup: one with drainage holes and one without. The tray with holes will hold the growing medium and seeds, allowing excess water to drain through. The tray without holes will serve as a reservoir for bottom watering, ensuring the roots stay moist without flooding the surface.
Next, you’ll need a growing medium. Coconut coir is an excellent choice. It’s sterile, free from pathogens, and holds water well without becoming overly compacted. Since clover microgreens draw energy from the seed itself, they do not need a nutrient-rich soil during the early growth stages, making coconut coir ideal. It can be purchased in compressed blocks, which expand when hydrated with boiling water.
A humidity dome or an additional seed tray can be used to cover the seeded tray during the first few days. This keeps moisture in and helps with consistent germination. For lighting, natural indirect sunlight near a bright window is sufficient, although grow lights can be used if natural light is limited.
You will also need a sharp knife or a clean pair of scissors for harvesting. A scale is optional but useful if you want to track yields or compare results from different methods. For those interested in experimenting, a liquid hydroponic nutrient like MaxiGro can be added to the water after the first few days to support more vigorous growth, as it did in the side-by-side trial, where it produced better visual results and a higher harvest weight.
🌿 Recommended Microgreens Supplies |
Step-by-Step Guide: How to Grow Clover Microgreens
1. Preparing the Growing Medium
Begin with coconut coir as your base. If you’re starting with a compressed block, place it in a large container and pour boiling water over it. Let it absorb the water and expand fully, then allow it to cool before handling. The corn should become light and fluffy, easy to spread with your hands. Fill the tray with holes almost to the top, then level the surface with your palm or a tamper. A flat and even surface helps ensure that the seeds make good contact and receive equal light and moisture.
2. Sowing the Seeds
Use approximately 25 grams of clover seed per standard-sized tray. This amount strikes a balance between good coverage and airflow. Scatter the seeds evenly over the coir surface, making sure not to cluster them too tightly. Too many seeds in one area can cause overcrowding, reduce air circulation, and encourage mold growth. It helps to imagine that every seed will sprout. Although that might not be the case, this mindset encourages even distribution, which leads to more consistent growth.
3. Ensuring Seed Contact
Once the seeds are evenly spread, gently press them into the surface. This can be done with a tamper or your hands. The goal is to create contact between the seeds and the moist coir without burying them too deeply. Some growers prefer to sprinkle a very light layer of coir over the top of the seeds, especially if they are in a dry environment. This keeps humidity in and helps the seeds stay in place. Using a second tray as a lid or a humidity dome helps retain moisture and warmth during the early germination phase.
4. Watering Technique
Watering is one of the most important steps, and it’s recommended to use the bottom watering method. Fill the solid tray with water and place the seeded tray with holes inside it. The growing medium will absorb moisture from below without disturbing the seeds. Let it sit for about 30 minutes, then remove the top tray and pour out any excess water. Bottom watering helps maintain an ideal moisture level while preventing fungal issues that can arise from wetting the surface directly. This method was used in the growing trials with both nutrient and control groups and was effective in supporting healthy, even growth.
Germination and Light
After sowing and initial watering, the clover seeds require a warm, dark space to begin germination. This phase typically lasts for two to three days. During this period, the seeds absorb moisture, swell, and begin to sprout. The goal is to simulate the conditions seeds would naturally experience underground—darkness and warmth. A consistent environment is key, and one effective spot is on top of kitchen cabinets, where it’s warmer and out of direct light. This is a practical and proven choice for indoor growers.
During this blackout phase, keep the tray covered with either a humidity dome or a second tray to preserve moisture and keep the temperature stable. Avoid uncovering the tray during these early days unless you’re checking for excessive condensation or dryness. Humidity is important at this stage because it softens the seed coat and encourages uniform sprouting. If the soil begins to look dry, water briefly again, but avoid soaking it.
Once you begin to see the white root hairs and early shoots emerging, it’s time to remove the cover and expose the microgreens to light. At this point, they have completed germination and are ready for photosynthesis. Move the tray to a location with bright, indirect sunlight, such as a south-facing window. Avoid direct midday sun, as it may dry out the microgreens too quickly or burn them. A grow light can be used if natural light is insufficient, but clover microgreens do quite well in window-lit conditions if the space is bright enough for most of the day.
Exposure to light triggers the chlorophyll production that gives microgreens their green color. As observed in a side-by-side growing experiment, clover grown under consistent light and with added nutrients produced noticeably darker, healthier leaves. The MaxiGro-fed microgreens not only had larger leaves but also maintained a uniform color that indicates good photosynthetic activity. This suggests that both light quality and nutrient availability during the post-germination phase have a significant impact on the final appearance and quality of the microgreens.
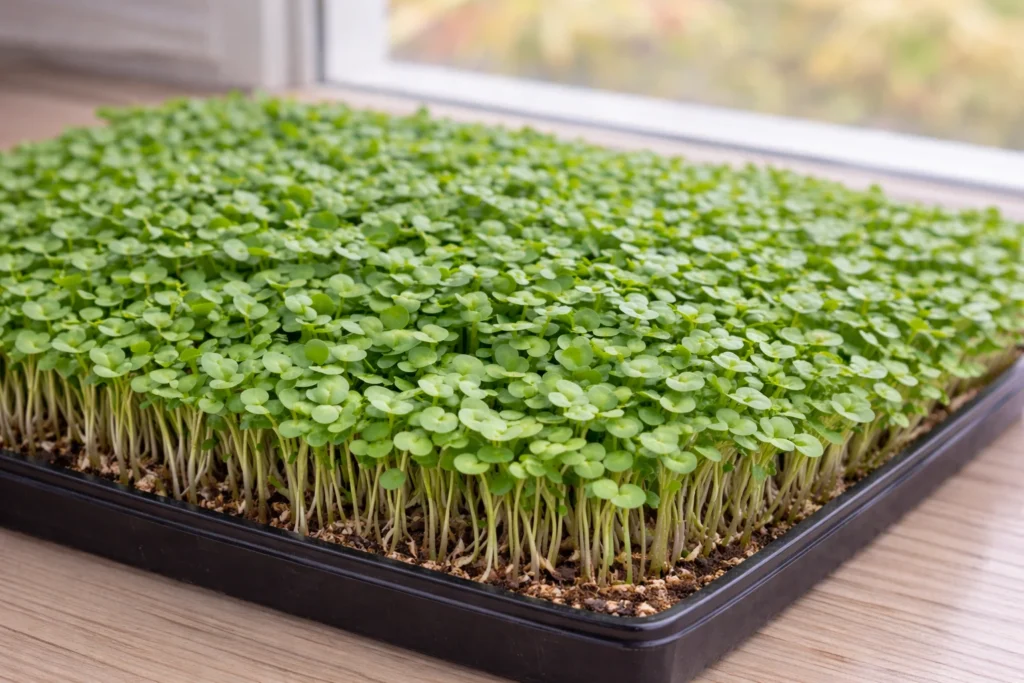
During the next 7 to 10 days after light exposure, clover microgreens will grow rapidly. You’ll notice the formation of cotyledons and, soon after, the true leaves. The presence of these true leaves is the main visual cue that the microgreens are ready for harvest. From start to finish, the process typically takes 10 to 14 days,s depending on room temperature, humidity, and light conditions.
Harvesting Your Clover Microgreens
Harvesting clover microgreens is one of the most rewarding parts of the process. Once the plants have developed their first true leaves and reached a height of about three to four inches, they are ready to be cut. This usually happens between days 10 and 14, depending on growing conditions like temperature and light.
To begin harvesting, gently hold a small section of the microgreens near the base with one hand. With your other hand, use a sharp, clean knife or pair of scissors to cut just above the growing medium. The goal is to keep the cuts clean and avoid pulling up the roots or disturbing the coir. A smooth cut helps preserve the structure of the greens and keeps them looking fresh for longer.
During one growing session, a harvest produced approximately 176 grams of fresh clover microgreens from a single tray. Another setup using MaxiGro nutrient solution yielded a heavier harvest of 201 grams. This shows how nutrient choice and growing conditions can directly affect not just appearance but also total yield.
After cutting, place the greens into a clean basket or container. If you’re planning to store them, you can use a salad spinner to remove excess moisture and then refrigerate them in an airtight container lined with a paper towel. They stay fresh for up to a week when handled carefully.
Clover microgreens do not regrow once cut, so the growing medium can either be discarded or reused if properly cleaned and sterilized. Coconut coir can be soaked again in boiling water to prepare it for the next crop. This makes it a sustainable and cost-effective option for small-scale home growing.
Tips for Best Results
For consistently healthy and vibrant clover microgreens, a few small adjustments can make a big difference.
Start with clean trays and tools. This helps prevent mold and bacteria from affecting your crop. Sterilize trays between harvests if you’re growing regularly. When spreading your seeds, focus on even spacing. Avoid letting seeds cluster too closely together. Overcrowded trays are more likely to trap moisture and create the perfect environment for mold or rot.
Humidity plays a major role early in the process. Use a cover or dome for the first two to three days to trap moisture and keep the temperature stable. After the seeds sprout, remove the cover to allow airflow and reduce the risk of fungal growth.
When it comes to water, less is more. Bottom watering is not just about avoiding seed disturbance. It also reduces the chances of mold growth since the surface stays drier. Water only when the medium starts to feel dry to the touch. Overwatering is one of the most common mistakes for beginners.
If you’re looking for a bigger yield or want your greens to look more vibrant, consider adding a gentle hydroponic nutrient like MaxiGro after the first few days. In practical tests, trays using this nutrient produced microgreens that were darker in color and yielded over 13 percent more than trays grown with only Epsom salt solution.
Place your trays near a bright window with good natural light. If you notice your greens leaning toward the light, rotate the tray daily, so they grow straight. If natural light is limited, especially in winter months, you can use a grow light to maintain steady, strong growth.
Common Mistakes to Avoid
One of the most common mistakes new growers make is using too many seeds. It might seem like more seeds would lead to a fuller harvest, but crowding the tray actually reduces airflow and increases the chance of mold or poor growth. It can also cause some seedlings to fail because they don’t get enough space or light.
Another issue is overwatering. While moisture is essential, a saturated growing medium can suffocate roots and promote fungal issues. Bottom watering for short periods and draining any extra water keeps moisture levels in the right range without waterlogging the tray.
Skipping the blackout period at the start can also lead to uneven germination. Those first two or three days in the dark help the seeds sprout at the same time and push their roots into the coir. If they’re placed in light too early, they may become leggy and weak.
Inconsistent light is another factor that can affect the final look and quality of your microgreens. Trays placed in dim or uneven lighting may grow thin or stretch out, leading to floppy stems and pale leaves. Try to provide even light from above for the best results.
Lastly, failing to clean and reuse materials properly can introduce unwanted bacteria or fungi into your next crop. If you plan to reuse your trays and growing medium, clean them thoroughly and sterilize anything that comes in contact with the plants or seeds.