
Dark Opal Basil microgreens bring bold color, aroma, and flavor to even the simplest meals, and you can grow them in a small tray on a shelf.
This guide shows you exactly how to grow Dark Opal Basil microgreens at home, from prepping the soil and sowing those tiny seeds to harvesting a fragrant purple canopy in about 11 days. You’ll also get real seeding rates, yield examples, and a simple daily routine that helps you avoid the most common headache with basil: sticky seed coats.
By the end, you’ll be able to grow reliable trays with confidence and actually enjoy every harvest.
Understanding Dark Opal Basil microgreens
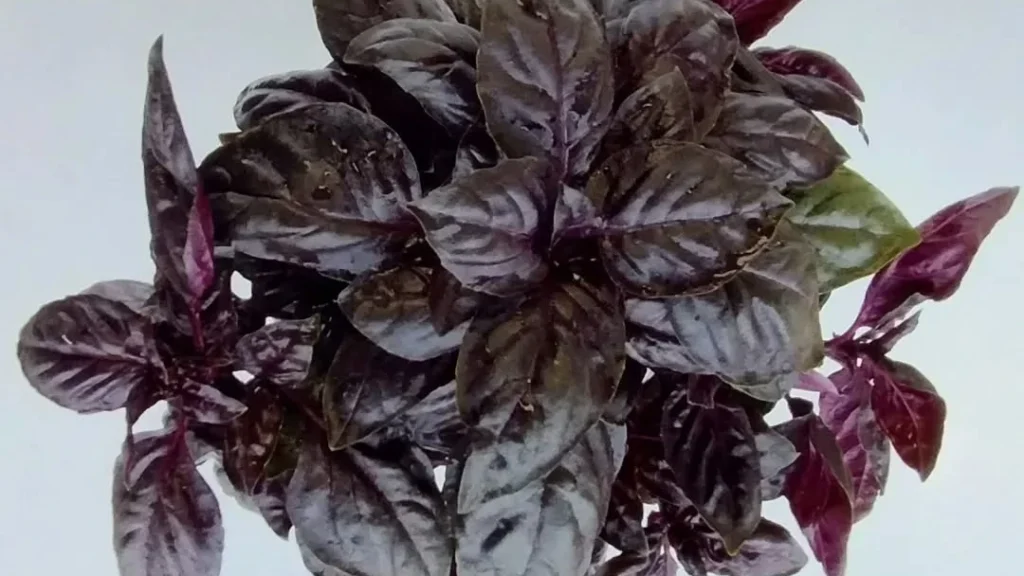
Dark Opal Basil is one of those microgreens that looks expensive even when it’s grown in a basic tray at home. The leaves show deep purple tones with little flashes of green, especially early on. That contrast makes food look more intentional without doing anything fancy. A small pinch can change how a plate feels, and the aroma hits before you even take a bite.
Flavor-wise, Dark Opal Basil is more intense than standard green basil microgreens. It’s herbal, slightly spicy, with a warm clove-like note. The stems are thin and delicate, so they sit lightly on salads, soups, pasta, and small bites. At the microgreen stage, you get concentrated flavor without the bitterness that can creep in if you hold basil too long in the tray.
Home growers love it for the same reason chefs do: it doesn’t take much space, it grows fast, and one tray can cover a week of meals. Once you understand how basil seeds gel and how to keep that gel from drying on the leaves, Dark Opal Basil becomes a dependable crop.
Growth timeline and what to expect
Dark Opal Basil microgreens usually follow a steady schedule indoors:
- Days 1 to 5: covered germination
- Days 6 to 10: under lights, canopy fills, and color deepens
- Day 11: harvest
In a 10-by-10 tray, growers commonly use about 0.5 oz of seed and harvest around 2 oz of finished microgreens when conditions are consistent. In a full 10-by-20 tray, using about 1 oz of seed often produces roughly double the yield.
At harvest, expect plants around 5 to 8 cm tall. Color won’t always be perfectly uniform. Some green mixed in is normal, especially with younger leaves or slightly lower light. What matters more is canopy density and leaf quality. The best harvest point is when leaves are open, tender, and standing strong, not stretched and floppy.
If you let them sit too long beyond day 11, stems can toughen, and moisture issues become more likely. Keeping the cycle tight makes results repeatable.
🌿 Recommended Microgreens Supplies |
What you need before you start
Trays and basic setup
A 10-by-10 tray is a smart starting size for Dark Opal Basil. It’s manageable, fits on a shelf easily, and lines up with the seeding and yield numbers above.
You can grow in trays with drainage holes or without. The safest setup is:
- One tray with holes sitting inside
- one tray without holes underneath to catch runoff
This makes watering and cleanup easier and helps prevent soggy roots.
Growing medium
Dark Opal Basil does best in a fine, light soil that holds moisture without staying wet. A microgreen blend or screened potting mix works well. Avoid big bark pieces and wood chunks. Those create uneven seed contact and thin patches.
You only need a shallow layer of soil. For a 10 by 10 tray, aim for about 2 to 3 cm deep, leveled, and lightly pressed.
Seeds and seeding rate
Dark Opal Basil seeds are tiny and easy to overdo. These rates tend to work well:
- 10 by 10 tray: about 0.5 oz seed
- 10 by 20 tray: about 1 oz of seed
Because the seeds blend into the soil, sow slower than you think you need to. Even coverage is what creates that clean, uniform canopy.
Watering tools and lighting
Keep it simple:
- a spray bottle for gentle misting
- or a small watering can with a fine rose
For lights, any decent grow light that covers the tray evenly can work. Keep it close enough to prevent stretching but not so close that it overheats or dries the surface too quickly. A timer helps you stay consistent without thinking about it daily.
How to grow Dark Opal Basil microgreens step by step
This crop rewards routine more than effort. Your job is small daily checks, not big complicated steps.
Step 1: Prep the tray and pre-moisten the soil
Fill the tray with soil to about 2 to 3 cm. Break up clumps, remove wood bits, and level the surface. Press lightly so it’s even but not compacted.
Now water the soil before you add seeds. This matters. Basil seeds form a gel when they touch water. If you blast them after sowing, they can wash into piles.
Moisten the soil until it feels evenly damp through the top layer. You want “moist and dark,” not shiny with puddles.
Step 2: Sow the seeds evenly
Weigh your seed so you can repeat results each time. Sprinkle in smooth, overlapping passes across the tray. After the first pass, pause and scan for light spots, then fill them in with a gentle sprinkle.
Mist again lightly. Your goal is to hydrate the seeds without disturbing the pattern.
Step 3: Cover for germination (Days 1 to 5)
Covering is the secret weapon for basil microgreens.
During germination, basil seeds create a jelly coat like chia. If the tray is left uncovered and the gel dries onto the cotyledons, it can stick like glue and stunt the tray. A cover keeps humidity high so the gel stays soft instead of drying on the leaves.
Daily routine during Days 1 to 5:
- Lift the cover once per day
- Check moisture
- Mist lightly if needed
- Put the cover back on
What you’ll notice:
- Day 2: seeds look swollen and gel-like
- Day 3: tiny white root threads begin
- Day 4: seedlings push upward
- Day 5: seedlings stand about 1 cm tall and are ready for light
Step 4: Move under lights (Days 6 to 10)
Once uncovered and under lights, growth shifts fast. Leaves open, stems strengthen, color deepens.
Daily routine under lights:
- Water once per day, enough to keep the soil moist
- Avoid soaking the surface repeatedly
- Keep airflow in the room so the canopy stays fresh
Signs you’re on track:
- Day 6: cotyledons open
- Day 7: tray begins filling in
- Day 8 to 9: canopy gets dense, and color becomes richer
- Day 10: leaves are open, and the tray looks full
A good tray feels springy. If you run your hand just above the canopy, it should bounce back rather than collapsing.
Step 5: Harvest on Day 11
Harvest when leaves are open, tender, and the stand is dense.
How to harvest cleanly:
- Use sharp, clean scissors
- Cut as close to the soil as you can without dragging stems through dirt
- Work in sections and keep your hands gentle
If you pack into clamshells, a dry paper towel on the bottom helps manage moisture. Label with variety, date, and weight. Refrigerate quickly.
Troubleshooting common Dark Opal Basil problems
Sticky seed coats on leaves
This is the classic basil issue. It usually happens when the gel dries during germination.
Fix:
- Keep trays covered for the first five days
- maintain steady moisture
- Avoid strong airflow directly on covered trays
Overwatering and musty smells
If the soil stays soaked, roots struggle, and stems can weaken. Musty odor and limp patches are warning signs.
Fix:
- aim for moist, not wet
- Reduce water volume, not the daily check
- If using a solid-bottom tray, make sure water is not pooling
Underwatering and curled leaves
Basil is shallow-rooted, so it shows dryness quickly.
Fix:
- water thoroughly when needed
- check temperature and humidity in the grow area
- keep lights at a distance that doesn’t bake the surface
Thin patches or bare corners
Usually, sowing speed or uneven coverage.
Fix:
- sprinkle slower
- Do a second visual scan before the final mist
- Use a small cup for better control
More green than purple
A little green is normal. If you want deeper purple, slightly stronger light, or a better light spread usually helps.
Post-harvest handling and storage
The first few minutes after harvest matter. Basil microgreens bruise easily and lose quality faster if condensation builds up inside the container.
Best practices:
- pack dry, not dripping
- If condensation forms, crack the lid briefly to vent
- store on a lower fridge shelf where temps are steadier
- Avoid stacking heavy items on top
With good handling, Dark Opal Basil microgreens typically hold well for 4 to 6 days. Replace the paper towel if it becomes damp. Discard if you notice slime, sour smell, or dark, wet patches.
Nutritional benefits of Dark Opal Basil microgreens
Dark Opal Basil microgreens offer a concentrated version of what makes basil valuable: aromatic plant compounds plus antioxidant pigments. The purple color comes from anthocyanins, which are widely studied antioxidants linked with cellular protection and overall antioxidant capacity.
Even small portions can add:
- vitamin K
- vitamin A precursors
- small amounts of minerals like calcium and iron
- aromatic compounds such as eugenol that contribute to basil’s signature scent
Microgreens are usually eaten in small amounts, so think of them as a nutrient-dense upgrade, not a primary vegetable serving. They lift flavor and add plant compounds without adding calories.
How to use Dark Opal Basil microgreens in cooking
Treat them like a finishing herb. Heat dulls their aroma and softens the leaves, so add them at the end.
They pair especially well with:
- tomatoes, mozzarella, balsamic
- pasta and creamy sauces
- eggs and avocado toast
- soups right before serving
- grilled vegetables and grain bowls
They also work as a garnish for citrus drinks and light desserts, where you want an herbal contrast.
Easy recipes that use every harvest
Mini caprese skewers
Skewer cherry tomato halves and mozzarella. Drizzle olive oil and balsamic reduction, then top with a pinch of Dark Opal Basil microgreens right before serving.
Small batch microgreen pesto
Blend a small handful of microgreens with garlic, olive oil, nuts, and grated hard cheese. Use as a sandwich spread, pasta finish, or roasted veggie topper.
Citrus spritz garnish
Mix sparkling water, lemon juice, and a touch of honey. Add ice, then finish with a pinch of microgreens. The aroma lifts with the bubbles.
Small-scale selling: what you can learn from real growers
Dark Opal Basil is ideal for small local sales because it’s eye-catching and doesn’t require huge volume. A single 10-by-10 tray can supply a restaurant with a small weekly order, like two ounces, without adding complexity to your schedule.
If you plan to sell, focus on repeatable quality:
- clean harvest and clean packaging
- paper towel to manage moisture
- labeled weight and harvest date
- simple communication about freshness windows
Consistency is what chefs remember. One reliable tray per week can turn into steady demand, and steady demand is what gives you room to add more varieties.