
Tired of store-bought greens that wilt in days and cost a fortune? Flaxseed microgreens might be the little secret your kitchen and body have been waiting for.
These tiny greens pack a flavorful punch with a mild nutty taste and deliver a boost of nutrients like omega-3s and fiber that your meals will love.
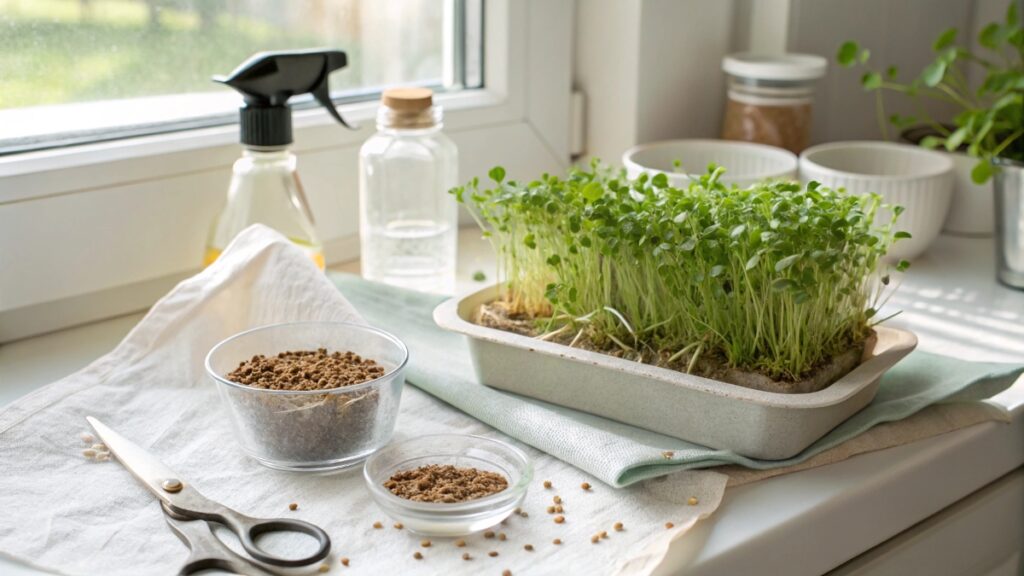
Growing them at home is quick, clean, and costs almost nothing. No messy soil piles or fancy tools needed. Just a few flax seeds, a spray bottle, and a sunny spot by your window. In less than a week, you’ll be snipping fresh greens straight onto your plate. Pure freshness with zero fuss 🌱✨🥗
What Are Flax Seed Microgreens?
Flaxseed microgreens are the tender, young shoots of the flax plant. Unlike mature flax plants, which are cultivated primarily for their seeds or fiber, these microgreens are harvested during the early seedling stage, typically within six to ten days of sowing.
At this stage, the plant focuses its biological energy on sprouting and root development, producing concentrated nutrients, enzymes, and chlorophyll. The leaves are tender, the roots minimal, and the stems juicy, making them perfect for raw consumption.
Flax seeds used for microgreens can be either brown or golden. Both types are viable and perform similarly during germination. Brown flax seeds tend to be more common and affordable, as noted in one of the videos, where the seeds were sourced inexpensively from a bulk food store. Golden flax may have a slightly milder flavor, but this is a matter of preference rather than superiority.
One of the defining features of flax seeds during sprouting is their mucilaginous property. When exposed to moisture, they form a gelatinous coating, similar to chia seeds. This gel helps retain moisture around the seed, supporting consistent germination. However, it also means that pre-soaking flax seeds is not recommended, as it can cause clumping or spoilage. Instead, they should be sown directly onto a moist surface for best results.
Nutritional Profile and Health Benefits of Flaxseed
Flax seed microgreens are miniature nutrition powerhouses, packed with a wide array of health-promoting compounds. While mature flax seeds are widely known for their omega-3 content and dietary fiber, the microgreen version emphasizes chlorophyll, enzymes, and early-stage antioxidants.
Chlorophyll, the pigment responsible for the vivid green color of flax microgreens, is more than just aesthetically pleasing. It plays a crucial role in detoxification, supports oxygen transport in the body, and may help reduce inflammation. The young greens also contain active plant enzymes that assist with digestion and nutrient absorption, which are often missing in heavily processed foods.
Although flax microgreens contain lower levels of ALA (alpha-linolenic acid) compared to the seeds themselves, they still provide a gentle dose of plant-based omega-3s. This makes them particularly useful for those following plant-based diets who want to incorporate more natural sources of essential fatty acids.
Scientific literature on microgreens in general has shown that they can contain up to four to forty times more vitamins and minerals than their mature counterparts, depending on the variety. While specific data on flax microgreens remains limited, early growth stages in similar plants such as chia and broccoli show elevated levels of vitamins C, E, and K, along with carotenoids and polyphenols.
From a wellness standpoint, flax microgreens support:
- Immune function through antioxidants
- Cardiovascular health through chlorophyll and plant sterols
- Skin and hair wellness via micronutrients
- Digestive health thanks to light fiber and enzyme content
In addition to these physical benefits, the act of growing microgreens at home can reduce stress, enhance mood, and foster a deeper connection with the food one consumes.
Different Methods to Grow Flax Microgreens at Home
Flaxseed microgreens are incredibly versatile and can be grown using multiple techniques, each catering to different living environments, resource availability, and personal preferences.
Soil-Based Method with Clean Harvesting Layer
This method involves planting flax seeds on a thin layer of moist potting soil inside a shallow container. A unique twist, recommended by one of the creators, is the use of a natural, unbleached paper towel laid over the soil before sowing the seeds. This acts as a protective barrier, allowing the roots to penetrate the towel into the soil while keeping the upper layers clean.
The benefits of this technique include:
- Easy cleanup after harvest
- Minimal soil contact, making the greens safer for raw consumption
- Reduced chance of fungal contamination
The process includes filling the container halfway with organic potting mix, misting it thoroughly with water, laying down the paper towel, and spreading seeds evenly on top. After misting again, the container is kept in darkness for a few days to stimulate sprouting. Once green shoots emerge, the setup is moved to a well-lit area.
Soilless Method Using Paper Towels or Napkins
Another effective method uses nothing more than a plate, a paper towel (or even napkins/toilet paper), and flax seeds. The key steps include:
- Placing a paper towel on a plate and soaking it with water
- Spreading the seeds evenly without overlapping
- Covering the plate with another plate to create a mini humidity dome
- After a few days, remove the cover and place the setup near a window
This method is mess-free and ideal for apartments, dorm rooms, or anyone without access to gardening tools or soil. As the greens grow, they naturally adhere to the towel, which simplifies harvesting and avoids any contact with dirt or compost.
It is important to avoid soaking flax seeds prior to sowing in this method, as the mucilage can become slimy and unmanageable.
Optional Advanced Hydroponic or Growing Mat Method
While not discussed extensively in the examples provided, hydroponic setups or reusable growing mats like coconut coir, hemp fiber, or jute can also be used. These systems offer higher yields and better moisture control, but they require more setup and investment. They are better suited for dedicated microgreen growers or small business operations.
Step-by-Step Growth Timeline
Understanding the daily progression of flax microgreens is essential for success. Below is a realistic timeline based on hands-on growth experiences.
Day 1–2: Germination Phase
Flax seeds are sown on a moist surface and kept in a dark, warm place such as a kitchen cabinet or under an inverted plate. Within 24 to 48 hours, the mucilage begins to form, locking in moisture. Seeds start to swell and crack as the root emerges.
Day 3–5: Sprouting and Root Development
Tiny white roots begin to appear, followed by green cotyledons—the first leaf structures. During this time, it is essential to keep the environment humid. Light misting with a spray bottle in the morning and evening is usually enough. The sprouts begin to anchor themselves either into the paper towel or through it into the soil layer.
Day 5–7: Exposure to Light
The greens are moved to a window or under grow lights for photosynthesis. The once-pale shoots begin turning vibrant green as chlorophyll production increases. A light mist in the morning and evening helps them thrive.
Day 6–10: Harvest Window
The microgreens reach their peak flavor, height (usually 2 to 4 inches), and nutrient density. Harvesting can begin by snipping the stems just above the paper or soil line. It’s advised to harvest in small batches to keep the rest fresh and growing.
This timeline is flexible depending on environmental conditions such as temperature, humidity, and light quality. Flax microgreens do not regrow once cut, so staggered planting is a smart option for a continuous supply.
Tools and Materials Needed
Growing flaxseed microgreens doesn’t require fancy or expensive equipment. In fact, one of the main appeals is the minimal investment required, using many items you likely already have at home. Below is a breakdown of essential tools and materials, categorized by method:
For Soil-Based Growing:
- Container/Tray: A shallow, flat container, such as a salad to-go box,x works perfectly. Reusing takeout containers not only saves money but also supports sustainable practices. One grower emphasized the practicality of these containers, recommending that people keep them after ordering food to repurpose them for microgreen cultivation.
- Organic Potting Mix: A small amount is enough. Fill the tray about halfway. Make sure the mix is light and well-draining. It can be purchased affordably at local nurseries or home improvement stores.
- Unbleached Paper Towel or Natural Sheet: This is laid on top of the soil before spreading the seeds. It simplifies harvesting by separating greens from the soil and provides a clean growing surface.
- Spray Bottle: Essential for maintaining humidity. A fine mist sprayer is ideal, but even a basic kitchen bottle works.
- Flax Seeds: These are inexpensive and available in bulk at natural food stores like Whole Foods. Both brown and golden varieties can be used interchangeably.
For Soilless Growing:
- Plate: Any flat plate can be used. A larger plate increases your growing area, but even a small dessert plate can produce a good handful of greens.
- Paper Towel/Napkins/Toilet Paper: Acts as a growing medium by retaining moisture. Avoid scented or chemically treated varieties.
- Second Plate: Used as a lid for the first few days to maintain darkness and humidity.
- Spray Bottle or Cup for Gentle Pouring: Used for moistening the paper towel and maintaining hydration throughout the growth cycle.
These setups make flax microgreens highly accessible, especially to beginners, urban dwellers, or people with limited space or sunlight.
🌿 Recommended Microgreens Supplies |
Common Mistakes and Troubleshooting
Even though flax microgreens are relatively simple to grow, a few common pitfalls can hinder successful harvests. Here’s an overview of mistakes to avoid and how to fix or prevent them:
1. Pre-soaking the Seeds
Flax seeds become extremely gelatinous when soaked. One experienced grower highlighted that soaking causes the seeds to form a thick, sticky gel that is difficult to manage. It can lead to mold, clumping, and uneven growth. The correct method is to sow dry seeds directly onto a moist surface.
2. Overwatering
Too much water can suffocate the roots and promote mold or rot. In one example, the grower made it clear that although you can water heavily at the beginning, it’s important to moderate moisture after sprouting begins. The lower soil layer should be moist—not soaking.
3. Allowing Seeds to Dry Out
Flax microgreens are delicate during germination. If the seeds dry out even briefly, they may die or fail to sprout uniformly. Daily misting is essential—especially in drier climates or during winter months with indoor heating.
4. Using Chemically Treated Paper
Avoid paper towels that contain bleach or fragrances. These chemicals can leach into the roots and potentially harm the plants or introduce toxins. One recommendation was to use unbleached paper towel options from health food stores, which are free of chlorine and dyes.
5. Uneven Seed Distribution
Clumped or uneven seed spreading leads to patchy growth. Use a spoon to scatter seeds uniformly. Three spoonfuls were used to cover a medium-sized container in one guide, showing that even coverage gives the best results.
6. Lack of Light After Sprouting
If microgreens remain in the dark too long after sprouting, they can become leggy, pale, and weak. As advised, once the greens start to emerge—usually by day five—they should be moved to a bright window or under a grow light to green up and grow upright.
Harvesting and Storage
Flax microgreens are ready for harvest between day 6 and day 10, depending on growing conditions. Timing is crucial to maximize freshness, taste, and nutrient content.
How to Harvest:
- Gently pull up the paper towel or soil layer to elevate the greens slightly.
- Use clean, sharp scissors to cut as close to the base as possible.
- Only cut what you need to ensure the rest remains fresh and continues growing.
This staggered harvesting technique ensures you’re always consuming the freshest greens. As highlighted by a grower, there’s no need to harvest everything at once—just snip as needed.
Storage Tips:
- If you must store some after harvesting, wrap them in a slightly damp paper towel and place them in an airtight container in the fridge.
- Use within 2–3 days for optimal taste and nutrition.
- Do not wash the greens before storage unless visibly dirty. Washing introduces moisture, which may reduce shelf life.
Thanks to the clean-growing method using paper towels, there is often little or no dirt residue, which makes flax microgreens ideal for raw applications like salads or smoothies without the need for excessive washing.
Culinary Uses and Flavor Profile
Flax microgreens are more than just a visual garnish—they deliver a pleasant, nutty flavor that blends well with both savory and sweet dishes.
Flavor Profile:
- Subtly nutty and earthy
- Crisp texture with tender stems
- Mild enough to complement a variety of cuisines
Culinary Applications:
- Salads: Add freshness and nutritional punch without overpowering flavors
- Smoothies: A small handful blends easily into fruit or green smoothies, adding chlorophyll and plant fiber
- Breakfast Bowls: Combine with oats, yogurt, or chia pudding
- Sandwiches and Wraps: Adds crunch and vibrant color
- Spreads and Dips: Mix into hummus, guacamole, or plant-based spreads
- Soups and Stir-fries: Use as a garnish for hot dishes right before serving
If you’re not fond of the texture of raw greens, incorporating flax microgreens into smoothies is an excellent alternative. You’ll retain the nutrients while avoiding the fibrous mouthfeel.
Environmental Benefits and Sustainability
Growing flaxseed microgreens is not just good for your health—it’s also a win for the planet. Here’s how:
1. Low Resource Consumption
Microgreens require significantly less water and time than full-sized crops. A full tray of flax microgreens can be harvested in under ten days using just a few sprays of water daily.
2. Minimal Waste
Repurposing food containers, using paper towels, and avoiding chemical fertilizers results in an eco-friendly, low-waste operation. Plus, the roots and leftover paper towel can be composted.
3. No Pesticides or Herbicides
Because microgreens are grown indoors and harvested early, they don’t need chemical treatments. This is a cleaner alternative to conventionally grown produce.
4. Supports Biodiversity (Outdoor Option)
Interestingly, one grower mentioned scattering flax seeds outdoors to enjoy their beautiful blue flowers and attract pollinators like bees. Even if not harvested, the flowers offer ecological value in home gardens or balconies.
Growing your own flax microgreens also reduces your carbon footprint by minimizing store trips and eliminating plastic packaging typically associated with store-bought greens.