
Want fresh microgreens without buying special gear? This guide explains how to grow crisp, flavorful greens in simple ice cube trays using natural light. It is an easy indoor method that fits on a kitchen counter, works with mustard, radish, and broccoli, and produces a harvest in about seven to eight days.
You will learn the seed rate of about one teaspoon per tray, how to handle hydrophobic soil during the first watering, and how to read readiness cues, such as lids lifting before trays move to indirect window light.
Daily care stays simple with gentle misting, rotation for even growth, and harvest at the soil line. Follow along to grow microgreens at home with minimal cost and maximum freshness.
Why Ice Cube Trays and Natural Light
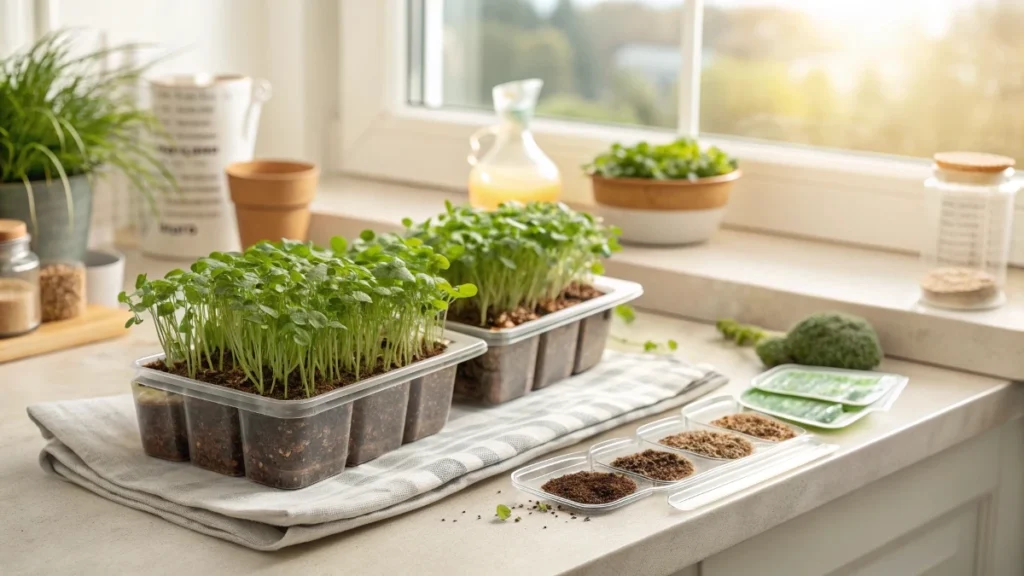
Ice cube trays with lids make a simple starter system for growing microgreens at home. A common four-pack costs about 10 dollars, and the lids create a humid space that helps seeds start without any extra blackout gear. The trays are compact, easy to handle on a kitchen counter, and you can still use them for their original purpose if you change your mind.
Natural light from a window is enough to finish the crop. Indirect light works well and avoids the heat that can come with direct midday sun. As the seedlings grow,w they naturally lean toward the light source, so a little rotation during the grow keeps the canopy even. You can also see clear readiness signals in this setup. When the seeds have rooted, the seedlings can push the lids upward on their own, which is a practical cue that it is time to move them into light.
What You Will Need
You need lidded ice cube trays, a bag of potting soil, and seed for microgreens. The method shown uses mustard, radish, and broccoli. A roll of labeling tape and a marker help you tell similar crops apart before they green up. For watering, a small hand sprayer gives gentle coverage. A sharp kitchen knife or a pair of scissors makes clean harvesting easy. That is the full list. There is no need for grow lights or specialty trays.
One note on soil. Some mixes can be hydrophobic at first. That means they resist water, and the surface looks wet in spots and dry in others. This clears up once the soil has time to take in moisture, so the first watering may require a few short rounds of misting with a pause in between.
Seeding and Setup on Day 0
Fill each tray with soil and level the surface with your hand. Lightly tamp the soil with the underside of an empty tray so seeds have good contact. Measure about one teaspoon of seed per tray. This rate works for mustard, radish, and broccoli in this container size and gives a dense but manageable canopy at harvest.
Mist the surface to start moisture moving through the soil. If the mix of beads and water, pause and let the moisture soak in, then mist again. Attach a label to each lid. This is especially helpful for mustard and broccoli since they look similar early on. Snap the lids closed to start the covered stage. The lid keeps humidity high so seeds can crack open and root.
Covered Stage from Day 1 to Day 3
Keep the lids closed and check moisture at least twice a day. The target is evenly moist soil without puddles. By the second day, you should see many seeds cracking with tiny roots starting to anchor in the mix. By the third day, there is clear progress, but most crops still benefit from staying covered a little longer so the roots can set before light is introduced.
This stage is about stability. Short, gentle misting keeps the surface from drying and prevents disturbance of the young roots. A sink or counter that is easy to wipe makes cleanup simple since a few spills are likely at this step.
Moving to Light on Day 4 and Day 5
Use simple visual cues to decide when to uncover. When seedlings have enough strength, they push the lids upward. In practice, radish and mustard often reach this point around the fourth day. Broccoli can trail behind and may need one extra day covered before it is ready.
Once a tray is ready, place it by a window with indirect light. Bright indirect light turns the pale yellow sprouts green within a day. By the fifth day, all three crops can usually sit in light together and color up well. Continue to water as needed and start rotating the trays so each side faces the window in turn. This keeps growth even and reduces leaning.
Watering and Daily Care
Watering is simple but important. Use a handheld sprayer for gentle top watering. Aim for moist soil that is saturated but not pooling or overflowing. In practice, this often works out to two sessions per day, morning and evening, with extra attention if the air is dry.
Watch the corners of the trays since they can dry faster. Radish is especially thirsty and can flop over if one area goes dry. When this happens, a thorough watering brings the canopy back within a few hours. Keep surfaces clean, rotate trays for even light, and avoid overwatering. Pooled water is a sign to cut back since it can stress the young stems and lead to poor stands.
These habits set up the crop for the final stretch. With steady moisture, indirect light, and small adjustments like rotation, the trays grow into a dense, upright canopy that is ready to cut on the seventh or eighth day, depending on the crop.
🌿 Recommended Microgreens Supplies |
Common Issues and Quick Fixes
Hydrophobic soil can slow the first watering. If water beads on the surface, mist lightly and pause so the mix can start absorbing. Repeat short rounds until the surface stays evenly moist. This avoids runoff and protects the tiny roots.
Uneven moisture is the other frequent issue. Corners and edges can dry faster than the center. Radish shows stress first because it grows quickly and drinks more. If you see a patch leaning or falling over, give it a thorough watering. In the observed grow the radish corner that slumped on day six stood back up within a few hours after proper hydration.
Pooling water is a warning sign. If you notice puddles or overflow, reduce volume and space out watering sessions. The goal is saturated but not pooling. Gentle top watering with a handheld sprayer helps keep the canopy clean and reduces splash that can lodge debris on the stems.
Labeling prevents mix-ups. Mustard and broccoli look similar during the covered stage, so a simple label on the lid keeps tracking accurate. This avoids harvesting a tray before it reaches peak height and flavor.
Rotation manages leaning. Seedlings orient toward the brightest side. Turn the trays each day so all sides face the window in turn. This produces a thicker, more upright canopy that is easier to cut cleanly.
Timeline and Harvest Cues
Days one through three are for rooting under the lids. Moisture is steady, light is blocked, and seeds crack open. By day four, the lids on radish and mustard lift on their own, which is a clear readiness cue for light. Broccoli often lags and may stay covered one more day.
Once trays are in indirect light, color changes quickly. Yellow sprouts green up by the next day. Growth accelerates, and the canopy thickens. Keep watering consistently because this is when the trays drink the most.
Radish reaches harvest height around day seven. The canopy feels full and fluffy, stems are sturdy, and any extra day can push height to the point where plants bend from their own weight. Mustard and broccoli reach their ideal height around day eight. They look even, green, and dense with minimal bare spots.
Harvest and Post-Harvest
Harvest at the soil line with a sharp knife or scissors. Hold the canopy gently with one hand and make smooth passes with the other. Cutting in sections keeps stems tidy and reduces debris. Avoid tugging since this can pull soil into the greens.
You can also pop out root cubes like ice cubes for presentation. It is a fun way to show how the greens were grown, though a straight cut is faster for larger batches.
After harvest, remove leftover roots and stems and add them to compost. This keeps the work area clean and ready for the next sowing. Place cut microgreens in a container and refrigerate promptly. In practice, radish stored overnight kept its color and texture the next day, which is encouraging for short-term storage.
Rinse just before eating for the best shelf life. Excess surface water in storage can shorten freshness, so a quick spin or pat dry helps if you wash ahead.
Crop Notes for Flavor and Use
Radish brings a bright, peppery bite and grows the fastest. It is excellent for sandwiches, grain bowls, and tacos. Because it is vigorous and thirsty, keep a close eye on the moisture near the edges.
Mustard delivers a clean heat that blends well with milder greens. Mixing mustard with broccoli balances flavor and adds complexity to salads and eggs. It is ready for light early and finishes a day after radish in this system.
Broccoli has a mild, almost egg-like note that works well on burgers and breakfast plates. It tends to trail radish and mustard by a day during the covered stage. Give it that extra day if the lid has not lifted, and you will see a more even stand once it moves into light.
Scaling and Scheduling
Use about one teaspoon of seed per tray as a starting rate. This produced a dense canopy for mustard, radish, and broccoli in the same container size. If your trays have smaller or larger cubes, adjust slightly up or down to maintain coverage without crowding.
Stagger sowings for a steady supply. A new tray every two to three days is a practical rhythm in a home kitchen. With a seven-to eight-day cycle under natural light, this pattern yields fresh greens several times a week without overwhelming your space.
Keep routine simple. Morning and evening checks for moisture, quick rotation for even light, and a glance for issues like hydrophobic spots or pooling are enough to keep the grow on track.
Quick Reference Data Points
A four-pack of lidded ice cube trays costs about 10 dollars in the example grow.
Seed rate was about one teaspoon per tray for mustard, radish, and broccoli.
Watering frequency was about twice daily, with the target of saturated but not pooling.
Lids lifted around day four for radish and mustard, while broccoli often needed one more day covered.
All trays were in indirect window light by day five and greened up quickly.
Radish harvested on day seven. Mustard and broccoli were harvested on day eight.
A slumped corner of radish on day six recovered within hours after proper watering.
Cut greens stored in the refrigerator held well into the next day.
These figures give a reliable baseline for growing microgreens in ice cube trays using natural light with no special equipment needed.