
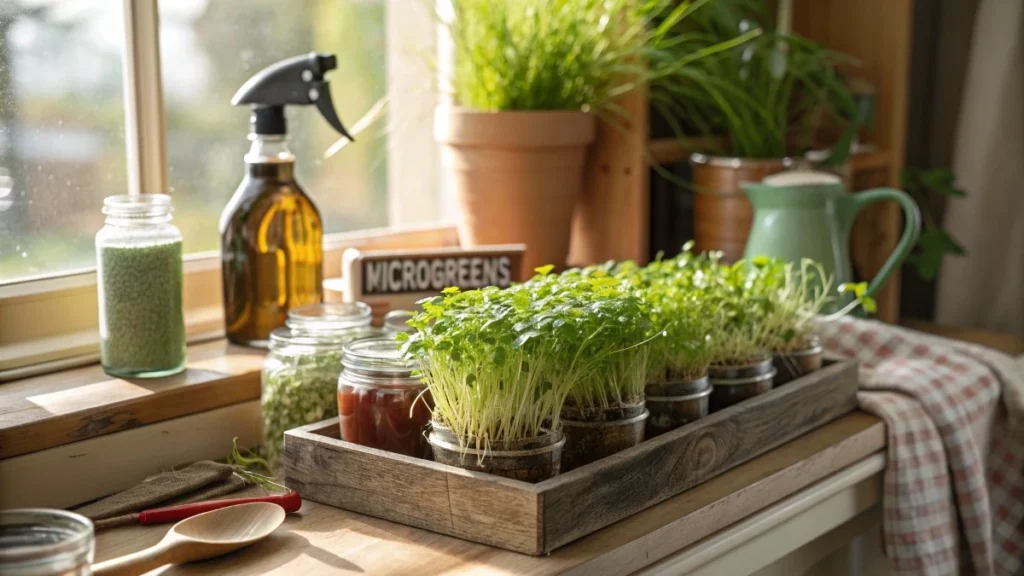
Growing your own fresh, flavorful greens doesn’t need a garden, fancy equipment, or a ton of space. A few mason jars, some seeds, and a sunny windowsill are all it takes to bring a mini harvest right into your kitchen.
In just a few days, you can have crisp, nutrient-packed microgreens ready to toss on salads, top your eggs, or snack on straight from the jar. It’s clean, fun, and surprisingly simple.
Plus, watching those tiny sprouts grow each day is pretty satisfying. If you’re into easy wins that taste amazing and look good doing it, this jar method might just be your new favorite hobby 🌱✨🥗
What Are Microgreens?
Microgreens are young, edible seedlings of vegetables and herbs harvested within 5 to 14 days of germination. Unlike sprouts, which are consumed whole (including the root and seed), microgreens are cut above the root line, and only the stem and leaves are consumed. This distinction gives them a richer taste, improved texture, and a safer growing process when hygiene is followed properly.
Despite their small size, microgreens are a nutritional powerhouse. According to USDA research, microgreens can contain up to four to forty times more nutrients than their mature plant counterparts. For instance, red cabbage microgreens were found to contain six times more vitamin C and 69 times more vitamin K than the fully grown cabbage. They are also rich in antioxidants, carotenoids, and polyphenols, which contribute to cellular repair and immune health.
The most common types of microgreens suited for jar cultivation include broccoli, alfalfa, radish, mustard, kale, and arugula. Specialty blends such as “mild mix” or “hot mix” often combine several seed types to offer variety in taste and harvest timing. For example, the mild mix used in the demonstration germinated and reached a harvestable stage in just five days, while the hot mix took ten days, indicating variability depending on the seed composition.
Microgreens are not just about nutrition—they also bring vibrancy, flavor, and freshness to meals. Their intense, sometimes spicy or nutty flavors make them ideal for garnishing salads, enhancing sandwiches, or blending into smoothies.
Why Use Mason Jars Instead of Trays?
Traditional microgreen cultivation often involves trays filled with soil or growing mats, placed under grow lights or near sunlight. While effective, these systems can be messy, require more space, and demand routine maintenance. For someone living in a small apartment or gardening indoors during the winter months, this can pose a challenge.
Mason jars provide a clean, compact, and accessible alternative. A single wide-mouth jar can serve as both a sprouting vessel and a mini greenhouse. This approach eliminates the need for soil, reducing mess and simplifying cleanup. Jars also naturally limit over-watering since they can be drained easily, helping to prevent mold growth—a common issue in traditional tray systems.
In one home experiment, the grower utilized Dollar Tree “mild mix” and “hot mix” microgreen seeds, mason jars, and cloths secured with jar rings. With no soil, grow lights, or trays involved, she successfully harvested multiple batches of greens. This method proves effective for everyday use, even with minimal investment. She noted that using jars avoided the clutter and upkeep of trays, while still yielding edible greens in just a few days.
Another major advantage is affordability. A single $1.25 seed packet produced several handfuls of greens, and the jars were items she already had at home. The process also scales well. Multiple jars can be rotated or staggered, allowing for continuous harvests without taking up more than a windowsill’s worth of space.
While jar systems typically produce a smaller yield compared to tray methods, they are ideal for individuals or small families seeking fresh garnishes rather than bulk production. They also double as a fantastic educational tool for teaching children or beginners about plant growth and sustainable food practices.
Supplies You’ll Need
Starting a mason jar microgreen setup is surprisingly straightforward. Most of the required materials are already available in the average kitchen. The few that aren’t can be sourced at a dollar store or online at a low cost.
Mason jars are the core of the system. Wide-mouth jars work best as they provide better air circulation and make it easier to rinse and drain the seeds. However, any clean glass jar can work as long as it has a way to secure a breathable lid.
Lids or covers are essential for rinsing and draining. Specialized sprouting lids, such as the Handy Pantry brand used in the demonstration, can be attached to the jar for efficient water drainage while keeping seeds contained. These lids feature mesh screens that allow water to flow out without losing seeds. However, not everyone has access to these specialized lids. Fortunately, several effective DIY alternatives exist.
Cloth options such as flower sack towels, muslin fabric, coffee filters, or even paper towels can be secured over the jar mouth using a metal ring or rubber band. During the experiment, these improvised lids performed just as well as commercial sprouting lids in allowing proper drainage and airflow.
Seeds are a key variable. Choose seeds labeled as suitable for microgreens or sprouting. The demonstration used two mixes from Dollar Tree: “mild mix” (including broccoli, kale, kohlrabi, arugula, and red cabbage) and “hot mix” (containing mustard, radish, and arugula). Alfalfa was also used to show a faster germinating alternative. All performed well, though some took longer than others to mature.
Clean water is another important ingredient. Ideally, use filtered or distilled water, as chlorine in tap water may hinder germination or harm delicate seedlings. Rinsing the seeds thoroughly and regularly with clean water helps maintain hygiene and reduces the risk of mold.
Optional tools include a dish rack or a bowl to keep the jar tilted downward during drainage. This setup helps remove excess water and improve airflow inside the jar. A dark or shaded location is also recommended during the initial days of growth to simulate soil coverage and stimulate sprouting.
🌿 Recommended Microgreens Supplies |
Step-by-Step Guide to Growing Microgreens in a Jar
Growing microgreens in mason jars follows a simplified process that balances moisture, air circulation, and light exposure — all without soil. Here’s a breakdown of the key stages, refined from real-world trials and proven techniques:
Step 1: Seed Measurement and Soaking
Start by measuring your seeds. For a regular-sized wide-mouth mason jar (approximately 32 oz), use about ½ to 1 teaspoon of small seeds such as broccoli, alfalfa, or radish. Larger seeds like sunflowers or peas may require 1 to 2 tablespoons. Overcrowding can lead to poor airflow and mold, while too few seeds yield an underwhelming harvest.
Add the seeds to the jar and cover them with lukewarm filtered water — about 1½ to 2 inches above the seed level. Let them soak for 6 to 12 hours, depending on the seed type. For example:
- Alfalfa and broccoli: 6 to 8 hours
- Radish or mustard: 8 to 10 hours
- Pea or sunflower: 10 to 12 hours
Soaking initiates germination by hydrating the seed coat and triggering enzymatic processes within the seed.
Step 2: Draining and Rinsing
After soaking, cover the jar with your chosen breathable lid (mesh lid, fabric, or paper towel secured with a band). Drain the water by inverting the jar at a 45-degree angle to allow any residual water to escape.
Once drained, rinse the seeds by filling the jar with clean water and swirling gently. Drain again. This rinsing step should be done twice a day—once in the morning and once in the evening.
To avoid seed clumping, gently roll or shake the jar after draining so the seeds spread evenly along the sides of the jar. This promotes air exposure and consistent germination.
Step 3: Germination in Darkness
Keep the jar in a dark, cool location for the first 2 to 3 days. The darkness simulates the soil covering that seeds would naturally experience in the ground. A pantry, cabinet, or shaded counter works well. Avoid excessive heat, as temperatures above 75°F (24°C) can increase the risk of mold.
Seeds will begin to sprout, developing small white root hairs. These are often mistaken for mold, but they are completely normal and healthy signs of growth.
Step 4: Light Exposure and Growth
After 3 days, move the jar to a well-lit location—a windowsill or a spot with indirect sunlight is ideal. At this stage, photosynthesis begins, and the microgreens will turn from pale yellow to vibrant green as chlorophyll develops.
Continue rinsing and draining the jar twice daily. Watch for over-saturation. The grower noted that too much moisture was the biggest enemy, potentially causing mushy greens or mold. Keeping the jar tilted for at least 10 minutes after each rinse improves air flow and water drainage.
Step 5: Harvesting
Microgreens are ready to harvest when they have developed their cotyledons (seed leaves) and first set of true leaves, typically 5 to 10 days after sowing,g depending on the variety. Alfalfa and mild mix types were harvest-ready in just 5 days, while the hot mix took closer to 10 days.
To harvest, simply tip the jar and gently pull out the greens with clean fingers or tweezers. Rinse them one final time before consumption.
Seed Selection Tips (Best Types for Jar Growing)
Not all microgreens behave the same way in a jar environment. Some seeds thrive in the confined, soilless conditions of a jar, while others are better suited for trays due to their size, growth style, or oxygen needs.
Best Microgreen Seeds for Mason Jars:
- Alfalfa: Quick germinator (3–5 days), mild flavor, fine stems
- Broccoli: High-yielding, nutrient-dense, ready in 5–7 days
- Radish: Spicy kick, fast-growing, sturdy leaves
- Mustard: Strong flavor, attractive reddish stems, 7–10 days
- Arugula: Peppery taste, great for salads, moderate growth rate
- Red Cabbage: Vibrant color, rich in antioxidants, 6–8 days
In the grower’s trial, Dollar Tree seed blends labeled as “mild mix” and “hot mix” both performed excellently. The mild mix germinated fastest and provided a fluffy, delicate texture. The hot mix developed more slowly but had bolder flavors and colors.
What to Avoid:
- Peas, Sunflowers, and Beans: These are too large for mason jars and tend to retain excess moisture in a closed environment. They often require soil or mats and more space to avoid fungal issues.
- Basil: Though possible, basil has a mucilaginous (gel-like) seed coat when soaked, which can clump easily in jars and restrict airflow.
For beginners, starting with broccoli or alfalfa is ideal. They offer rapid results, minimal fuss, and a reliable success rate even with DIY mesh covers.
Daily Maintenance and Care
Consistency is key to successful microgreen growth in jars. A few minutes of care each day can prevent 90% of problems.
Rinsing Routine
- Rinse and drain twice daily, morning and evening.
- Use cool or room-temperature filtered water.
- After each rinse, keep the jar at a slanted angle in a bowl or dish rack to drain completely. A 45-degree tilt works best.
Ventilation and Moisture Control
Jars need airflow to discourage mold. The cloth lid should allow some air in while preventing pests or dust. Avoid sealing jars with airtight lids.
Humidity is a common issue. In the case study, the grower emphasized that even a tablespoon too much water left in the jar could spoil the whole batch. Ensure there’s no standing water after rinsing.
If condensation appears or the greens smell musty, increase airflow by using a thinner cloth or leaving the lid partially uncovered during the day.
Light
Once germination is underway, place the jars in a bright location with indirect sunlight. Direct sun can overheat the jar and dry the greens too quickly. If natural light is limited, a cool LED grow light placed 8 to 12 inches away works well.
Yield and Expectations
Jar-grown microgreens are compact but efficient. While they won’t match the volume produced in large trays, they provide ample greens for personal use, especially when staggered in rotation.
In the referenced example:
- A single $1.25 seed packet from Dollar Tree produced three generous harvests per jar.
- Each harvest yielded approximately ½ to ¾ cup of microgreens, suitable for 2–3 servings as a garnish or salad addition.
- The grower was able to sustain weekly greens for a family of four using 4 jars in rotation—one planted every 2 to 3 days.
Expected growth timelines:
- Alfalfa: 4–6 days
- Broccoli and Radish: 5–7 days
- Mustard and Arugula: 7–10 days
From a cost-efficiency standpoint, this method is exceptional. The combined cost of seeds, jars (if purchased), and cloth lids was under $10 total, yet provided weeks of fresh greens with almost zero waste or spoilage.
Common Mistakes to Avoid
Even though growing microgreens in jars is relatively simple, there are several pitfalls that can affect yield, taste, or even lead to spoilage. Recognizing and preventing these mistakes can significantly improve your success rate.
Overcrowding the Seeds
A common beginner error is using too many seeds in a single jar. It may seem like more seeds will produce more greens, but the opposite often happens. When seeds are overcrowded, air can’t circulate properly, and moisture gets trapped. This creates a perfect environment for mold and damping-off disease.
In the documented grow, a teaspoon of small seeds such as alfalfa or broccoli per jar was more than enough to produce a dense yet breathable mat of microgreens. Going over that threshold reduced airflow and resulted in clumping and yellowing.
Insufficient Draining
Leaving even a small amount of residual water at the bottom of the jar is the leading cause of spoilage. The grower emphasized that after each rinse, jars must be thoroughly drained and stored at an angle for at least 10–15 minutes.
Water collecting at the base creates anaerobic conditions that lead to slimy roots, unpleasant odor, and inedible greens. Using a mesh or cloth cover that allows complete inversion is essential.
Wrong Seed Types
Larger seeds like sunflower, pea, mung bean, or beet have thicker husks and longer roots, making them unsuitable for confined jar conditions. They need more oxygen, space, and often a rooting medium. Attempting to grow these in jars frequently results in incomplete germination or sour-smelling sprouts.
One attempt to grow sunflower greens in a jar led to a “mushy failure,” with nearly the entire batch going bad due to the density and slow growth rate.
Neglecting Light Timing
Delaying the transition from dark to light after germination can hinder chlorophyll development. Once rootlets appear and sprouts reach about half an inch in length, they need indirect light exposure to green up and strengthen. Leaving them in darkness too long results in pale, weak microgreens.
Not Cleaning Between Batches
Reusing jars without proper sanitization can introduce pathogens from old batches into new ones. After each harvest, jars should be washed with warm soapy water and rinsed with diluted vinegar or hydrogen peroxide. Skipping this step often leads to recurring mold or poor germination.
Storage and Shelf Life
Once harvested, microgreens are highly perishable. However, when handled carefully, they can remain fresh for up to 7 to 10 days in refrigeration.
Harvesting for Maximum Freshness
Greens should be harvested right before use whenever possible. But if you plan to store them:
- Harvest with clean, dry hands or sanitized tweezers.
- Do a final rinse with cold, filtered water, then pat dry with a lint-free towel or use a salad spinner to remove excess moisture.
- Let the microgreens air-dry on a clean towel for 20–30 minutes before storing. Trapped moisture shortens shelf life.
Storage Containers
Store microgreens in glass or BPA-free plastic containers with a dry paper towel at the bottom to absorb moisture. Avoid sealing containers completely; instead, use breathable lids or poke tiny holes to reduce condensation.
The grower noted that when stored correctly, their harvested greens retained crispness and flavor for up to 8 days, though taste was best in the first 4 to 5 days.
Recipes and Uses for Jar-Grown Microgreens
Microgreens from mason jars may be small in volume, but they pack intense flavor and nutrition. They can be used in a variety of dishes:
Everyday Uses
- Sprinkle on salads for added texture and flavor.
- Use as a garnish on soups or curries.
- Top on sandwiches, burgers, or wraps.
- Fold into omelets or scrambled eggs.
- Mix into smoothies for a nutrient boost.
- Add tBuddhaha bowls or poke bowls for visual appeal and flavor layers.
Flavor Pairing by Type
- Radish and mustard: Pair well with spicy dishes, grilled meats, or cheese-based meals.
- Broccoli and red cabbage: Ideal for fresh green smoothies, slaws, or spring rolls.
- Alfalfa and arugula: Complement light salads, seafood, and soft cheeses.
Because the microgreens are grown without soil and are handled minimally, they are clean and safe to eat raw right out of the jar, with only a gentle rinse needed before consumption.