
Want fresh greens even in winter? This guide shows how to grow microgreens in your kitchen using simple gear and a windowsill. You will learn the best seeds, how much to sow, and why a short blackout period builds taller, easier-to-cut stems.
We use numbers such as a 3×5-inch tray that is 15 square inches and a 12-gram seed packet that can cover up to about 35 square inches. Expect bright indirect light to be enough.
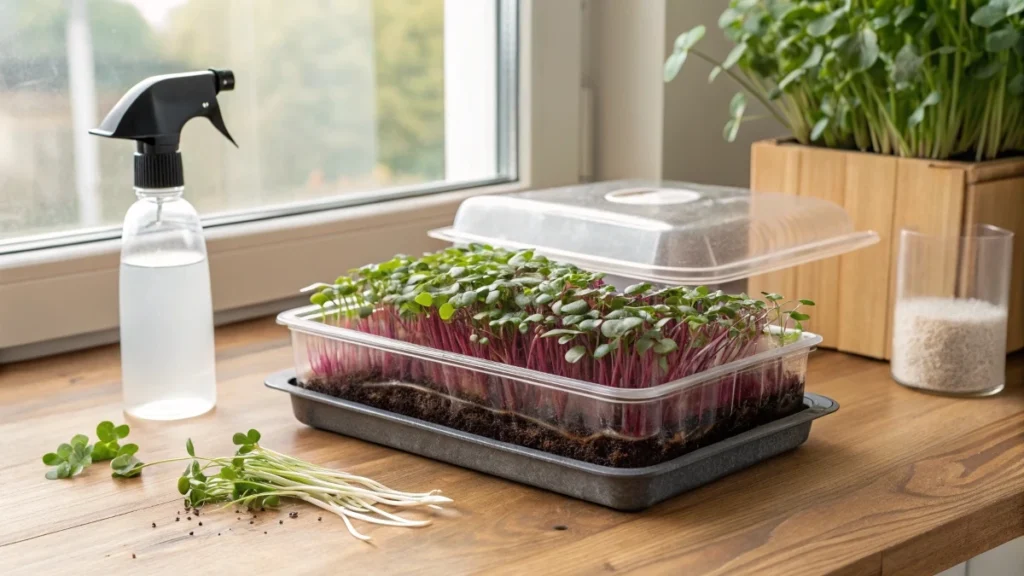
No special lamps required. Moist coconut coir, a sprayer, and lids are all you need. Harvest in about a week and store cut greens in the refrigerator for one week.
Why grow microgreens indoors
Fresh food during winter
When the outdoor season winds down, you can still harvest something bright and flavorful from a kitchen windowsill. A tray of microgreens gives you fresh leaves while larger garden projects pause. This works as a backup plan if the greenhouse starts fail. You are not waiting months. Most trays move from sowing to first harvest in about a week in typical home conditions.
Small space with real output
You do not need a big setup. A single tray that measures 3×5 inches covers only 15 square inches yet yields a generous handful of toppings for soups, egg sandwiches, and meats. Because you seed densely, you get a concentrated cut of stems and baby leaves rather than sprawling plants. After cutting, the compact root mat lifts out cleanly, so the reset time is quick.
Easy lighting from a regular window
Microgreens respond well to bright indirect light. A west-facing window worked well. A south-facing window can be nice, but it is not required. This makes kitchen growing practical even in homes without a perfect sun aspect. A little stretch in the stems is welcome because longer stems are easier to cut.
🌿 Recommended Microgreens Supplies |
What you need in a kitchen setup
Shallow trays with lids
Low trays help you seed densely and cut cleanly. Lids matter for two reasons. First, they hold humidity during the early days so seeds hydrate evenly. Second, they make it simple to stack trays during the blackout period to save counter space. The trays used here were 3×5 inches and had no drainage holes, so watering is best done with a sprayer.
Seed starting mix or a simple swap
A light blend based on coconut coir works well. Small flecks of perlite or vermiculite are fine. Microgreens are harvested quickly, so the mix is mainly there to anchor roots and hold moisture. You can also double up bamboo paper towels, dampen them, and use them as a soil-free base. Both approaches work in a kitchen.
A fine sprayer plus labels
A hand mister lets you wet the surface without flooding. This is important when trays have no drainage. Add a simple label with the crop and date so you do not lose track of timing.
Seeds and how much to sow
Regular seed is all you need
Microgreens come from the same seed you would use for full-sized plants. You can even set aside a pinch of seed for the garden. Keeping about 15 to 20 seeds from a packet lets you raise a mature plant later, while the rest becomes quick indoor harvests.
Mix and match varieties
Good kitchen candidates include red cabbage, kale, cress, arugula, peas, broccoli, radish, and sunflower. You can grow a single crop per tray or combine crops that share similar needs.
Use the packet numbers to plan
One packet in the example weighed 12 grams and can cover up to about 35 square inches of tray area. A 3×5-inch tray is 15 square inches. That means you need just under half the packet for one full tray at a dense kitchen rate. Sow a little less if you prefer slightly looser growth and easier airflow.
Which seeds need soaking
No soak group
Red cabbage, kale, and cress can be sown dry on the pre-moistened surface. These are small brassica seeds that readily absorb water from the mix once covered and misted.
Soak the first group.
Peas and sunflowers benefit from a soak because the seed coats are larger and need more water to germinate from dormancy. A brief soak plumps them so they germinate more evenly once sown.
Preparing the growing medium
Hydrate thoroughly at the start.
Coco-based mixes arrive quite dry. The first watering should fully hydrate the mix, so it is evenly damp from top to bottom without puddles. This initial step is more generous than later waterings. Once hydrated, the mix holds moisture well for the first few days under the lid.
Water gently because there is no drainage
If your trays do not have holes, switch from pouring to misting. A fine spray prevents water from pooling at the bottom and keeps seeds from floating into clumps. Aim for a surface that feels evenly moist to the touch.
Sowing methods that work indoors
Even broadcast across a moist surface.
Scatter seed so it covers the surface in a single layer with minimal overlap. Tapping the tray helps seeds settle. This simple step sets up uniform growth and a neater harvest.
Light top dressing to guide roots
A very thin sprinkle of mix over the seeds improves contact and surrounds each seed with moisture. This helps the first root grow downward into the medium. The tradeoff is that a few flecks of mix may cling to the leaves after cutting, which is fine for home use and easy to rinse away. An alternative approach is to place another empty tray on top with a small weight, so the seeds press into the surface. The kit method relied on the light top dressing rather than a weight, and it worked well.
The blackout period
What blackout does
Early on, you want slightly longer stems so cutting is easy. Keeping the trays dark for a short window encourages the seedlings to stretch before they green up. This is the role of blackout.
How long to keep them covered
Plan for about four days of darkness. A five-day span also worked without issue. During this time, keep lids on and stack trays to save space. Peek once or twice to confirm the environment stays humid and the surface does not dry out. Because the lids’ slow evaporation, you will rarely need more than an occasional mist.
When to end the blackout
Remove the lids on schedule so the young plants do not sit in still humid air for too long. Staying covered past the target window can invite rot. Once the lids are off, move trays to bright indirect light so the leaves can color up and build flavor.
Into the light
Move trays out of the darkness at the right moment
After about four to five days of darkness, remove the lids and shift the trays to bright indirect light. Keeping them covered for longer invites stale air and excess humidity, which can lead to rot. A regular kitchen window works well. A west-facing window performed reliably. A south-facing window is helpful but not required.
Light quality and placement
Microgreens do not need special lamps for this short grow. Place trays where they receive steady daylight without harsh midday rays. Rotate the trays daily so stems rise evenly and do not lean toward one side. If your window gets cold at night, keep trays a few centimeters back from the glass to avoid chilling.
A little stretch is useful.
Unlike full-size seedlings, microgreens benefit from a touch of stretch. Slightly longer stems make cutting cleaner and give a better bite. Once the trays are in the window, the leaves will color up, and the flavors sharpen. Red cabbage often shows a clear purple tone along the stem, which signals strong pigment development.
Watering and ongoing care
Manage moisture without drainage holes.
If your trays do not have holes, treat watering like a misting routine rather than a pour. The first hydration saturates the coconut-based mix. After that, switch to a fine sprayer. Mist whenever the surface loses its sheen or feels barely damp. Pools at the bottom suffocate roots, so keep applications light and even.
Daily checks for humidity and airflow
Look in on trays at least once a day. You are watching for two things. The surface should not crust over, and the stems should not sit in stagnant air. Once the lids are off, keep the area airy to discourage disease. A small fan on a low setting across the room can help if your kitchen is still.
Even stands and gap filling.
If a patch looks thin, sprinkle a pinch of seed into that spot during the first couple of days in light and mist again. Early gap filling evens the canopy before the harvest window arrives and makes cutting easier.
When to harvest and how to cut
Read the leaf stage, not the calendar
Most kitchen trays reach peak harvest around one week from sowing in typical home conditions. The best cue is the first true leaves just beginning to appear between the two seed leaves. Cress often hits this stage a bit sooner than brassicas such as kale and cabbage.
Lift, snip, and keep the medium out of the bowl.
Slide a hand under the slab. You will feel a dense root mat that holds the tray together. Lift the slab and use clean kitchen shears to cut just above the surface of the mix. Avoid pulling. Pulling brings the medium into the harvest and bruises stems. If you used a light top dressing, expect a few specks on the leaves. A quick rinse right before serving clears them.
Flavor and color signals
Watch for clear color on varieties that pigment strongly. Red cabbage showing purple stems is a good sign. Harvest at first true leaves for a bright, fresh taste. Waiting longer adds leaf mass but can dull the tender texture that makes microgreens special.
After harvest
Fast kitchen uses
Microgreens add snap and color to soups, egg sandwiches, and roasted meats. They blend smoothly into a smoothie as well. A small handful will brighten a plate that needs contrast.
Storage that keeps quality
Transfer cut greens to a lidded container and refrigerate. Expect a useful life of about one week. If you rinse to remove specks, spin or pat dry before chilling, so condensation does not shorten shelf life. Open the container once a day for a few seconds to let excess moisture escape if droplets form inside.
What to do with the leftovers
The spent root mat is perfect for the compost bin. If you keep poultry, the mat and any fallen bits mixed with medium make good chicken feed. This closes the loop and readies the tray for the next sowing.
Troubleshooting
Specks of mix on the leaves
This comes from a light top dressing at sowing. Rinse after cutting if you used that method. On the next batch, skip the top dressing or press seeds gently with an empty tray used as a weight.
Patchy germination
Reseed thin spots early while the canopy is still short. Keep the surface evenly damp during the first days so small seeds do not dry out.
Too wet for too long
Leaving lids on past the blackout window keeps humidity high and can lead to rot. End the dark period on schedule and move trays to the window.
Drying between mists
Thin layers of mixed dry faster than potting soil. Mist more frequently rather than pouring. If edges dry first, mist the perimeter lightly and then the center.
Stems leaning toward the window
Rotate trays every day. A slow turn encourages upright growth and a uniform canopy, which makes cutting smooth and reduces waste.
Ten-day kitchen timeline
Day 0 sowing
Pre-moisten the mix so it is evenly damp. Broadcast seed across the surface. For a tray that measures three by five inches, which equals fifteen square inches, use just under half of a twelve-gram packet that is rated to cover up to about thirty-five square inches. Optionally add a very thin sprinkle of mix on top to help roots find the medium. Mist well, cover with the lid, and add a label with the date and crop.
Days 1 to 4 blackout
Keep trays covered and stacked to save space. Check once or twice a day. Surfaces should stay humid. Mist lightly only if the sheen fades.
Day 4 or 5, move to light.
Remove lids to restore airflow and set trays in a bright window with indirect sun. Rotate trays daily. Continue misting to keep the surface evenly moist.
Days 7 to 10 harvest window
Begin cutting when the first true leaves appear between the two seed leaves. Lift the slab and snip above the medium with clean shears. Red cabbage should show rich purple stems at this point. Chill the harvest in a lidded container and enjoy within about one week.
Into the light for kitchen microgreens
Key takeaways for searchers
You can grow microgreens indoors on a windowsill with simple trays and a fine sprayer. Plan a four to five-day dark start, then move trays to bright indirect light. Harvest around one week from sowing when true leaves appear. Store the cut greens in the refrigerator in a closed container for about one week.