
Growing microgreens on your windowsill is an easy and cost-effective way to enjoy fresh, nutritious greens year-round, even in small spaces. Whether you are a beginner or an experienced gardener, this method allows you to cultivate a variety of microgreens like arugula, broccoli, and radishes in as little as seven to fourteen days.
Microgreens are packed with vitamins, minerals, and antioxidants, offering a powerful nutritional boost to your meals. They require minimal space, making them perfect for apartment living or homes without outdoor garden space.
In this guide, you will learn everything you need to know, from selecting the right seeds and containers to harvesting and using your microgreens in a variety of delicious dishes. Start growing today and add a healthy, vibrant touch to your meals!
Essential Supplies
To get started with growing microgreens on your windowsill, you’ll need a few key supplies. Fortunately, growing microgreens requires minimal space and investment, making it perfect for apartment dwellers or anyone with limited gardening space.
Containers
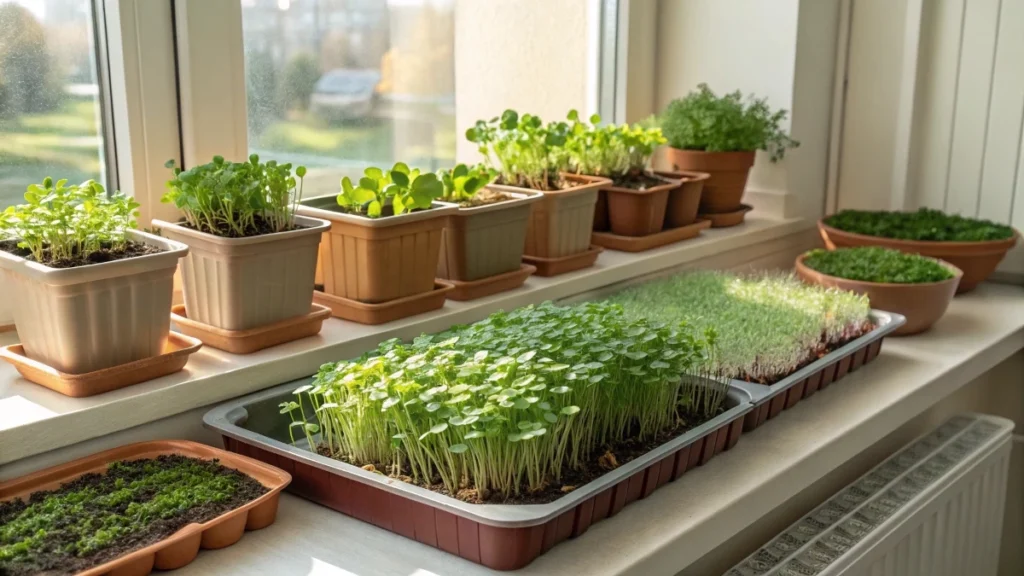
Choosing the right container is essential for your microgreens. Shallow trays or even recycled items such as takeout containers or old nursery pots can work well for growing microgreens. The key is to ensure the container is large enough to accommodate the soil and seeds but not too deep. Microgreens don’t need a lot of space for their roots to grow, so a shallow container is ideal.
Terracotta trays are particularly effective as they allow moisture to evaporate slowly, which can help maintain humidity levels without excess water buildup. If you choose a container without drainage holes, you’ll need to be more mindful of watering to prevent the soil from becoming too soggy.
Growing Medium
Microgreens thrive best in light, well-draining soil that provides adequate moisture while allowing proper airflow around the roots. A good quality indoor potting mix or coconut coir works great. Coconut coir is an excellent choice because it retains moisture well while still allowing for proper drainage.
Avoid using garden soil indoors, as it’s too heavy and can bring in pests. A mixture of soil or coir with a bit of perlite can ensure good root aeration and prevent compaction over time.
Seeds
Microgreens can be grown from almost any edible seed. Common varieties to start with include arugula, radish, broccoli, kale, sunflowers, and peas. You’ll want to choose seeds that are easy to germinate and grow quickly. Many of these seeds have different germination times, so it’s important to read the packaging instructions and select varieties with similar needs if you’re growing them together.
Watering Tools
A spray bottle is ideal for watering your microgreens. It provides a gentle mist that helps keep the seeds and soil moist without over-wetting the growing medium. Overwatering can lead to mold and root rot, so it’s best to mist the surface lightly to maintain an ideal moisture level.
Lighting
Microgreens require at least 4–6 hours of light per day. If you have a south-facing window, that should provide enough indirect sunlight. However, during cloudy days or in spaces with less natural light, you may need to supplement with grow lights. LED grow lights work well and provide the right spectrum of light for your plants to grow strong without the heat that can be generated by incandescent bulbs.
🌿 Recommended Microgreens Supplies |
Step-by-Step Growing Process
Growing microgreens on your windowsill is straightforward and doesn’t require any special skills. The following steps will guide you through the process from planting to harvest.
Preparation
Start by filling your chosen container with about an inch of soil. The soil should be moist but not soaking wet. You want it damp enough to encourage germination but dry enough to avoid waterlogging the seeds. Press the soil down lightly to remove any air pockets, ensuring the seeds have good contact with the soil.
Sowing Seeds
Microgreens don’t require much space, so you can plant the seeds densely. Scatter them evenly across the surface of the soil. Since microgreens are harvested young, you don’t need to worry about leaving space for each seed to grow to full size. Make sure to plant them thickly for a lush, carpet-like result.
For the best results, avoid covering the seeds with soil. Most microgreens germinate well when the seeds are left exposed but in contact with the moist soil. Some varieties may require a little additional moisture or light coverage during the germination period, but the general rule is to keep things simple.
Germination
To help the seeds sprout, create a humid environment. You can cover the container with a plastic lid or plastic wrap to trap moisture and heat. This mimics the conditions of a greenhouse and speeds up the germination process. Keep the container in a dark place for the first few days to simulate the conditions seeds need for sprouting. Once you start to see the first signs of growth, it’s time to remove the cover.
Watering
Use a spray bottle to lightly mist the seeds and soil once or twice a day. Be cautious not to overwater, as stagnant water can lead to mold growth. Keeping the soil moist is important, but you don’t want to drown the seeds. The moisture should be enough to keep the seeds hydrated without causing waterlogged conditions.
Lighting
Once your seeds have sprouted and started to grow, they will need light. Set your container on a sunny windowsill, ensuring they receive indirect sunlight for at least 4–6 hours daily. If your windowsill doesn’t get enough sunlight, you can use grow lights. Microgreens don’t need intense light like full-grown plants, but they do benefit from some light to develop their flavor and nutritional content.
Harvesting Your Microgreens
One of the greatest benefits of growing microgreens is how quickly they mature. Depending on the variety, microgreens typically take anywhere from 7 to 14 days to reach harvestable size.
Timing
The right time to harvest microgreens is when the first true leaves (not the seed leaves) appear. This is typically about 7–10 days after sowing, but it can vary depending on the variety. If you wait too long, the microgreens may start to get leggy, which can affect their flavor and texture. Once the true leaves start to show, it’s time to snip them.
Method
Harvesting microgreens is easy. Using clean kitchen scissors, snip the greens just above the soil level. Be careful not to disturb the roots too much, as they are fragile. A gentle, swift cut is all you need.
Storage
Microgreens are best eaten fresh, but they can be stored for a few days. To keep them fresh, place them in a container lined with a paper towel and store them in the fridge. Be sure to avoid washing them until you’re ready to eat them, as excess moisture can cause them to spoil more quickly.
Culinary Uses
Microgreens are incredibly versatile and can be added to nearly any meal to enhance flavor and nutrition. They add a burst of freshness, crunch, and color, making them perfect for both raw and cooked dishes.
Salads
Microgreens are excellent in salads, providing a light, fresh taste. Their flavor profiles vary depending on the variety, with radish microgreens offering a spicy kick, while pea shoots have a sweet, mild flavor. Mix different varieties to create a vibrant and flavorful salad.
Sandwiches & Wraps
Add a handful of microgreens to your sandwiches, wraps, or tacos for extra crunch and nutrition. They pair wonderfully with everything from avocado toast to turkey sandwiches.
Soups
Sprinkle microgreens on top of soups to add color, texture, and an additional layer of flavor. Whether you’re serving creamy tomato soup or a hearty lentil stew, a garnish of fresh microgreens will elevate the dish.
Smoothies
For a nutrient-packed boost, toss a handful of microgreens into your smoothies. They blend seamlessly with fruits and other vegetables, adding vitamins and antioxidants to your drink.
Troubleshooting Tips
While growing microgreens is relatively simple, there are a few common issues you might encounter. Here are some tips to ensure healthy growth and a successful harvest.
Leggy Growth
If your microgreens are stretching out too much and becoming leggy, this usually indicates that they aren’t receiving enough light. Ensure they’re placed in a bright location or use grow lights to supplement natural light. Adjusting the light cycle can help them grow strong and stocky.
Mold
Mold can be a common issue when growing microgreens, especially if the soil is too wet or there’s poor airflow. To prevent mold, make sure the containers are well-ventilated, and only mist the seeds lightly. If mold starts to form, remove the affected greens and adjust your watering schedule.
Pests
Although microgreens are less likely to attract pests than full-grown plants, they can still be vulnerable to insects like aphids or fungus gnats. To keep pests at bay, keep your growing area clean and inspect your microgreens regularly. If you spot pests, try using a mild organic insecticide or wash the affected leaves gently.