
Growing microgreens outdoors might be the simplest garden upgrade you’ve been overlooking. No fancy trays, no grow lights, and no expensive gear needed. Just seeds, a bit of soil, and a sunny patch of ground.
In just over a week, you could be snipping fresh, nutrient-packed greens straight from your backyard. They grow fast, taste amazing, and cost next to nothing.
Plus, they look incredible nestled into your garden beds, adding life and color while saving you trips to the store. It’s the kind of low-effort, high-reward project that just makes sense for anyone who loves fresh food and hates wasting space.
Your garden’s about to get a whole lot tastier 🌱💪☀️
Best Time to Grow Microgreens Outdoors
Outdoor microgreen production is highly seasonal. The ideal window for growing them outdoors is during the main season — late spring through summer and into early fall. These periods offer consistent daylight, warm temperatures, and faster drying times, all of which contribute to better germination and steady growth.
Unlike greenhouse-grown microgreens, outdoor crops are subject to environmental variability such as sudden temperature drops, unpredictable rainfall, and wind exposure. This makes outdoor microgreens less viable during the shoulder seasons — early spring and late fall — and nearly impossible in winter, especially in northern climates.
For example, in controlled greenhouse settings, sunflower and pea shoots can reliably mature in 8-day cycles from sowing to harvest. Outdoors, even under warm conditions, they typically take longer — about 10 to 11 days. The lack of temperature stability and controlled humidity slightly slows down germination and growth, even when the weather is favorable. Radish shoots, on the other hand, maintain their typical 8-day cycle even in outdoor settings.
The takeaway is that outdoor microgreen growing is ideal only during stable, warm months. Attempting to extend production beyond that window introduces unpredictability in growth rates and may reduce yield or quality.
Site Selection and Bed Preparation
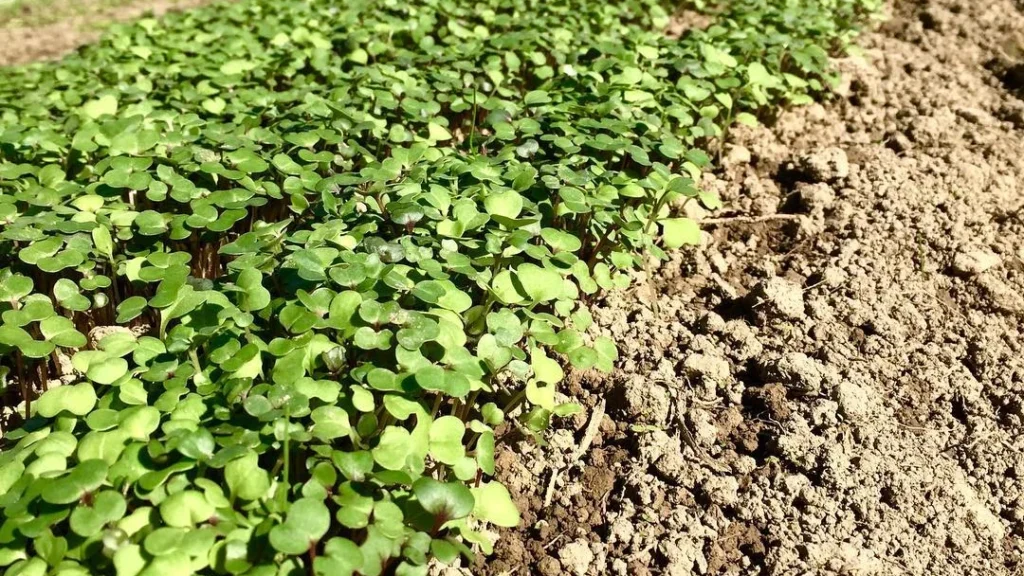
Site selection is crucial when growing microgreens outdoors. The ideal site should receive full sun for most of the day, have well-draining soil, and be protected from extreme wind. Unlike greenhouse setups that use plastic flats or grow racks, field-grown microgreens rely entirely on the ground medium, so the quality and consistency of the soil surface become essential.
The bed should be prepared in a way that mimics the flatness and evenness of nursery trays. This is done using a simple but effective tool called a bed board. In one method, a custom-sized board measuring 26 inches by 36 inches is used to tamp down the soil surface, creating a leveled and compressed seedbed. This size roughly equates to 4.68 square feet — equivalent to four and a half standard 1020 microgreen trays, each of which measures 200 square inches.
Having a flat, firm surface ensures uniform seed contact with soil and more even germination. Beds can be tilled or manually loosened beforehand, but what matters most is that they are flat and firm. There is no need for heavy soil amendments or fertilizers, since microgreens are harvested before they draw significant nutrients from the soil.
Despite minimal requirements, slight elevation can occur in beds due to the fluffing effect of soil preparation. This causes the edges of beds to dry out faster than the center. To mitigate this, soil is sometimes pulled up along the sides of the boards after seeding to help seal in moisture and reduce edge drying.
🌿 Recommended Microgreens Supplies |
Choosing Microgreen Varieties for Outdoors
Certain varieties perform better in outdoor field conditions due to their robust germination and growth habits. Three of the most reliable and popular types for outdoor growing are pea shoots, sunflower shoots, and radish microgreens.
Pea shoots and sunflower shoots both require pre-soaking to soften their seed coats and improve germination. These larger seeds have more mass, which allows them to handle outdoor variability like wind or surface dryness better than finer seeds. In contrast, radish seeds are small, fine, and delicate — they are best planted dry and require more careful seeding for even distribution.
Among the three, radish microgreens are the fastest to mature outdoors. They typically reach the harvest stage in about 8 days, aligning closely with their greenhouse counterparts. Sunflower and pea shoots tend to take slightly longer in outdoor settings, typically around 10 to 11 days, depending on daily temperatures and sunlight exposure. This delay is due to slower germination caused by cooler night temperatures and fluctuating humidity levels.
These three varieties also have different post-harvest handling needs. Radish and sunflower microgreens often require washing due to soil splashing during watering or rainfall, whereas pea shoots, being taller and more upright, can sometimes be harvested clean without washing — though outdoor conditions may still warrant it.
Seed Preparation and Sowing
Preparation of seeds before sowing directly affects germination rate and crop uniformity. For outdoor-grown microgreens, seed prep follows similar principles to indoor systems, with adjustments to accommodate the environmental conditions.
Sunflower and pea seeds should be soaked in water before planting. This process softens their seed coats, triggers early-stage hydration, and ensures that germination begins promptly after sowing. After soaking, these seeds should be rinsed thoroughly to remove any potential pathogens and then drained before being spread onto the beds.
Radish seeds are not soaked and are instead planted dry. Their smaller size makes them difficult to handle when wet, and dry sowing allows for more control over distribution. Since the radish seeds are lightweight and fine, they are usually broadcast using a gentle shaking motion to achieve as even a spread as possible. They are not spread by hand like the larger pea and sunflower seeds, which are easier to distribute by hand for consistent coverage.
Seed density is crucial for optimizing yield and avoiding overcrowding. In standard indoor trays, approximately 332 grams of seed is used per 1020 tray. For outdoor applications, this number is scaled according to the bed area. Using a 4.68 square foot bed (equivalent to 4.68 trays), one would require roughly 1.5 kilograms of seed in total, proportionally divided among the selected varieties.
After broadcasting, the seeds are pressed into the soil using the bed board again. This pressing step ensures good seed-to-soil contact, which is critical for moisture absorption and uniform sprouting. Finally, a light layer of soil or potting mix is used to cover the seeds. This cover helps to hold moisture and provides a slight barrier against temperature swings and drying winds. The fine texture of potting mixes like Sunshine #3 is particularly beneficial for this purpose, although finely sifted garden soil can also work if available.
Germination Conditions and Early Growth
The germination phase is the most delicate part of outdoor microgreen cultivation. To replicate the uniform germination that occurs when trays are stacked in nursery settings, growers use boards to cover the seeds once they are sown and lightly covered with soil.
These boards are typically wooden planks cut to the size of the bed section (in this case, 26 inches by 36 inches). Once placed on top of the seeded area, the boards apply mild pressure, simulating the weight of stacked trays. This pressure helps press seeds into the soil, ensuring proper contact with moisture and triggering more uniform germination. The added darkness under the board also mimics the low-light environment ideal for early sprouting.
After the seeds are covered and pressed, the area is watered heavily using a soft sprayer. Adequate moisture is vital during the first few days, and the goal is to maintain consistent humidity under the board to avoid drying out. The boards also help protect against direct sunlight and evaporation in the early stages. Weights — such as sandbags or row cover bags — can be placed on top of the boards to enhance seed-to-soil contact and ensure stability against wind.
Depending on the variety and weather, the germination phase typically lasts about 4 to 5 days. At this point, the seeds will have sprouted and begun pushing against the board. When you see the board being visibly lifted or pushed up by the emerging seedlings, it’s time to remove the board and allow exposure to full sunlight.
Maintaining soil moisture during this early growth phase is essential. If the weather is dry or windy, beds may require watering once or even twice a day using a gentle spray to avoid displacing the delicate seedlings.
Light, Temperature, and Watering Requirements
Outdoor microgreens thrive under full sun but need moisture retention to avoid drying out. Light is not typically a limiting factor outdoors unless the beds are in shaded areas. Full sun exposure encourages compact, thick growth and vibrant color in microgreens. However, full sun also means quicker drying, especially when the wind and heat are high.
Temperature plays a dual role. While warm days encourage faster growth, cool nights — common in most temperate zones — can slow down development. In contrast to greenhouse environments, where consistent temperatures speed up maturity, outdoor microgreens often take a couple more days to reach harvest size due to this fluctuation. For instance, sunflower and pea shoots that typically mature in 8 days indoors may take 10 to 11 days outdoors.
Watering is the most critical task and must be adapted based on environmental conditions. Because these greens grow directly in soil, they are more susceptible to splashing and soil contamination during watering or rainfall. A fine mist or soft-spray nozzle is ideal to keep seedlings hydrated without washing them away or causing soil splash.
Due to the natural elevation of garden beds, edges dry out more quickly than the center. To minimize moisture loss at the edges, a thin layer of soil can be pulled up along the border after board placement. This helps reduce airflow under the board and retains moisture uniformly across the entire bed.
If irrigation infrastructure like overhead sprinklers is unavailable, hand watering is sufficient but requires close monitoring. Drip irrigation is not suitable for microgreens because it doesn’t provide even coverage and can miss seeds on the surface.
Pest and Environmental Management
Outdoor growing introduces variables that indoor microgreens are largely protected from, including pests, birds, and erratic weather. While microgreens are quick to mature and thus less exposed over time, their early stages are vulnerable.
Birds, for instance, are attracted to the exposed seeds during the first few days. They can disturb or eat seeds before they sprout. Using row covers during the germination phase can deter birds and also help retain moisture. However, if wooden boards are already covering the seeds, they offer a layer of protection by concealing theseedbedd.
Pests like slugs, aphids, and flea beetles are less common in very young microgreens due to their short growing cycle, but they can still pose a threat, especially in humid or overly wet conditions. Growing in well-ventilated areas and avoiding overwatering are good preventive measures.
Environmental risks are harder to control. Rainstorms can lead to soil splashing, which contaminates the greens and increases the need for washing. Heavy rain can also compact the soil and flatten tender shoots. Wind exposure can dry out the surface layer rapidly, making consistent watering even more crucial.
Unlike greenhouse microgreens, which are grown under highly regulated conditions, field microgreens require constant observation and adaptation. Weather apps, physical barriers, and responsive watering schedules are all essential tools in managing the unpredictability of outdoor environments.
Harvesting and Post-Harvest Handling
Harvesting outdoor-grown microgreens follows the same method as indoor harvesting, but with a few key differences in post-harvest handling due to exposure to natural elements.
When ready for harvest — typically between 8 to 11 days depending on the variety and weather — microgreens are cut at the base using a sharp chef’s knife. The technique is the same as that used in greenhouses: smooth, clean cuts just above the soil line to minimize grit and stem damage.
However, since the greens are grown directly in soil and watered by hand or rain, there is a higher risk of dirt splashing onto the leaves. As a result, post-harvest washing becomes more important. While greenhouse-grown pea shoots can sometimes be sold unwashed due to their upright nature and controlled environment, field-grown versions typically require washing to remove soil and potential contaminants.
A multi-stage rinse using clean, cold water is effective in removing debris and extending shelf life. After washing, greens should be spun dry and stored in airtight containers in the refrigerator. The quality and yield from outdoor beds can be comparable to that of indoor flats. In one example, a bed measuring 4.68 square feet yielded nearly the same amount of microgreens as four to five standard nursery trays.
One noticeable difference in outdoor-grown microgreens is their size and texture. Because they grow in natural soil with greater access to nutrients and water, the cotyledons — or first leaves — tend to be larger and thicker. This gives outdoor microgreens a more robust appearance and texture, which can be attractive to consumers and chefs.
Expected Yields and Growth Timelines
One of the most common questions about outdoor microgreen production is how yields compare to traditional tray systems in greenhouses. The good news is that field-grown microgreens can produce yields that are comparable to indoor-grown flats—sometimes even slightly higher due to larger cotyledons and thicker stems.
In an example bed measuring 26 inches wide by 36 inches long (equivalent to 4.68 square feet or roughly 4.5 standard 1020 nursery flats), the grower used approximately 1.5 kilograms of total seed, calculated by multiplying the standard tray seeding rates (such as 332 grams per flat for pea shoots) by the bed’s square footage equivalency.
Growth timelines outdoors tend to be slightly longer. For instance, in controlled greenhouse environments, sunflower and pea microgreens are typically harvested on an 8-day cycle, often seeded on a Wednesday and harvested the following Thursday. Outdoors, due to fluctuating temperatures, even in the summer, that same crop may take 10 to 11 days to reach maturity.
Radish microgreens are an exception. In one case, they were harvested exactly 8 days after outdoor seeding, even under non-controlled conditions. This suggests radish is more resilient to temperature fluctuations and faster-growing in field conditions than pea or sunflower shoots.
Environmental factors like ambient temperature, rainfall, and sunlight duration will significantly affect actual harvest time, so it’s important to monitor progress daily rather than rely solely on a fixed schedule.
Pros and Cons of Outdoor Microgreen Production
Outdoor microgreen production has clear advantages, particularly in warmer months. One of the biggest benefits is cost savings. There’s no need for:
- Expensive infrastructure, like greenhouses or hoop houses
- Nursery trays or racks
- Heating or supplemental lighting
- Large volumes of potting mix
In one setup, only three liters of soil mix (the equivalent of one tray of indoor potting media) was needed to lightly cover an entire bed. In fact, growers can use finely sifted native soil instead of purchased mixes if their soil isn’t too clay-heavy or clumpy. This drastically reduces input costs.
Another advantage is space flexibility. If a grower is limited by the number of trays they can fit in a greenhouse or indoor grow room, expanding production to a prepared garden bed can dramatically increase output with minimal investment.
However, there are drawbacks. The biggest isthe lack of environmental control. Outdoor crops are subject to:
- Rain and wind, which can cause uneven watering or contamination
- Birds or insects are eating freshly seeded beds
- Slower or inconsistent growth due to fluctuating temperatures
- The need for more extensive post-harvest washing to remove dirt and debris
There’s also a limited seasonal window. In temperate or northern climates, outdoor microgreens can only be grown during the main season—typically late spring to early fall. They are not a viable option in winter or shoulder seasons without protective structures.
Best Practices and Tips for Success
To get the best results growing microgreens outdoors, attention to detail in every step—from bed preparation to harvest—is crucial. Here are some key practices refined through direct experience:
- Use Level Beds: Flat, well-tamped beds ensure uniform germination. Uneven beds can cause patchy growth and poor yields.
- Cover with Soil and Boards: A light layer of potting mix or fine soil helps retain moisture, especially when paired with wooden boards. Boards simulate the stacking method used indoors, encouraging consistent germination.
- Weigh Down Boards: Applying some weight—such as row bags—on top of the boards not only simulates the tray stacking effect but also keeps the boards in place during windy conditions.
- Pull Soil Up at Edges: Beds often have slightly raised edges. Pulling soil up around the perimeter of the board helps seal in humidity and prevents faster drying around the sides.
- Water Gently and Often: Use a soft sprayer to avoid disturbing seeds. In warm weather, expect to water once or even twice per day to maintain optimal moisture.
- Monitor for Lift-Off: When the board begins to lift on its own, seedlings are pushing up and ready to be exposed to light. Remove boards and begin open-air growth.
- Time Your Harvest: Even if greens look mature, wait until they reach the same visual indicators you’d expect indoors—well-developed cotyledons, rich color, and stem strength. Use a sharp knife to cut just above soil level.
- Clean Thoroughly After Harvest: Washing is essential for field-grown microgreens. Dirt and splashes are common, especially after rain or heavy watering.
- Plan for Seasonal Production: Only rely on field microgreens during the main growing season. In colder climates, plan to switch back to greenhouse or indoor production as fall approaches.
- Track Yields and Adjust Seeding Rates: Each bed will differ slightly in performance. Track your output and experiment with seeding rates for your specific soil type and climate.