
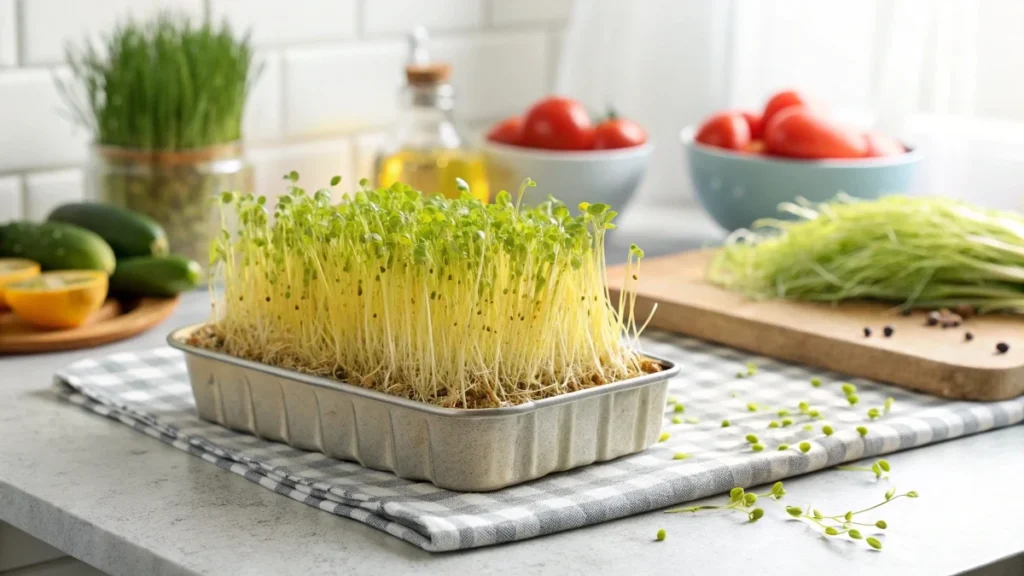
Popcorn microgreens are one of the most surprising and delightful crops you can grow. Unlike typical leafy greens, these shoots are cultivated entirely in darkness, which keeps them tender, bright yellow, and intensely sweet.
In just a week, they transform from simple kernels into tall, delicate shoots that taste almost like candy with a subtle grassy note. Their unusual flavor and striking appearance make them a favorite garnish for chefs and home cooks alike, adding elegance to both savory and sweet dishes.
Beyond taste, they also offer nutritional value, delivering enzymes, antioxidants, and plant compounds in a compact form. Growing them at home requires only a few tools and some patience, making them accessible for beginners.
Once harvested, they open up exciting possibilities in creative cooking.
Nutritional Profile and Health Benefits
These shoots are harvested very young,g so they are tender and easy to chew. Because they are grown in darkness, ss they stay low in chlorophyll and keep a light, bright, sweet taste that encourages raw use. While there is little standardized nutrient testing specific to popcorn shoots, the plant family is known to provide natural sugars, some fiber, and plant compounds that support a varied diet. The intense sweetness comes from natural sugars present in the young stalks. That sweet taste can make them a pleasant way to add a small burst of energy to salads or snacks without relying on added sweeteners.
Moisture content is high, which helps with hydration but also explains why storage life is shorter than sturdier greens. One commercial grower who packages at scale notes that pea shoots can last up to four weeks in a refrig,erator while popcorn shoots begin to decline around day five or six, even with careful packing. Another grower reports up to about ten days when stored unwashed and covered in a cold refrigerator. Taken together,r a practical home expectation is five to ten days, with quality best in the first week. If you are sensitive to very sweet flavors, start with a small amount and pair them with acid from citrus or tomatoes to balance the palate.
Because they are harvested as clean, tender shoots and typically eaten raw, good handling matters. Keep tools and trays cl andan dry the crop gently before packing if condensation is present, and store them cold and away from light. Light exposure after harvest quickly greens the shoots and shifts flavor toward bitterness, so even the fridge container should block light.
How to Grow Popcorn Microgreens
Choosing seeds
Use popcorn kernels rather than sweet corn seed. Popcorn germinates reliably and produces the tall, straight shoots you want. Experienced growers commonly source from reputable seed houses that test lots for germination and purity. Durable trays also matter because this crop grows tall. Many growers use rigid shallow trays that make harvesting easier and resist flex when weighted.
Preparation and soaking
Soaking improves germination for this crop. The practice ranges from four hours to a full day, and all of these timings have been shown to work. One grower who measured seed before and after soaking recorded a gain of about one hundred and fifty grams of water across the batch after a near full day soak, which shows how much moisture the kernels can take up.
Seeding rates depend on tray size. Common successful rates include about two hundred grams per standard ten by twenty tray, about two hundred and ten grams, two hundred and fifty grams, and roughly nine point seven five ounces,s which is about two hundred and seventy six grams. For smaller formats, one ounce is a solid rate for a five-by-five tray, and around one hundred and forty grams works well for ten by ten tray. These are useful starting points that you can fine-tune to your climate and tray depth.
Tray setup
Nest a tray with holes inside a solid tray so you can fill water later without disturbing the canopy. Fill with fine-textured medium. Growers use coconut coir and general-purpose potting soil with equal success. Depth is modest. About a quarter to one inch is common. Press the surface flat with a board or anything smooth, so seeds make full contact. Spread the soaked kernels evenly and avoid piling them. Many growers press the seed layer gently to set it in place. One method that consistently reduces surface mold is to add a very thin veil of coir over the seeds before the first watering.
Germination phase
Mist or gently shower the tray to fully hydrate the medium. Several approaches work from here. One group waters heavily at planting,g then does not water again until the end of germination. Another group mists every twelve hours for the first day or two. Most growers place a rigid lid or an extra tray on top and add weight to keep the seed layer pressed to the medium. Seven pounds is a typical weight for smaller trays. FFor afull rray ys, a solid object evenly distributed works well. Germination commonly runs three to five days. You will see sprouting in the first twenty-four to thirty-six hours. Check around day four so the edges do not peek out into stray light.
Blackout phase
Darkness is the rule for this crop from day one through harvest. There are many reliable ways to create it. A tall humidity dome coated in several thin coats of Plasti Dip blocks light while giving shoots six to eight inches of headroom. The small vents can remain open for airflow while still excluding light when fitted carefully. A wardrobe interior or a tall cabinet can provide full darkness without a dome. A black plastic bag loosely wrapped around stacked trays also works. Some growers build a blackout room or simply cover a shelf with a taped cardboard box once the crop is tall enough to press against a dome.
Timing depends on temperature. One grower keeps the trays stacked and in the dark for about five days, then domes for another four to five days, and harvests around day nine. Another unstacked around day seven and harvested day ten at room temperatures near twenty to twenty two degrees Celsius. A faster schedule showed four days weighted, then six days in blackout, with harvest on day ten. A warm room can speed things up and produce harvestable trays on day six to eight. The most important sign is the growth stage. Harvest when the shoots are tall and the first leaf begins to open. If you wait much longer, the texture quickly becomes fibrous.
Watering schedule
This is a low-watering crop when blackout is well sealed. The moisture that evaporates from the medium tends to condense on the dome and return to the tray. That is why several growers water only twice. Once at sowing and once just as the blackout begins. One grower even reported no additional water after planting because the medium stayed moist through day ten. Another method uses plain water in the first half of the grow and then a mild nutrient solution, such as a two-zero-three mix, in the second half, always applied from the bottom. Yet another routine is to bottom water with about two cups just before the dome goes on, then leave it alone until harvest. All of these can work if your room is not overly dry. The biggest risk factor is overwatering, which raises mold pressure.
Mold prevention
Darkness, humidity, and limited airflow favor moldont the seed hulls. The simplest defenses are to avoid overwatering and add airflow without light leaks. A thin layer of coir over the seeds helps noticeably. Vent holes on domes can be left open if the openings are fully covered from outside light. If you notice a few small cottony spots at the seed level early on, you can remove those areas promptly and continue. If you pull back the canopy and find a web of stringy growth across the tray, discard it and start again. A grower who ran a side-by-side showed how a tray can look perfect from above, while a dense mat of mold hides under the canopy. Past that point, trying to rescue the tray only adds moisture and often makes the problem worse.
Harvest
Mature height is usually six to seven inches when grown well. Harvest time ranges from day six to day ten,n depending on room temperature and the blackout consistency. Some growers prefer cutting only the tender yellow tops and leaving the denser lower stalks. Others clip higher up on the stem, just above the white base,e so the cut product stays delicate. A different serving style focuses on the sweet white base itself, which some people enjoy as the highlight. Try small samples from each part and decide what your kitchen prefers.
Yields vary with density and harvest timing. Reported results include about one hundred and forty grams average at seven days, one hundred and fifty-three grams from a single tray, one hundred and thirty-four grams from another tray in the same run, and approximately six point nine ounces, which is about one hundred andninety-fivee gram,s from a full tray harvested at day ten. A chef-focused grower expects two hundred and fifty to three hundred grams from a well-packed ten-by-twenty tray when harvested at the right stage. One small farm routinely fills two four-ounce containers from a single tray. After cutting, many growers fan the crop for thirty to sixty minutes to remove surface moisture before packing. Store cold, keep containers dark, and consider a small moisture absorber to reduce condensation.
🌿 Recommended Microgreens Supplies |
Flavor Profile and Culinary Uses
The flavor is the signature of this crop. Fresh shoots taste very sweet with a gentle grassy note. Some tasters compare the sweetness to candy. A few people describe a toothpaste-like aftertaste when they eat a handful on its own. That is why these shoots are used in small amounts as a contrast. Kept yellow, they remain soft and tender. If exposed to light,t they turn green quickly, become tougher, and bitterness appears within hours. A side-by-side taste test confirmed that greened shoots were both bitter and fibrous, while yellow shoots were sweet and soft.
These shoots work best where sweetness and crunch lift the dish. They pair well with tomatoes and crisp lettuce in simple salads. A handful added at the end of an egg scramble brings a pleasant, sweet finish. Chefs place them on savory plates like grilled fish or roasted poultry to add color and a sweet accent. They can also garnish desserts such as panna cotta, cheesecake, or a fruit bowl,s where their look and flavor make sense. Because they are so sweet, add a little acid from lemon or vinegar or a touch of salt to keep the balance on the palate.
Health Benefits in Depth
Popcorn microgreens are young plant tissue, so they are naturally low in calories and easy to digest in small servings. They bring a mix of water, a little fiber, and natural sugars. The water content supports hydration, and the sugars provide a quick energy lift. The fiber in the stalks contributes to daily intake without heaviness. Because they are eaten raw,w you keep heat-sensitive vitamins that are present in young plant tissue. At the same time, the lack of chlorophyll means the flavor stays mild, and the texture stays soft, which makes them a friendly choice for people who find stronger brassica microgreens too peppery.
Two practical health notes come directly from experienced growers. First, shelf life is short. Plan to enjoy them within five to ten days for the best quality. Second, manage light carefully even after cutting. If they green in the container, the taste shifts to bitterness,s which reduces enjoyment and may lead you to add more dressing or sugar to mask it. Good handling practices are part of the health picture as well. Clean trays and tools, avoid soggy conditions that encourage mold, and keep harvest areas tidy. If you notice a tray with widespread mold under the canopy, the safest choice is to compost it and start again.
If you are counting sugars closely, remember that the characteristic sweetness reflects natural sugar in the stalks. Portion control is straightforward because a little goes a long way on the plate. When paired with vegetables rich in acid and crunch, such as tomatoes and cucumbers, you can use less and still get the effect you want.
Storage and Shelf Life
Popcorn microgreens are more delicate than sturdier greens such as peas or sunflowers. Their high water content and the fact that they are grown in full darkness mean they have a shorter shelf life. Several growers report consistent timelines. In the best conditions, ns they can last up to about ten days when kept unwashed, covered, and refrigerated. Most commercial experiences show that quality starts to decline by day five or six, even when packed carefully.
After harvest, the shoots are often very moist. To extend freshness, it is best to fan-dry them gently for thirty to sixty minutes before packing. This step reduces condensation that otherwise collects in packaging. Moisture absorbers, often labeled food-safe packets, are sometimes added to help maintain dryness in sealed containers. Use containers that limit light exposure because even a little light will cause the shoots to turn green and bitter within hours. Compostable trays made from corn starch or other biodegradable materials are popular choices with customers who value eco-friendly packaging.
For best results, harvest only what you will use within a week. Keep the rest in blackout conditions until you are ready to cut more. If you are growing at home for personal use, harvest small amounts every day or two rather than the entire tray at once. This strategy helps you enjoy the sweetest flavor at peak condition.
Common Challenges and How to Overcome Them
Mold growth
Mold is the most common challenge when growing popcorn shoots. The combination of darkness, high humidity, and little airflow creates perfect conditions for fungi. Light cottony mold on a few seeds is usually harmless since it remains at the seed level below the harvest zone. If the mold spreads across the canopy and becomes stringy, it is best to compost the tray and start again. Preventive steps include watering less often, allowing for some airflow through dome vents without admitting light, and placing a thin layer of coir over the seeds at planting to reduce mold on the surface.
Overwatering
Many problems stem from giving too much water. Excess water raises humidity and accelerates mold. Several growers emphasize watering only twice across the entire cycle. Once during seeding and once at the start of blackout. Others report no watering after the initial soak and mist. By resisting the urge to keep watering, you create a more balanced environment inside the blackout dome.
Light exposure
Even short periods of light will trigger greening. Shoots that green quickly lose their tender sweetness and become fibrous and bitter. When checking trays, do it in a dark room or at night with minimal ambient light. After harvest, keep containers in the dark inside the refrigerator. If you use a dome, seal any gaps or place the dome inside a dark box to ensure no stray light enters.
Timing of harvest
Waiting too long to harvest is another common mistake. Once the first leaves fully open, the stalks begin to toughen. Experienced growers note that just a twelve-hour delay at warm temperatures can change texture and flavor. Aim to harvest between day six and day ten, with close observation of the crop each day after day six. Look for tall shoots around six to seven inches with the first leaf just beginning to open.
Easy Recipes with Popcorn Microgreens
Popcorn microgreens are best used raw or added just before serving so their sweetness and delicate texture shine. Their flavor is intense in small amounts, so think of them as a garnish or accent rather than a base green.
Sweet corn microgreen salad
Combine fresh tomatoes, sliced cucumbers, and crisp lettuce. Add a handful of popcorn shoots on top and drizzle with lemon juice and olive oil. The acidity balances the natural sweetness and creates a refreshing side dish.
Egg scramble with popcorn shoots
Prepare scrambled eggs until just set. Remove from heat and gently fold in a small handful of popcorn shoots. The heat lightly softens the shoots without greening them. This creates a breakfast with subtle sweetness and a soft crunch.
Dessert garnish
Use popcorn shoots as a topping for panna cotta, cheesecake, or even ice cream. Their bright yellow color adds visual appeal, and their sweetness complements creamy or fruity desserts.
Sandwich accent
Place a few shoots inside a sandwich or wrap. They pair well with roasted chicken or turkey, adding both sweetness and crunch. To keep them tender, add them at the very end before serving.
Restaurant-style plating
Chefs often use popcorn microgreens to elevate presentation. A few shoots laid across grilled fish or roasted meat add color contrast and an unexpected flavor twist. For professional use, harvest just before service to maintain the most vibrant look.