
Growing your own food doesn’t have to be complicated. In fact, quinoa microgreens are one of the simplest and fastest ways to add a burst of nutrition to your meals without needing a big garden or fancy tools.
These tiny greens grow in just days right on your kitchen counter, and they’re packed with flavor, color, and plant-based power.
From boosting your energy to supporting your immune system, quinoa microgreens do more than just look good on your plate.
They’re fresh, nutrient-rich, and surprisingly easy to grow. Plus, you’ll learn some tasty ways to enjoy them in everyday meals. This is homegrown goodness made simple 🌱💪🥗
What Are Quinoa Microgreens?
Quinoa microgreens are the tender, edible young shoots that sprout from quinoa seeds, typically harvested within 7 to 12 days after germination. Unlike full-grown quinoa plants, which are cultivated for their grain-like seeds, microgreens are harvested shortly after the cotyledons—the first true leaves—emerge. These microgreens offer a more concentrated burst of nutrition and flavor compared to their mature counterparts.
Quinoa, scientifically known as Chenopodium quinoa, is a pseudo-cereal originating from the Andean region of South America. It is known for its rich nutritional profile and adaptability to various growing conditions. When cultivated as microgreens, quinoa develops slender, vibrant shoots with a soft reddish or greenish stem and a delicate nutty flavor.
It’s important to distinguish between quinoa sprouts and microgreens. Sprouts are germinated seeds that are consumed whole, including the root, and are typically grown without soil or growing medium. Microgreens, on the other hand, are grown in a medium like soil or coconut coir, and only the stem and leaves are consumed. The root system is left behind, and the plant is cut above the surface for harvest. This method allows quinoa microgreens to develop more complex nutritional properties and flavor.
The rapid growth cycle of quinoa microgreens makes them a popular choice among home gardeners and health-conscious individuals. With a typical harvest window of less than two weeks, they offer a quick and rewarding way to grow nutrient-dense greens in limited space, such as a kitchen windowsill or countertop garden.
Why Choose Quinoa Microgreens?
Quinoa microgreens offer a unique combination of culinary appeal, nutritional density, and growing ease that sets them apart from other microgreens.
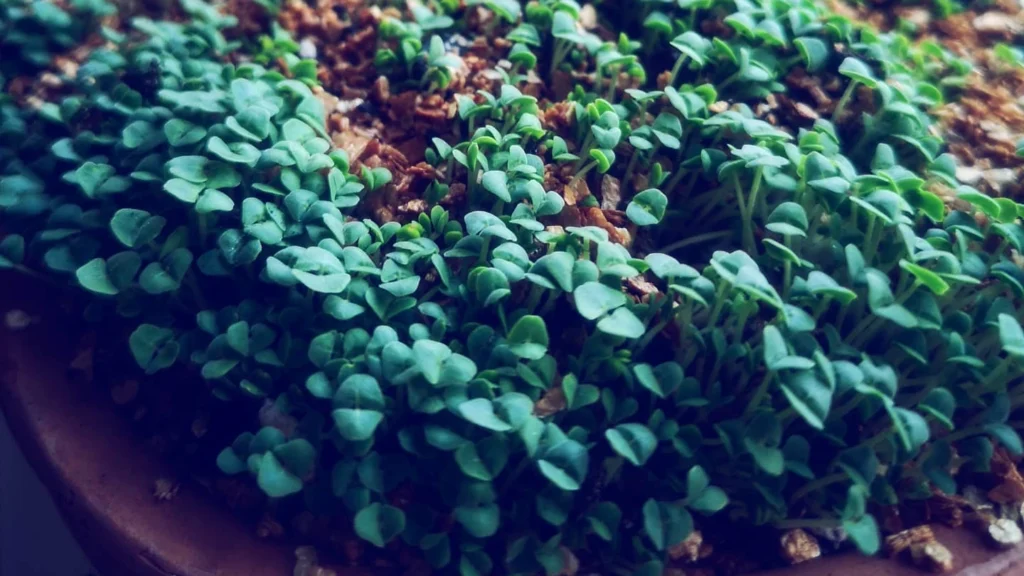
One of their distinguishing visual features is their striking appearance. Depending on the quinoa seed variety, the microgreens can exhibit vibrant shades of red, pink, or green, adding a colorful accent to dishes. The thin, elongated stems and small heart-shaped leaves contribute to an elegant texture that is both pleasing to the eye and the palate.
Flavor-wise, quinoa microgreens are subtly nutty with a mild, earthy undertone. This makes them versatile for a wide variety of culinary applications, from garnishing high-end dishes to adding a nutrient punch to smoothies and sandwiches.
From a gardening perspective, quinoa microgreens are beginner-friendly. They have a high germination rate and thrive in indoor environments with minimal input. Unlike some other microgreens that may require special lighting, temperature, or soaking techniques, quinoa seeds are relatively low-maintenance. Most varieties do not need soaking before planting, and the seeds germinate readily in a moist medium with indirect light.
They are also naturally gluten-free and completely plant-based, making them suitable for a wide range of diets,s including vegan, vegetarian, and gluten-sensitive lifestyles. Their rapid growth and compact size make them ideal for apartment dwellers or anyone with limited gardening space.
Moreover, growing quinoa microgreens at home is a sustainable practice. It reduces dependence on packaged greens, lowers food miles, and gives complete control over how the greens are grown—free from pesticides or chemical treatments. This makes quinoa microgreens not only a healthy food choice but also an environmentally responsible one.
🌿 Recommended Microgreens Supplies |
Step-by-Step: How to Grow Quinoa Microgreens at Home
Growing quinoa microgreens at home is an accessible and rewarding process that requires only basic tools and a short amount of time. Below is a detailed guide that outlines each phase of the growing process, from seed preparation to harvest.
A. Materials Needed
To begin, gather the following materials:
Organic quinoa seeds: It is essential to use organic, untreated quinoa seeds. Store-bought quinoa from a grocery store can work if it is raw and not pre-steamed or pre-cooked. White quinoa tends to produce pale green shoots, while red quinoa often results in more vibrant red stems.
Growing container: A shallow tray or container with drainage holes is recommended. You can repurpose food-grade containers or purchase purpose-built microgreen trays.
Growing medium: Coconut coir is a popular option due to its sustainability and moisture retention. Other options include organic potting soil or hydroponic grow mats like hemp fiber or jute.
Spray bottle: This allows for gentle watering, which helps avoid disturbing the delicate seeds and sprouts.
Light source: Quinoa microgreens do well with indirect sunlight but can also be grown under LED grow lights for optimal development.
B. Growing Process
1. Seed Preparation
Quinoa seeds naturally contain saponins, a protective outer layer that can create a bitter taste. It is essential to rinse the seeds thoroughly under cold water until the water runs clear. Soaking the seeds for 4 to 6 hours is optional. While not strictly necessary, soaking can help accelerate germination by softening the seed coat and initiating water absorption.
After rinsing (and soaking, if desired), drain the seeds completely to avoid waterlogging during planting.
2. Planting the Seeds
Spread the moist quinoa seeds evenly across the surface of your growing medium. Do not bury the seeds; instead, press them gently into the surface to ensure good contact. Even distribution is important to avoid overcrowding, which can lead to mold or poor air circulation.
Mist the seeds generously after planting to moisten the surface without creating standing water.
3. Germination Phase (Days 1–3)
Cover the tray with a blackout dome, lid, or another tray to create a dark, humid environment. This helps simulate the natural conditions needed for germination. During this phase, keep the medium consistently moist by misting two to three times per day. Avoid overwatering, which can cause seeds to rot.
By the end of day 2 or 3, small white roots will begin to emerge.
4. Growth Phase (Days 4–7 or up to 12)
Once germination is underway and the roots have taken hold, remove the blackout cover and expose the tray to a light source. Place the tray near a sunny window or under a grow light for at least 10–12 hours daily.
Continue misting daily, ensuring the medium remains moist but not soggy. Quinoa microgreens will grow rapidly during this period, with visible stem elongation and leaf development occurring by day 5 to 6. They are typically ready for harvest between days 7 and 12, depending on growing conditions and desired height.
5. Harvesting
Harvesting is done when the microgreens are approximately 2 to 3 inches tall, and the first set of leaves has fully opened. Using a clean pair of scissors or a sharp blade, cut the greens just above the soil line.
After harvesting, rinse the microgreens gently with cold water to remove any debris. Pat dry using a paper towel or salad spinner, and store them in an airtight container lined with a paper towel. They can be kept refrigerated for up to one week while retaining their freshness and nutritional value.
Nutrition Profile of Quinoa Microgreens
Quinoa microgreens pack a powerful nutritional punch, offering significantly higher concentrations of certain vitamins and antioxidants than their mature counterparts. Research published in the Journal of Agricultural and Food Chemistry (2012) found that microgreens in general can contain four to forty times more nutrients than fully grown vegetables, depending on the species and growing conditions.
Quinoa microgreens are particularly rich in vitamin C, an essential nutrient for immune health and tissue repair. They also contain vitamin E, a powerful antioxidant that helps neutralize free radicals, and vitamin K, which supports bone health and blood clotting.
The presence of beta-carotene in quinoa microgreens contributes to eye health and cellular protection. In addition to vitamins, quinoa microgreens are a good source of essential minerals such as iron, calcium, and magnesium. Iron is critical for oxygen transport in the blood, while calcium and magnesium play important roles in bone density, nerve function, and muscle health.
Quinoa, even in its microgreen form, retains its reputation as a complete plant-based protein. This means it contains all nine essential amino acids that the human body cannot produce on its own. This makes quinoa microgreens particularly valuable for vegetarians, vegans, and those seeking plant-based protein sources.
They also contain high levels of polyphenols and flavonoids, natural compounds known for their antioxidant and anti-inflammatory effects. These bioactive compounds may help reduce oxidative stress, which is linked to chronic diseases like heart disease, diabetes, and certain types of cancer.
Unlike mature leafy greens that may lose nutrients over time during transportation and storage, freshly harvested quinoa microgreens deliver concentrated nutrition with maximum freshness. Their low-calorie, high-nutrient profile makes them an ideal addition to a health-focused diet.
Health Benefits of Quinoa Microgreens
Quinoa microgreens are not just a culinary novelty — they provide a robust range of health benefits backed by their dense nutrient profile and bioactive compounds. Their composition makes them one of the most beneficial microgreens available for regular consumption.
Immune System Support
Quinoa microgreens are a strong source of vitamin C, which plays a vital role in immune defense by supporting cellular functions of both the innate and adaptive immune systems. Vitamin C enhances white blood cell activity and helps prevent oxidative stress during immune responses. Regular intake can reduce the duration and severity of colds and other infections.
Anti-inflammatory and Antioxidant Effects
These microgreens contain polyphenols, flavonoids, and vitamin E, which help combat inflammation and oxidative damage at the cellular level. Studies show that diets high in these antioxidants may reduce the risk of chronic inflammatory diseases such as arthritis, atherosclerosis, and certain cancers.
The antioxidant capacity of quinoa microgreens is particularly significant during their early growth phase. At the microgreen stage, antioxidant levels can be several times higher than in mature plants. This makes them powerful agents in neutralizing free radicals, which are unstable molecules associated with aging and disease progression.
Cardiovascular Health
The high levels of magnesium, potassium, and fiber in quinoa microgreens support healthy blood pressure, improved vascular function, and cholesterol regulation. Potassium helps relax blood vessels and offset the sodium in the diet, which contributes to lower blood pressure levels. Magnesium is essential for maintaining normal heart rhythm and reducing the risk of arrhythmias and heart attack.
Bone Density and Strength
Calcium and vitamin K, both present in quinoa microgreens, are critical for bone mineralization and density. Vitamin K is essential for the activation of proteins that regulate bone formation and calcium binding. In combination, these nutrients may reduce the risk of osteoporosis and bone fractures, especially in aging populations.
Digestive and Gut Health
Although fiber content in microgreens is modest compared to that of mature plants, quinoa microgreens still contribute prebiotic compounds that support gut microbiota. The presence of insoluble fiber and natural enzymes aids digestion and promotes regular bowel movements.
Blood Sugar Control
With a low glycemic index, quinoa microgreens can be safely included in diets aimed at managing or preventing Type 2 diabetes. The balance of protein, fiber, and antioxidants contributes to stable blood glucose levels and improved insulin sensitivity.
Weight Management and Satiety
Despite being low in calories, quinoa microgreens are nutrient-dense and high in fiber and protein, which helps increase feelings of fullness. When included in meals, they can help reduce overall calorie intake while improving satiety — a key factor in weight management strategies.
Easy Recipes Using Quinoa Microgreens
Quinoa microgreens are delicate, flavorful, and easy to integrate into a variety of dishes. Their mild nuttiness pairs well with both raw and cooked meals, enhancing not only the taste but also the nutritional content. Below are five simple recipes and meal ideas that showcase the versatility of quinoa microgreens.
A. Microgreen Power Salad
This refreshing salad brings together plant-based protein and fiber with a tangy citrus twist.
Ingredients:
- 1 cup quinoa microgreens
- ½ cup cooked chickpeas
- ½ cup cherry tomatoes, halved
- 2 tbsp chopped red onion
- 1 tbsp olive oil
- Juice of ½ lemon
- Salt and pepper to taste
Instructions:
Toss all ingredients together in a bowl. Chill for 15 minutes before serving to enhance flavor. Optional: sprinkle with sunflower seeds or feta cheese.
B. Green Smoothie Booster
Add quinoa microgreens to your morning smoothie for an antioxidant boost without overpowering the taste.
Ingredients:
- 1 banana
- 1 handful of spinach
- 1 handful of quinoa microgreens
- 1 cup unsweetened almond milk
- 1 tsp chia seeds (optional)
Instructions:
Blend all ingredients until smooth. Serve chilled.
C. Avocado Toast with Quinoa Microgreens
Elevate your classic avocado toast with a vibrant topping of quinoa microgreens.
Ingredients:
- 1 slice whole grain or sourdough bread
- ½ ripe avocado
- Pinch of salt and chili flakes
- ¼ cup quinoa microgreens
- Drizzle of extra virgin olive oil
Instructions:
Toast the bread and spread mashed avocado evenly. Sprinkle with salt, chili flakes, and top with quinoa microgreens. Finish with a drizzle of olive oil.
D. Quinoa Microgreen Wraps
Perfect for a light lunch or snack, these wraps are packed with flavor and plant-based protein.
Ingredients:
- 1 whole wheat wrap or tortilla
- 2 tbsp hummus
- ¼ cup shredded carrots
- 2 tbsp diced cucumber
- ½ cup quinoa microgreens
- Optional: grilled tofu or tempeh slices
Instructions:
Spread hummus on the wrap, add all other ingredients, and roll tightly. Cut in half and serve.
E. Microgreens as Garnish or Side
Use quinoa microgreens as a topping on soups (like carrot or lentil), omelets, grain bowls, and even homemade pizzas. Add them last to retain their freshness and color.
Tips, Troubleshooting, and Storage
While quinoa microgreens are relatively easy to grow, some common challenges may arise during the process. Below are practical tips and troubleshooting strategies to ensure a healthy, mold-free harvest.
Lighting Tips
If your microgreens appear pale or yellow, it’s likely due to insufficient light. Ensure they receive 10–12 hours of indirect or artificial grow light daily after germination. Placing the tray near a south-facing window or under full-spectrum LEDs yields the best results.
Mold Prevention
Mold is one of the most common issues in microgreen cultivation. To prevent it:
- Use clean, sterilized trays.
- Avoid overseeding to improve airflow.
- Maintain good ventilation in the growing area.
- Water lightly and avoid excess moisture pooling at the base.
If white fuzz appears near the roots, don’t panic — this may be natural root hairs. Mold tends to smell sour and spreads irregularly across the tray.
Seed Rot and Damping-Off
Overwatering, poor drainage, and cold growing conditions can lead to seed rot. Always drain seeds thoroughly after rinsing, and use a breathable growing medium to reduce stagnation.
Avoid over-saturating the tray; the surface should be consistently moist but never soggy.
Harvest Timing
Harvest at the peak of nutrient density—usually when the first set of true leaves begins to show. Waiting too long can reduce flavor intensity and increase the risk of bitterness.
Storage
After harvest, rinse and pat dry with a paper towel. Store the microgreens in a container lined with a dry paper towel to absorb residual moisture. They will keep fresh in the refrigerator for up to 7 days.
Avoid washing microgreens until just before use to maximize their shelf life.