
Rainbow mix microgreens bring color, crunch, and fast nutrition to any kitchen. This guide shows how to grow two popular styles: vivid beet or chard stems and quick brassica blends of bok choy, cabbage, arugula, kale, mustard, and kohlrabi.
You will learn seeding rates, such as about sixty grams per 10 by 20 tray for large seeds, simple germination cues like edges overflowing before you remove weight, and nutrient tips, including one teaspoon per gallon mixes.
Expect brassica rainbows in seven to ten days and beet or chard in about three weeks. We also cover benefits, including reports of up to five times the vitamins of mature greens, plus recipes for breakfast, lunch, and dinner.
What Rainbow Mix Microgreens Means and how to choose yours
Rainbow mix can point to two different ideas, and it helps to pick the one that matches your goal.
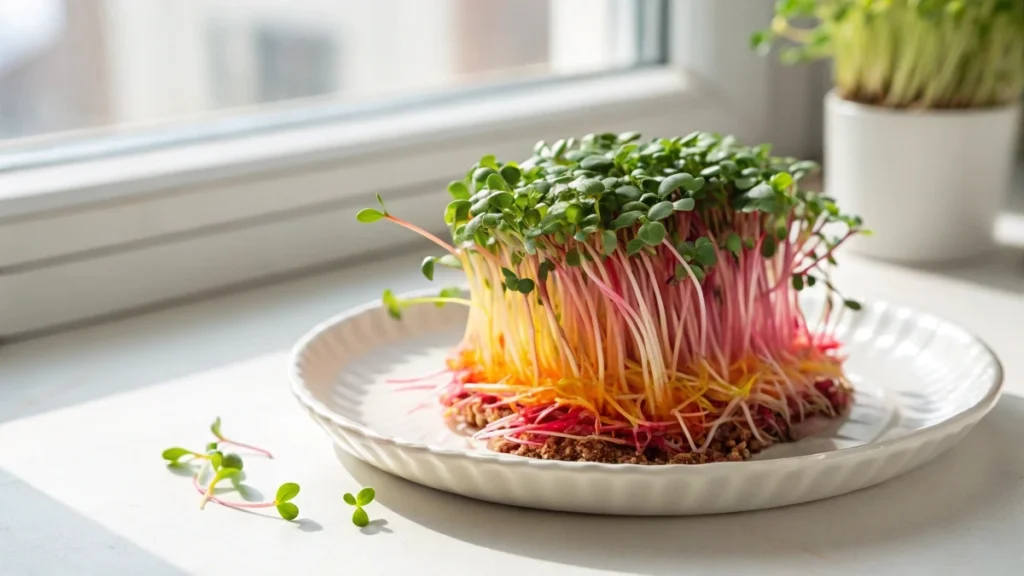
The first path is all about color in the stems. Think beet and Swiss chard families that show vivid pink, red, orange, and yellow stems. These crops are slower and need a little more technique, but the plate appeal is amazing. A rainbow beet mix or a rainbow Swiss chard mix fits here.
The second path is a rainbow of flavors from quick brassicas. These mixes blend small-seeded crops such as bok choy, cabbage, arugula, kale, mustard, and kohlrabi. They grow fast, give a balanced sweet to spicy bite, and are ideal when you want quick weekly harvests.
Choose stem color mixes when presentation matters most or when a chef wants a striking garnish. Choose brassica flavor mixes when you want reliable seven to ten-day harvests and a flexible base for salads, eggs, wraps, and bowls.
🌿 Recommended Microgreens Supplies |
Why grow microgreens at home: benefits and real numbers
Microgreens deliver concentrated nutrition and bright flavors without needing a garden bed. Several growers report that small servings can hold much higher vitamin levels than the same weight of mature leaves. One packaging claim for a retail rainbow mix states about five times more vitamins than mature greens. Another experienced indoor gardener cites a range of five to forty times, depending on the crop.
They also fit into tiny spaces. A single light bar of about seventeen inches can cover three trays when hung around sixteen to eighteen inches above the canopy. A thirty-three-inch bar can cover about six trays at the same height. That scale works on a kitchen shelf or a small rack.
The economics are friendly. One passive hydro setup mixed nutrients at one teaspoon per gallon and estimated nutrient cost at roughly two cents per tray. The same gardener estimated an all-in cost of nearly thirty cents per tray, including electricity and seeds, when run efficiently. Controlled indoor farms that sell ready-to-eat microgreens also emphasize resource efficiency, noting very large savings in water and land compared with field methods.
For anyone considering sales, the same set of experiences shows real demand. One operation in a large city supplies around one hundred twenty restaurants and about one hundred fifty weekly customers from a space of nearly two thousand square feet. That is a useful proof that microgreens can scale while still fitting in compact rooms.
Gear and media are two proven setups that actually work
Soil or coir with a dome or weight
This is the classic tray method. Use a ten-by-twenty tray, fill it with hydrated coco coir or a seed starting mix, and level it very flat so harvests are clean. A clear lid helps hold humidity early. A spare tray or a weight on top helps control large seeds like beets or chard. Keep a small fan or some airflow nearby and harvest with sharp scissors.
Passive hydro with mesh insert
This method uses a solid reservoir tray with a mesh insert so roots sip nutrient solution from below. A paper towel cut to fit the mesh keeps tiny seeds from falling through. Fill the reservoir so the liquid just reaches the top of the mesh. Lids are useful for the first few days to keep humidity high. This approach stays clean, resets quickly, and makes it easy to track nutrient use.
Lights and placement
Place a seventeen-inch bar about sixteen to eighteen inches above the trays and line up three trays under it. With a thirty-three-inch bar, you can run about six trays. Timers set to twelve hours on and twelve hours off work well for brassicas and mixes. For slower beet or chard trays, you can keep similar hours and focus more on airflow and moisture control.
🌿 Recommended Microgreens Supplies |
Seeding rates and prep by mix type
Beet and chard rainbow stems
These seeds are large and often cling to the cotyledons if they are not managed. Experienced growers get the best density at around sixty grams of seed per ten-by-twenty tray. Some start at forty-five grams but step up to sixty grams to fill the tray since these crops grow relatively thin. Spread the seed evenly on a pre-moistened surface. Do not pre-soak chard as it is not needed and only wastes time. Top dress with a very fine and fluffy layer of mix around one-sixteenth of an inch. The cover must be light enough for shoots to break through but present enough to trap hulls.
Brassica flavor rainbows
These are tiny seeds and respond best to a dense and even broadcast. Many seed packets for these mixes advise surface sowing with no cover because they germinate well in light. Level the surface well before sowing so the stand is even. The aim is a uniform carpet that harvests cleanly in seven to ten days.
Germination and blackout choices that reduce hulls and stretch
Beet and chard
Use weight or blackout for five to six days. The goal is simple. Keep those hulls down in the medium so they do not ride up into the canopy. A good visual cue is when the crop begins to push to the tray edges and looks like it is squirting out the sides. That is your signal to lose weight. In cool rooms, set a second empty tray between the crop and the heavy block so the block does not chill the medium. A black top tray also keeps stray light out during this phase.
Some growers who do not like stacking still keep a blackout lid without weight for about five days, then break up any crust with a spray bottle on a firm stream. The stream knocks apart clods so stems are not pinched. Both styles work, and the common thread is to delay light until the majority of seeds have popped and anchored.
Brassica mixes
Use a clear dome for about two to four days. You can place the tray under lights from the start. Once the majority have popped, vent the lid or remove it fully so seedlings do not stretch. Strong light at the correct height is your friend for short, sturdy stems.
Watering and nutrient practices from real growers
Soil or coir trays
Soak the medium well at sowing and then leave it alone during the early blackout. For beet and chard, do not open and fuss every day. After removing weight, begin bottom watering. A common pattern is about one to one and a half cups of water per ten by twenty each time, adjusting by feel. One simple feed that has worked is half an ounce of an ocean-based nutrient concentrate in one gallon of water. The dose is light and meant to nudge growth rather than push it hard. Because beet and chard can be airy rather than dense, moisture tends to evaporate freely, which lowers mold risk, but you still want airflow.
Passive hydro trays
Mix the nutrient solution in a jug so you can fill several trays at once. Options that have worked include MaxiGro at one teaspoon per gallon, MasterBlend as a two-part at one teaspoon per gallon of each part, and Pure Blend Pro at the label rate. Fill the reservoir so the liquid just touches the top of the mesh. In the first week to week and a half, you often do not need to add water at all because the wick action holds steady. When the level drops later on, pour nutrient solution into a corner and avoid flooding to the rim since roots still need oxygen.
Storage and handling of retail packs
When you buy a ready-to-eat rainbow mix, keep it cold and avoid rinsing before storage to preserve shelf life. If you will not use the whole pack, move the greens into an airtight container such as a reusable bag or tub. Stored well, they generally last several days and often up to about a week beyond the printed date. If you prefer to rinse, do it right before eating and drain well.
Day-by-day timeline for rainbow mixes
Fast Brassica Rainbow Timeline
Day zero
Sow densely on a level, moist surface. Leave seeds uncovered because small-seeded brassicas germinate well with light. Snap on a clear dome and place the tray under lights set on a simple timer, such as twelve hours on and twelve hours off. Hang lights about sixteen to eighteen inches above the tray.
Days two to five
Watch for a uniform pop. Vent the dome as soon as most seeds have sprouted. Remove the dome fully once cotyledons open, so stems stay short and sturdy. At this stage, you usually still do not need to water if the starting moisture was correct.
Days six to ten
Begin light bottom watering only when the surface looks dry. A gentle pour into the side of the tray is enough. Harvest when plants are about two inches tall, and the canopy is full. Brassica rainbows are often ready in seven to ten days.
Rainbow stems, beet, and chard timeline.
Day zero
Broadcast about sixty grams of seed per ten-by-twenty tray onto a uniformly moist surface. Do not pre-soak chard. Top dress with a very fine and fluffy layer of mix around one-sixteenth of an inch. The cover should be just thick enough to hide seeds but thin enough for easy emergence. Place a blackout tray on top. You can add weight if you are targeting very clean hull removal.
Days five to six
Look at the tray edges. When shoots are pushing to the sides, and the crop seems to be squirting out, remove the weight or blackout. In cool rooms, add a second empty tray between the crop and the weight so the weight does not chill the medium. Using a black top tray prevents stray light during this phase.
Days six to eight
Move under the lights and begin bottom watering. Expect the canopy to look squashed on day six and to stand up within about twenty-four hours. One to one and a half cups of water per ten by twenty is a typical drink each time, then adjust by feel.
Days eight to day twenty-one
Grow on with steady airflow. Many growers push beets to the first true leaves for more color and yield. That takes about two more weeks after the blackout. The longer you push, the higher the risk of damping off, so decide based on the look of your tray and the airflow in your room.
Harvest, yield, and storage
How to harvest cleanly
Use sharp scissors and cut just above the medium. Hold small handfuls by the tops, snip the bases, and gently shake to release fines and hulls. With beet mixes, this step is slower because hulls cling and stems tangle. Work over a clean tray to keep the cut product off the media.
What to expect for yield
A rainbow beet tray grown to a strong color commonly gives six to seven ounces per tray, which usually fills three two-ounce clamshells. Chard can grow thin even at sixty grams, so many growers either sell full trays or accept that a tray may yield only one or two small retail packs.
Storage that preserves quality
If you pack your own, many growers avoid washing before packing to keep shelf life high, and label the pack with a simple wash before eating reminder. Chill promptly after harvest. If you buy a ready-to-eat rainbow mix, keep it cold, avoid rinsing before storage, and move leftovers to an airtight container. Stored well, it generally lasts several days and often up to about a week beyond the printed date. If you prefer to rinse, do it right before serving and drain well. A few brown seed hulls in the pack are normal and can be picked out as you plate.
Troubleshooting
Hulls all over the canopy
Large seeds like beets and chard need management. Bury lightly with a fine top layer and keep trays under blackout or weight for five to six days. Wait until the crop presses to the tray edges before you remove the cover. This keeps hulls anchored in the medium instead of riding up.
Soil crust pinching stems.
If the top layer hardens, stems can be trapped, and disease risk rises. Sift your top cover so it is fluffy and easy to break. Use a spray bottle on a firm stream to break clumps as sprouts push through. The goal is a light layer of particles, not a solid sheet.
Damping off and wet spots
Improve airflow with a small fan. Avoid overwatering. In soil or coir, water sparingly and let the surface dry a bit between irrigations. With passive hydro, keep the solution at the mesh level, but do not flood the tray since roots need oxygen. If you see weak patches, harvest a little earlier rather than pushing to full true leaves.
Leggy or pale brassicas
Vent or remove the dome as soon as most seeds have popped. Keep lights sixteen to eighteen inches above the canopy. A consistent twelve-hour photoperiod on a timer prevents stretch from irregular light cycles.
White fuzz at the base
Fine white hairs at the base are usually root hairs. True mold often comes with a sour smell and a slimy surface. If you see that, improve airflow and sanitation, and consider resetting that tray.
Cold room germination
If your weight is cold, it can slow or stop germination. Insert a second empty tray between the crop and the weight. Use a black top tray to keep light out during blackout, even if your main trays are translucent.
Costs, pricing, and business reality
Real input costs
A passive hydro method that mixes seedling nutrients at one teaspoon per gallon yields a nutrient cost of nearly two cents per tray. One experienced grower who runs efficient lights and compact trays estimates about thirty cents per tray, all in for electricity and supplies. Your figures will vary with local power rates and seed choices, but these numbers show why small home setups are economical.
Pricing slow color crops
Beet and chard mixes are slow and labor-intensive. A common floor price is five dollars per ounce. Two-ounce clamshells often sell for ten dollars. Many growers report two to three clamshells per beet tray, which means twenty to thirty dollars in revenue per tray. Because harvest is tedious, it often makes sense to bundle these trays with higher-yielding crops such as radish or peas rather than sell them alone.
Selling full trays to kitchens
One grower sells rainbow chard as a full tray for about twenty dollars to restaurants. That avoids portioning and labeling, cuts labor, and keeps the greens fresh in the walk-in. Kitchens can use the tray over several days because chard and beet microgreens hold their shape longer than ultra-fast crops.
Proof that demand exists
A compact indoor farm in a major city supplies around one hundred twenty restaurants and about one hundred fifty weekly household customers from a space of nearly two thousand square feet. That footprint demonstrates that microgreens can scale without needing a warehouse.
Recipes in five minutes or less
Breakfast scrambled eggs with feta and microgreens
Scramble four eggs and plate them hot. Crumble feta over the top. Add a generous handful of fresh microgreens such as arugula or kale. The heat softens the greens, and the feta lifts the flavor. A squeeze of lemon or a few chili flakes are easy twists.
Lunch soup and a quick wrap
Heat a favorite soup, such as chicken tortilla, and finish each bowl with a pinch of microgreens for a fresh bite. For the wrap, lay a large chard or kale leaf on a board or use a tortilla. Spread a few spoonfuls of hummus, add slices of ham if you eat meat, then heap on microgreens. Squeeze fresh orange over the greens, roll, trim the thick stem if you used a leaf, and eat.
Dinner: big microgreen salad
Fill a plate with a mix of radish, kale, and mustard microgreens. Add halved cherry tomatoes and a handful of black beans. Crumble feta, drizzle olive oil, and squeeze an orange over the top. Finish with cracked pepper and fresh herbs if you have them. This is a full meal salad that takes minutes.
Zoodle bowl with rainbow mix
Spiralize one or two zucchini into a bowl. Add chopped pepper, celery, tomato, and half an avocado. Dress with lemon juice, a splash of coconut aminos, and a small splash of coconut vinegar. Toss, then pile a big handful of rainbow mix microgreens on top. Finish with nutritional yeast and a spoon or two of hemp seeds.
Safety and cleanup
Clean gear between cycles
Wash trays, lids, and tools between plantings. Start with fresh or properly pasteurized media. This simple routine limits algae and disease and keeps stands even.
Smart harvest habits
Cut above the medium to keep debris out of your harvest. If you do not prewash, mark the package with a clear wash before eating note. Chill cut greens promptly.
Storage tips for ready-to-eat packs
Keep packs cold. Do not rinse before storing, since added moisture shortens shelf life. If you will not use everything at once, move the remainder to an airtight container or a reusable bag and return it to the refrigerator. Rinse only right before serving.
Regrowth expectations
Some legumes, such as peas, can give a second cut. Kale sometimes does as well. Most mixes are one-and-done, which is normal for microgreen production. Reset the tray rather than nursing a weak regrow.