
Rapeseed microgreens, also known as canola microgreens, are fast-growing, nutrient-rich greens prized for their mild, nutty flavor and delicate texture.
Packed with vitamins A, C, K, and essential minerals, they offer a healthy boost for salads, smoothies, and savory dishes. These tender shoots are easy to grow indoors in just 7–10 days, making them perfect for home gardeners and small-scale growers.
With their vibrant color, subtle taste, and impressive nutritional profile, rapeseed microgreens bring both beauty and wellness to your plate.
This complete guide covers how to grow, harvest, and enjoy their flavor through simple recipes and proven techniques.
What Are Rapeseed Microgreens
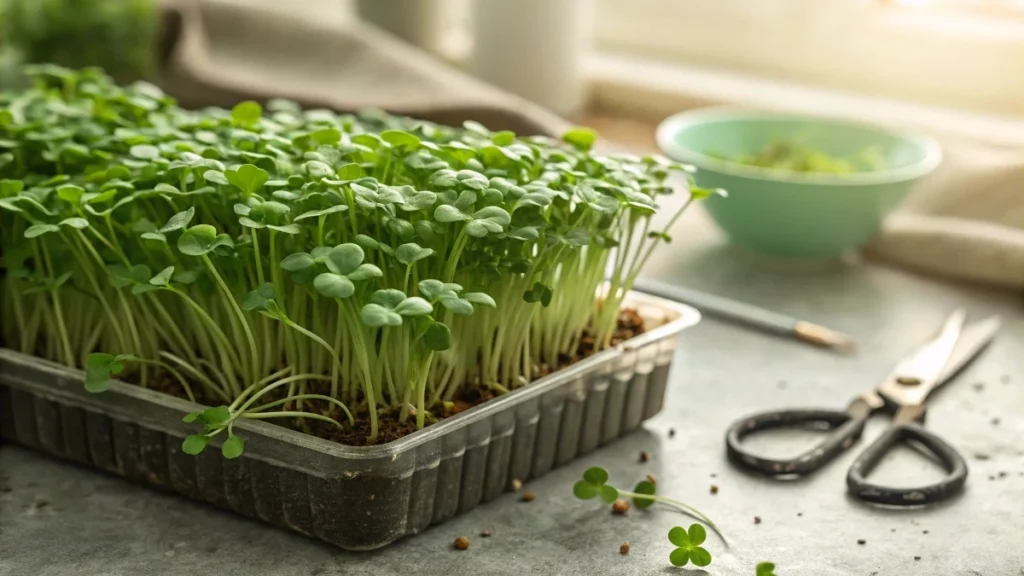
Rapeseed microgreens are the young edible shoots grown from rapeseed, which is the same Brassica species used for canola oil. The greens have a mild brassica flavor with a gentle nutty note and a faint pepper finish. Stems are slender and crisp. Cotyledons are rounded and bright green. A healthy tray shows uniform height with short, sturdy stems rather than thin, pale growth.
Compared with mustard or radish, rapeseed is less pungent and easier to pair with delicate foods. The texture stays snappy when used as a finishing layer on warm dishes. The flavor opens up nicely with lemon, yogurt, or light vinaigrettes. These greens are ideal for salads, egg dishes, grain bowls, fish, and blended sauces where you want a clean brassica note without heat.
A useful clarification for readers is the naming. Traditional rapeseed included higher erucic acid types grown for industry. Modern food cultivars commonly labeled canola are bred for low erucic acid and are the usual source for food-grade seed. When buying microgreens, you will typically see either rapeseed or canola listed. Both work for microgreens so long as the seed is sold for food use and is untreated.
From a growing perspective, rapeseed is a small, round seed that germinates quickly and evenly. It does not need presoaking. It thrives in the same environment as other small brassicas like broccoli and cabbage. Most growers harvest between day seven and day ten when cotyledons are fully expanded, and first true leaves are just starting to peek through. At this stage, the bite is tender, and the color is vibrant, which is exactly what buyers and home cooks want to see on the plate.
Sourcing Seeds, Food Grade and Untreated Only
Choose a seed that is clearly labeled for sprouting or microgreens. Look for the phrases food grade and untreated. Avoid seed that is dressed or coated for field planting. If a label mentions coating, treatment, or seed colorants, skip it.
Variety names can be generic, such as canola, or more specific. For microgreens, you are selecting for uniform germination and clean flavor rather than oil yield. If you have options, choose a canola type listed for culinary sprouts. These often give tighter timing and even height across the tray.
Buy in small test quantities first. Two hundred fifty grams is enough to dial in your density and confirm flavor before committing to larger bags. Store seed in a cool, dry place in an airtight container. Aim to use it within twelve months for best vigor.
A practical starting density for a standard ten-by-twenty-inch tray is 10 to 15 grams. This lighter density gives good airflow and reduces the chance of damping off while you learn how the variety behaves. After the first two runs, you can adjust by plus or minus 3 grams based on canopy thickness and stem sturdiness.
If you plan to sell, keep batch notes. Record supplier, lot number if available, sowing weight, media type, temperature, humidity, days to uncover, days to harvest, and any off odors or losses. These simple notes make it easy to trace a problem and keep consistent quality from tray to tray.
Gear and Setup Basement or Micro Farm Friendly
Trays
Use a solid bottom tray paired with a shallow tray that has ribs or mesh to hold the media. You also need a light-blocking cover for the blackout phase. Many growers simply invert a second tray for this purpose. The solid bottom makes bottom watering easy and keeps foliage dry, which helps food safety.
Growing media
Two reliable options are a fine sifted soilless mix or a dedicated mat such as hemp or coco fiber. Soilless mix has strong water buffering and supports sturdy stems. Mats are clean and fast to turn over after harvest. If you choose mats, place them flat without gaps and pre-wet them thoroughly so the seed does not roll. With a mix, spread an even one-centimeter layer and level it with a straight edge. Discard or compost media after harvest rather than reusing it.
Light
Simple LED shop lights work very well. Position lights 15 to 20 centimeters above the canopy at first exposure. Target a canopy intensity in the range of 150 to 250 micromoles per square meter per second. If you do not have a meter, use the height guideline and watch the plants. If they stretch quickly and lean, lower the light slightly. If leaf edges curl and the canopy feels warm, raise the light.
Temperature and humidity
Keep the ambient temperature between 18 and 22 degrees Celsius. Relative humidity between 45 and 60 percent supports steady growth and reduces disease pressure. Provide gentle air movement across the room rather than a fan pointed directly at trays. Air movement dries leaf surfaces after misting and discourages fungal growth.
Watering method
Bottom watering is the most consistent approach. Pour water into the solid tray in measured amounts and let the root zone wick it up through the media. Many growers like a capillary mat that sits in a shallow reservoir of 5 to 8 millimeters. Refill with fresh water daily and keep the reservoir clean. Avoid letting water stand stale under trays.
🌿 Recommended Microgreens Supplies |
Step-by-Step Grow Guide From Day Zero to Harvest
Day zero prepare and sow
Wash your hands and tools. Mix clean water with a small pinch of calcium hypochlorite. If you use a sanitizing dip for shears and trays, then let items air dry. Moisten the media to field capacity. When you squeeze a handful, it should hold together with only a drop or two released. Spread the moistened media evenly and level the surface. Broadcast 10 to 15 grams of seed across a ten-by-twenty tray. Aim for even coverage without clusters. Press gently with a clean board or a second tray to set the seed into the surface. Mist lightly to settle any loose seed. Cover with a light-blocking lid or an inverted tray. Stack no more than three trays high to avoid compaction.
Days one and two germination under cover
Keep trays covered. The goal is warm and slightly humid air around the seed with no puddles. Check once or twice per day. If the surface looks dry, lift the cover and mist the edges. Temperature in the range of 18 to 22 degrees Celsius gives quick and uniform sprouting. You will see delicate white fuzz at the roots, which are root hairs and not mold. Root hairs appear like a halo around the root tip and disappear when the root is wet again. True mold forms cottony mats that bridge between seeds and carry a musty smell.
Days three and four uncover and give light.
When most seeds have cracked, and shoots are about one to two centimeters, remove the lid and move the trays under light. Set the photoperiod to 14 to 16 hours on. Keep the light about 15 to 20 centimeters above the canopy. The greens will change from pale to bright green within a day. Begin bottom watering. Start with 300 milliliters in the solid tray. After 30 minutes, pour off any standing water so roots do not sit in a bath.
Days five to seven grow out and manage moisture.
Continue bottom watering once or twice daily based on the media. Mats usually need smaller but more frequent waterings than a soilless mix. A common cadence is 300 to 500 milliliters per watering for a ten-by-twenty. Observe weight as your guide. The tray should feel noticeably lighter before the next watering. Maintain room humidity between 45 and 60 percent and keep gentle airflow moving.
Days seven to ten harvest window
Rapeseed microgreens are usually ready between day seven and day ten. An ideal harvest is when cotyledons are fully open, stems are firm, and the first true leaves are just beginning to show. This timing preserves a mild flavor and crisp texture. Use a clean, sharp knife or shears and cut one to two centimeters above the media. Avoid pulling up the roots. If debris is present, give a quick rinse in cold water and spin dry. If the tray is clean, leave greens unwashed and wash right before use for best shelf life.
Troubleshooting Fast Fixes that Work
Pale or leggy greens
This points to insufficient light or excessive warmth. Lower the light to the 15 centimeter range or increase intensity if adjustable. Keep the room closer to 20 degrees Celsius. A longer photoperiod without increasing intensity does not fix weak stems. Focus on intensity at the canopy.
Yellow after uncovering
This is normal. Shoots grown under cover do not have chlorophyll. They green up within 12 to 24 hours under proper light. If yellowing persists, review light height and duration.
Damping off or dead patches
This is usually a water and airflow issue. Switch to bottom watering only. Increase gentle airflow in the room. Sanitize trays and tools between crops. Thin your sowing by 2 to 3 grams on the next run to open the canopy. Keep humidity nearer to 50 percent during the dense early days.
Off odors
A sulfur note can appear with brassicas when trays stay wet and warm. Improve drainage by pouring off standing water after each irrigation. Reduce reservoir depth if you use a capillary mat. Confirm that air is moving across the room. Harvest on the earlier side of the window for a fresher aroma.
Uneven height
This is often due to lumpy media, clumped seed, or uneven light. Level the media carefully before sowing. Broadcast seed from two directions to even the distribution. Check that the lights are level and at consistent height across all trays. Rotate trays once per day if your bench gets uneven light at the edges.
Bitter taste
Over-mature greens or heat stress can push bitterness. Harvest closer to day seven or eight. Confirm that canopy temperature under the lights is not climbing well above room temperature. If it is, raise the lights slightly and increase air movement.
Food Safety and Storage
Clean tools and clean hands matter as much as light and water. Rinse trays and shears, then sanitize with a food-safe solution and let them air dry. Work on a tidy bench so cut greens do not touch wet surfaces. Keep foliage dry during growth by watering from the bottom. Standing water on leaves shortens shelf life and invites spoilage.
Harvest into a clean container that has been chilled. If you wash, use very cold water and a brief dip. Spin or towel dry until surface moisture is gone. Excess moisture inside a bag is the main reason for early yellowing and off aromas.
Pack unwashed greens if the tray was clean. Use vented clamshells or produce bags with a paper liner to absorb stray moisture. Store at zero to four degrees Celsius. Most batches hold for five to seven days when packed dry and cold. Open and air the container once after the first twelve hours in the fridge if condensation forms. For chefs, label with the harvest date and use first-in-first-out.
Keep raw greens away from raw meat and seafood. Rinse just before serving. If anyone in the household is immunocompromised, take the extra step of using single-use gloves during harvest and cleaning the spinner and knives right after use.
Nutrition and Potential Benefits
Rapeseed is a brassica, and young brassica shoots contain vitamins, minerals, and sulfur-containing compounds that create the familiar mustard cabbage flavor family. The tender stage concentrates certain nutrients relative to mature leaves. Studies on Brassica microgreens, such as broccoli and mustard, have reported higher concentrations of vitamin C and total carotenoids per fresh weight compared with their mature counterparts. Similar families share glucosinolates like sinigrin that can convert to isothiocyanates during chewing. These conversions are part of why the flavor is bright and why the aroma blooms when you slice or dress the greens.
Typical nutrition talking points for this group include vitamin K, vitamin C, folate, potassium, and a modest amount of fiber. The exact numbers vary by seed lot and growing conditions. What stays consistent is the freshness advantage. Cutting and serving within a few days preserves the crisp texture and the gentle pepper note that people enjoy.
Two notes for everyday use are helpful. First, brassicas can carry goitrogenic compounds in raw form, which can be relevant for people with thyroid concerns. Normal culinary amounts are generally considered fine, and a varied diet matters more than any single item. Second, those who are sensitive to mustard family plants may experience oral irritation. If a reaction has occurred with other brassicas, taste a small amount first.
Flavor Pairing Notes
Rapeseed microgreens taste mild with a nutty finish and a soft pepper whisper. Citrus brings the flavor forward without covering it. Lemon and orange zest work well in dressings. Creamy supports like yogurt and tahini create balance and let the greens shine. Salty accents such as feta, capers, or smoked fish make a small handful feel more savory.
Think in simple templates. For cold dishes, pair the greens with an apple or pear, a spoonful of toasted seeds, and a light honey mustard dressing. For warm food, finish eggs, potatoes, or seared fish at the very end so the greens stay crisp. In sauces, blend a small portion with parsley, garlic, and vinegar for a quick chimichurri that stays bright green.
Avoid long cooking. High heat dulls the color and collapses the texture. Add the greens as the last step or use them raw as a fresh layer.
Five Quick Recipes with Exact Measures
Lemon Tahini Rapeseed Microgreen Slaw
Serves two as a side
One hundred grams of finely shredded cabbage
Thirty grams of rapeseed microgreens
Two tablespoons of tahini
Two tablespoons of lemon juice
One tablespoon of honey
One tablespoon of water
Half a teaspoon of salt
Freshly ground black pepper to taste
One tablespoon toasted sesame seeds
Whisk tahini, lemon juice, honey, water, and salt until smooth. Toss the cabbage with the dressing. Fold in microgreens just before serving. Finish with sesame seeds and pepper.
Green Eggs with Rapeseed Microgreens and Feta
Serves one
Two large eggs
Twenty-five grams of rapeseed microgreens
Twenty grams of feta, crumbled
One teaspoon of olive oil
Pinch of salt and pepper
Beat eggs with a pinch of salt. Warm a nonstick pan over medium-low heat and add oil. Pour in eggs and stir gently until just set. Remove from heat. Fold in microgreens and feta. Finish with pepper.
Rapeseed Microgreen Chimichurri
Makes about one cup
Thirty grams of rapeseed microgreens
Forty grams flat leaf parsley
One small garlic clove
Two tablespoons red wine vinegar
Sixty milliliters of extra virgin olive oil
Half a teaspoon of salt
Quarter teaspoon crushed red pepper, optional
Finely chop microgreens and parsley or pulse in a processor. Stir in minced garlic, vinegar, oil, salt, and pepper flakes. Spoon over grilled vegetables, steak, or roasted potatoes.
Warm Potato Salad with Rapeseed Microgreens and Capers
Serves two
Four hundred grams of small waxy potatoes, halved
Forty grams of rapeseed microgreens
One tablespoon of capers, rinsed
One tablespoon of Dijon mustard
Two tablespoons of apple cider vinegar
Three tablespoons of olive oil
Half a teaspoon of salt
Freshly ground black pepper
Boil potatoes in salted water until tender, about ten to twelve minutes. Whisk mustard, vinegar, oil, salt, and pepper. Drain potatoes and toss warm with the dressing and capers. Fold in microgreens at the table.
Miso Sesame Soba with Rapeseed Microgreens
Serves two
One hundred sixty grams of dry soba noodles
Forty grams of rapeseed microgreens
One small cucumber, julienned
Two scallions, thinly sliced
One tablespoon of white miso
One tablespoon of rice vinegar
Two teaspoons of soy sauce
One teaspoon toasted sesame oil
One teaspoon of honey
Two tablespoons of water
One tablespoon toasted sesame seeds
Cook soba, rinse in cold water, and drain well. Whisk miso, vinegar, soy sauce, sesame oil, honey, and water. Toss noodles with cucumber and scallions. Add dressing and mix. Top with microgreens and sesame seeds just before serving.
For US measures, one tablespoon equals fifteen milliliters, one teaspoon equals five milliliters, and one cup of loosely packed microgreens is about twenty grams.
Cost, Yield, and Small Operation Notes
A ten-by-twenty tray with twelve grams of seed is a sensible starting point. If seed costs ten dollars per kilogram, then seed for one tray costs about twelve cents. Media and water vary, yet a realistic all-in cost per tray, including media, water, packaging, and overhead, often lands between one and two dollars for a home-scale setup.
Fresh-cut mass depends on media, density, and harvest timing. Many growers see two hundred fifty to four hundred grams per tray when using a shallow layer of soilless mix. Mats tend to produce on the lower end of that range. If your total tray cost is one dollar and fifty cents and you harvest three hundred grams, the cost per one hundred grams is about fifty cents before labor.
For a side business, focus on consistency and simple packaging. Deliver in vented clamshells with a paper liner and a clear label that lists rapeseed microgreens, harvest date, and storage guidance. Price should reflect local demand. Many markets support three to five dollars per one hundred grams for fresh and clean greens with reliable weekly delivery.
Keep a log for every tray. Note sowing weight, dates for uncover and harvest, smell, and color on day three in the fridge, and customer feedback. Small adjustments, such as lowering the light by two centimeters or harvesting one day earlier, can move you into a sweet spot for both flavor and shelf life.
If you use a self-watering setup, keep the reservoir shallow at five to eight millimeters and refresh daily. A deeper pool can encourage off odors. Scrub any biofilm from trays and reservoirs between cycles.
Short FAQs
Do I need to soak the seed?
No. Rapeseed is a small, round brassica seed that hydrates quickly. Even broadcasting on pre-moistened media gives uniform germination without soaking.
Can I reuse the media?
Reusing media is not recommended for food safety. Spent media hosts roots and microbes from the previous crop. Compost it and start with fresh media each cycle.
Why do the greens smell sulfurous
A light sulfur note is a normal brassica aroma, but a strong smell usually means the canopy stayed too wet or too warm. Pour off standing water after each irrigation, keep airflow gentle and constant, and harvest on the earlier side of the window.
My tray turned yellow after uncovering.
That is normal. The shoots green up within a day under adequate light. If the color remains pale, lower the light slightly or check that the photoperiod is at least fourteen hours.
What is the best harvest time?
Most batches taste best between day seven and day ten. Cut when cotyledons are open, and the first true leaves are just peeking. This gives a mild, clean flavor and sturdy stems that hold up in the fridge.
🌿 Recommended Microgreens Supplies
These are the tools and supplies I personally recommend for growing healthy and flavorful microgreens at home.
As an Amazon Associate, I earn from qualifying purchases.