
Tired of buying sad, wilted greens that go slimy in two days? Red Russian kale microgreens flip that script with trays of fresh, crunchy flavor grown right on your shelf.
I love how a tiny sprinkle of rosy stems suddenly makes tacos, eggs, and rice bowls feel like a restaurant plate, and I am not even trying to be fancy.
Here you learn how to grow red Russian kale microgreens step by step, how long they take, how much seed to use, and simple ways to keep them fresh all week. Plus a few easy recipes, so nothing in your harvest goes to waste at all for you and your family.
Why Red Russian Kale Microgreens Are Worth Growing
Red Russian kale microgreens bring together flavor, color, and consistent growth, which makes them one of the more enjoyable varieties to grow indoors. They mature in roughly eight to ten days and stay steady across soil, reusable grow mats, and hydroponic screens. The flavor is mild with a soft egg-like tone and a subtle spicy finish, so they fit easily into tacos, bowls, eggs, roasted veggies, and sandwiches without overpowering anything on the plate.
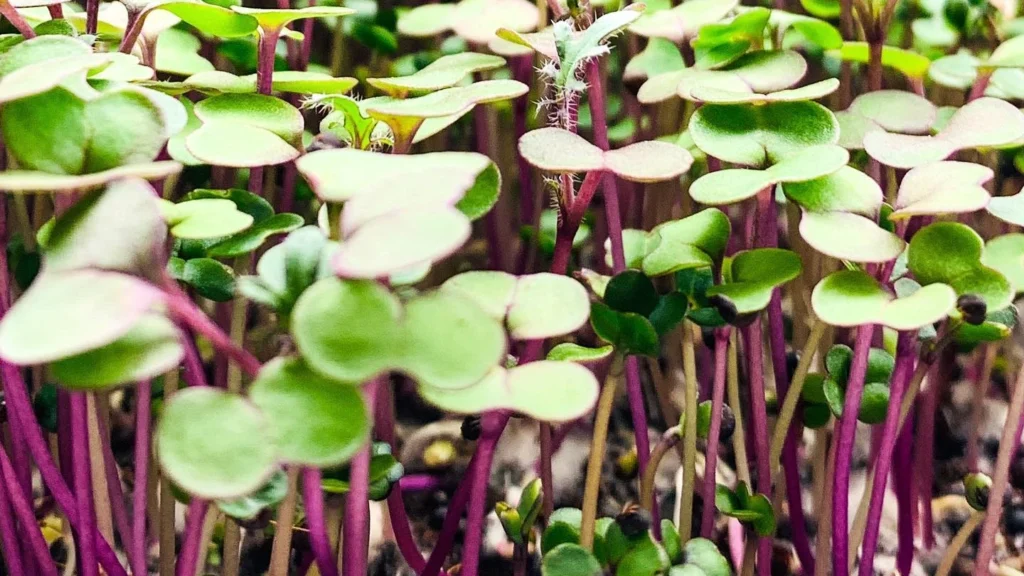
Their appearance makes them feel special. Stems shift from pale pink to deeper rosy shades, and those colors hold well at harvest. Sprinkle them over chicken tacos or rice bowls, and the meal instantly looks brighter. Many growers appreciate how much visual appeal they bring with almost no effort.
Yield is another reason they stand out. A reusable medium tray grown with twenty grams of seed reached two hundred thirteen and a half grams of harvest in nine days. A soil tray produced about nine point nine ounces with similar seed input. A hydroponic ten-by-ten kit seeded with twenty-five grams reached roughly fifteen and a half ounces. For a grow that takes less than two weeks, that kind of output feels very rewarding.
Nutritionally, young kale plants carry dense concentrations of vitamins and beneficial plant compounds. Adding a handful to everyday meals becomes an easy habit, especially when the tray sits right inside your home and produces reliably each cycle.
Red Russian kale handles indoor conditions well, even when temperatures drop a bit. Once you understand seed density, watering, and blackout timing, the routine settles into a straightforward rhythm. The combination of light flavor, attractive color, and steady yield makes it a variety many growers keep in rotation year-round.
What You Need Before You Start
A simple and organized setup makes growing Red Russian kale microgreens smooth from the first day. High-quality seed is the starting point, preferably fresh and labeled specifically for microgreens, so germination stays consistent.
Tray choice shapes your experience. Many growers use the standard ten-by-twenty format with a mesh tray stacked inside a solid tray. The mesh supports the medium and lets roots breathe, while the solid tray holds water for bottom watering. Smaller setups often rely on ten-by-ten trays, which deliver strong yields without taking much space. Hydroponic personal kits use a food-grade screen placed above a shallow water reservoir with a bubbler for oxygen circulation.
The growing medium decides how roots behave. Fine-textured soil mixes work extremely well because they allow roots to anchor quickly. Pro Mix BX and similar blends without bark chunks create an even surface, which supports uniform germination. A fifty-fifty mix of coconut coir and organic potting soil is another great option since it holds moisture evenly.
Reusable silicone grow mats provide a soil-free option. One sheet sits flat on the tray and stops seeds from falling through while remaining easy to clean. These mats work well for growers who want minimal mess and repeated use.
Hydroponic screens offer a different experience. Seeds sit on a fine mesh, roots grow downward through the screen, and the bubbler keeps the water moving and oxygen-rich. During the early days, many growers mist the seeds with a gentle antifungal blend made from potassium bicarbonate and oregano oil to support a clean start.
A good misting bottle helps during the germination phase, when seeds need moisture without being washed out of place. Once roots reach the bottom, watering shifts to bottom feeding, which keeps foliage clean and reduces mold risks.
A blackout tray and some weight complete the setup. Weight helps press seeds into the medium, improves contact, and leads to a fuller canopy. Some growers use around five pounds for a single tray, while others stack several trays and place a fifteen-pound brick on top.
Grow lights around twenty watts create the final piece of the puzzle. Red Russian kale does not demand extreme brightness, but it does need steady light once it leaves the blackout. Positioning the lights close to the canopy helps the greens turn vibrant and upright.
With these items in place, the process becomes predictable, clean, and surprisingly low-maintenance.
🌿 Recommended Microgreens Supplies |
Seed Density: How Much to Use for Best Results
Seed density has a major influence on how full and even the tray becomes. Red Russian kale handles moderate to heavy seeding well, and real numbers give a clear starting point.
Many growers use twenty grams of seed on a ten-by-twenty tray. That amount consistently produces a dense canopy with strong roots and balanced moisture. A reusable grow mat seeded at this rate reached two hundred thirteen and a half grams of harvest, which shows how efficiently the seeds convert into finished greens.
Another grower followed a very similar rate using zero point seven one ounce, which is roughly twenty grams, and produced close to nine point nine ounces in ten days. The coverage looked even because they shook the seed across the tray in two passes, which prevented clumping.
Some soil growers prefer a slightly higher rate, around one ounce of seed for a ten-by-twenty tray when they want a fuller look. Red Russian kale can handle this because stems stay slim and do not create a hard mat.
Hydroponic trays often use a heavier density. A ten-by-ten screen system seeded with twenty-five grams grew past the edges of the tray and produced about fifteen and a half ounces. Heavy seeding works well in these water-based systems because roots stay constantly hydrated.
A practical starting point is twenty grams for a ten-by-twenty tray and around twelve to fifteen grams for a ten-by-ten tray if you want slightly lighter density. Increasing slowly helps you find the balance between airflow and fullness that fits your setup.
Step by Step: How to Grow Red Russian Kale Microgreens
These steps combine soil, reusable mats, and hydroponic methods into a clear routine that works across setups.
Step 1: Prepare the Tray and Medium
Begin by creating a flat and even surface. Soil trays need a level top layer so seeds rest evenly. Removing large chunks helps avoid thin patches later. Silicone mats only need to lie flat with no folds. Hydroponic screens should be positioned securely over the water reservoir.
Mist the surface lightly so seeds stay in place. Measure your seed and spread it smoothly across the tray. Twenty grams typically fills a ten-by-twenty tray, while twenty-five grams suits a ten-by-ten hydro tray. After spreading, mist again to begin hydration.
Step 2: Germination (Days 0–3)
Cover the tray and add weight so the seeds press firmly into the surface. Many growers avoid watering the soil during this stage because the initial moisture is enough. Mat-based systems may need a short mist once or twice a day for fifteen to twenty seconds.
By the second morning, small white roots begin emerging. These roots develop fine hairs quickly, which help them absorb water and anchor to the medium. When stems start pushing the blackout lid upward, the tray is progressing well.
Step 3: Short Blackout Dome Stage
After the roots anchor and seed shells begin to fall, microgreens move into a short blackout dome. This phase allows the young stems to stretch slightly before meeting light.
Reusable mats often use an inverted tray to create a dome with room for upward growth. Hydro kits rely on the plants themselves lifting the lid as they grow. Soil trays typically need a brief extension of blackout to even out the canopy.
This stage usually lasts about a day.
Step 4: Into the Light
Place trays under LED grow lights. Moderate light encourages cotyledon leaves to open and develop color. Red Russian kale responds well to the steady glow of twenty-watt lights placed close to the canopy.
Begin bottom watering at this stage. For a ten-by-twenty tray, one cup of water works well as a starting amount. Hydro trays simply get their reservoirs topped up. Check trays one or two times daily and add water only when the bottom looks dry.
Step 5: Harvesting and Yield
By day eight to day ten, the greens are ready. Stems stand upright, leaves open fully, and the pink color appears along the stalks.
Stop watering ahead of harvest, so foliage stays dry. This helps microgreens last longer after cutting.
Use a sharp knife or scissors and cut about a quarter inch above the surface. Keeping the cut above the medium prevents debris from mixing with the greens. Some growers harvest hydro trays upside down to avoid pulling roots upward.
Shake gently to release loose hulls. Rinse and spin dry if you prefer a very clean finish.
Real harvest examples show what is possible. Twenty grams of seed on a reusable mat produced two hundred thirteen and a half grams. A soil tray seeded similarly produced nine point nine ounces. A ten-by-ten hydro tray using twenty-five grams reached fifteen and a half ounces. These numbers help you understand how productive this variety can be.
Benefits of Red Russian Kale Microgreens
Red Russian kale microgreens bring a combination of gentle flavor, eye-catching color, and dependable growth. The flavor profile is soft with an egg-like character and a mild spice. It works well with savory breakfasts, wraps, bowls, soups, and salads.
Their appearance is one of their strongest features. The rosy tone along the stems makes them look lively on the plate, and the leaves hold their bright green color from cut to storage.
Nutritionally, these young plants pack concentrated vitamins and beneficial compounds into each handful. Adding them to meals becomes simple because they blend smoothly with common foods without adding bitterness.
They grow well even when indoor temperatures cool down. The routine is predictable and repeatable: seed, blackout, light, water, and cut. Yield stays strong with minimal effort, which makes them a frequent choice for growers who like to keep fresh greens on rotation.
Producing several hundred grams of greens from twenty to twenty-five grams of seed in about a week gives a sense of how efficient this crop can be. Once you taste them and see how quickly they grow, they tend to become a regular part of the kitchen shelf.
How to Use Red Russian Kale Microgreens
Red Russian kale microgreens fit into everyday cooking in a way that feels effortless. Their mild taste makes them one of those greens you reach for even when you are not planning anything fancy. A handful works with warm meals, cold salads, and even quick snacks when you want a little extra nutrition or color.
These microgreens hold their shape well when added to warm dishes, so they sit nicely on top of tacos, roasted vegetables, or rice bowls without wilting immediately. One simple example is adding them to chicken tacos with grilled onions and tomatillos. They bring both color and a fresh bite that cuts through richer flavors. A small scoop beside a rice dish gives the bowl more texture and contrast, and the rosy stems look striking against warm ingredients.
Cold meals benefit just as much. Tossing them into salads adds brightness without introducing harsh bitterness. Burgers become more interesting when you swap a lettuce leaf for a small handful of kale microgreens. Wraps and sandwiches get extra crunch without weighing the meal down. Even pizza takes on a modern look when a pinch of kale microgreens is scattered over fresh mozzarella or roasted tomatoes.
Smoothies are another easy place to use them. Their gentle flavor mixes well with fruits like banana, mango, or berries, and they contribute nutrients without making the drink overly earthy. A scoop blended into a green smoothie gives you the benefit of kale without needing a blender full of tough, mature leaves.
Soups and broths also pair well with kale microgreens. Drop them on top right before serving so they keep their structure. The warmth from the bowl softens them slightly while keeping the fresh taste intact.
Their versatility makes them one of the easiest microgreens to use daily. They blend into nearly any meal while adding color, nutrition, and a bit of personality to the plate.
Easy Recipes with Red Russian Kale Microgreens
You can weave Red Russian kale microgreens into simple meals without changing much of your routine. Here are a few practical recipe ideas using their mild flavor, rosy stems, and soft crunch.
Kale Microgreen Taco Toppers
Warm tortillas with chicken or vegetables, then spoon grilled onions and roasted tomatillos over the filling. Add a generous handful of kale microgreens on top. The fresh greens brighten the richness of the toppings and give the taco a clean finish. This combination works well because the greens remain crisp even when they touch warm ingredients.
Kale Microgreen Rice Bowl
Start with a base of warm rice, then add roasted tomatoes, sautéed vegetables, or leftover protein. Add a scoop of kale microgreens right before serving. The greens bring a fresh contrast that balances heavier textures. Their stems add a light snap that pairs well with soft rice and cooked vegetables.
Kale Microgreen Smoothie Booster
Blend banana, pineapple, or strawberries with ice and your preferred milk. Add a handful of kale microgreens to the blender. Their mild flavor blends easily with fruits and adds a green boost without altering the taste. This works well for anyone who wants more nutrients without relying on large leaves of mature kale.
Kale Microgreen Scramble
Whisk eggs and cook them gently until nearly set. Add a pinch of salt, black pepper, and a handful of kale microgreens. Fold them into the eggs during the final seconds so they stay bright and tender. The slight egg-like note in the greens complements the dish naturally.
Kale Microgreen Salad Mix
Combine kale microgreens with sliced cucumbers, cherry tomatoes, and a light citrus dressing. Because the greens carry a mild flavor, they take on the tang of the dressing beautifully. The pink stems make the salad visually appealing without overwhelming it.
These recipes keep the greens at the center without requiring complicated steps. They make it easy to use your daily harvest and enjoy the full flavor of your microgreens.
Troubleshooting and Grower Tips
Growing Red Russian kale microgreens stays simple once you understand what they need at each stage. When something feels off, small adjustments usually bring the tray back on track.
Slow growth is common when the room feels cool. Kale naturally grows a bit slower than some fast varieties, so a few extra days are normal. If stems look thin or pale, try adjusting the light slightly closer to the tray. Consistent light helps the cotyledon leaves open and develop color.
Uneven germination often comes from rough or chunky soil. Large bark pieces create small hills and valleys that keep some seeds from making full contact. Using a fine-textured mix or smoothing the surface before seeding helps create an even stand.
If you notice extra seed hulls clinging to the leaves, a gentle rubbing technique helps. With taller stems, you can lightly brush your hand across the canopy. This opens gaps for light to reach smaller shoots and encourages hulls to fall away.
Moisture control matters throughout the process. If the tray feels constantly wet, reduce watering and let the bottom tray dry slightly between feedings. Fresh water wicks upward best when the medium is moist but not saturated. In hydro trays, maintaining clean water and steady oxygenation helps roots remain healthy and white.
A dry harvest day makes a huge difference. Cutting microgreens while the foliage is dry reduces the need for extra handling. Dry greens last longer in storage and retain their crisp texture.
Small adjustments like these keep each tray consistent and make the growing routine more predictable over time.
Storage: Keep Your Kale Microgreens Fresh
Good storage habits extend the life of Red Russian kale microgreens and keep them crisp throughout the week. Always cut them dry. Microgreens harvested with dry foliage last longer and resist spoilage better than those cut when wet.
After cutting, shake the greens gently in a bowl to release loose seed hulls. If you prefer a very clean finish, you can rinse and use a salad spinner to dry them thoroughly. Spinning removes excess moisture and helps prevent sogginess in storage.
Place the greens in an airtight container lined with a clean paper towel. The paper towel absorbs any trace moisture and keeps the microgreens crisp. Store the container in the refrigerator on the middle shelf where the temperature stays stable.
When stored this way, Red Russian kale microgreens usually stay fresh for five to seven days. Their stems remain firm, and their rosy color stays bright. Removing any wilted pieces during the week keeps the container looking clean and helps the rest stay fresh.
Proper storage protects the delicate structure of the greens and allows you to enjoy each harvest fully, tray after tray.
FAQs About Red Russian Kale Microgreens
How long does it take to grow Red Russian kale microgreens
Most trays finish in eight to ten days, depending on temperature and growing method.
Do they grow well without soil
Yes. They grow reliably on reusable silicone mats and hydroponic screens.
How much seed should I use per tray?
Twenty grams works well for a ten-by-twenty tray. A ten-by-ten tray performs well with twelve to twenty-five grams, depending on your preferred density.
Why are my microgreens pale?
They need consistent light or shorter blackout time. Bringing the lights closer usually helps.
Why are parts of my tray thin?
The growing surface may not be even. Smoothing the medium before seeding improves contact.
Do they regrow after cutting
No. Microgreens are a single-harvest crop.
Do they have a strong flavor?
No. They have a mild flavor with a soft egg-like character and a gentle spicy edge.
Why is kale slower than other microgreens?
Kale develops more gradually than fast growers such as radish or cress, which is normal for this variety.