
Learning how to plant Brussels sprouts is the fastest way to bring a sweet, winter ready super veg to your table. A small handful can deliver about four times the vitamin C of one orange, and a touch of frost makes sprouts taste even sweeter. This guide shows when to start seeds, where to plant, and how to create firm, fertile soil that grows tight, uniform buttons.
You will learn spacing, watering, and simple protection that keeps pests away. Whether you garden in beds, square foot plots, or balcony containers, you can grow Brussels sprouts successfully. We include warm climate tweaks, harvest tips, and cooking ideas to keep flavor fresh.
Why grow Brussels sprouts
Brussels sprouts reward a little patience with real gains in the kitchen and the garden. A small handful can carry about four times the vitamin C found in one orange, which is remarkable for a cool season vegetable and a helpful boost through winter. When the weather turns cold the plants become sweeter because starches shift into sugars. That is why light frosts often make homegrown sprouts taste mellow and nutty rather than sharp.
There is a practical benefit too. Sprouts sit tightly on the stalk for weeks and often for months, so you can step outside and pick what you need for dinner while the rest stay fresh on the plant. That living pantry effect is hard to match with store produce that has already traveled and sat in storage. Finally, this crop fits many setups. You can raise sturdy rows in ground, tuck a few plants into square foot beds, grow in balcony containers, and even succeed in warm regions if you time the season carefully and use a suitable variety.
Key takeaways for gardeners
Plant for cool weather so flavor and development stay on track. Expect better sweetness after a chill. Treat the stalk as a long living storage system and harvest as you cook. Choose the growing method that suits your space and climate.
Timing is the secret behind perfect sprouts
Brussels sprouts are built for cool days and cold nights. Plan the calendar before you open a seed packet and the rest goes smoothly.
In cool and temperate regions such as Zone 6 the most reliable plan is to start seed in early June. That schedule brings transplant size plants into the garden in midsummer and sets maturity for late autumn just as light frosts arrive. Another simple rule is to count about four months backward from your average first fall frost. That backward count lands you on your seed starting date.
In mild or warm regions you will shift the season much earlier. Start seeds in September while days are still warm, keep young plants protected in bright shade, then move them to the garden around November when nights sit in the sixties Fahrenheit and ideally dip into the fifties. This timing helps the crop grow through the coolest part of the year and finish before spring heat returns.
From sowing to first harvest many gardeners see about twenty to twenty four weeks. If you are transplanting sturdy starts into containers the clock often shortens to about three to four months. The common thread is simple. Keep development inside the cool window and you avoid the stalled growth and pest pressure that arrive with heat.
Practical cues to watch
Night temperatures that settle in the sixties or fifties signal safe transplanting in warm areas. Light frosts in cool regions signal improved sweetness. If heat is building sooner than you planned, topping late in the season can help push energy into sizing the buttons before temperatures climb.
Choosing and starting seeds
Variety choice matters more than most people expect. In warm or variable climates a heat leaning hybrid such as Jade Cross F1 has shown faster and more reliable development compared with older types that linger too long. In classic cool climates compact or medium height strains are useful where wind or bed size is a concern.
Start seed in clean modules filled with fresh compost or a quality seed mix. Make a shallow divot and sow two seeds in each cell at about one to two centimeters deep. This double sowing improves your odds in every cell. When both germinate thin to the strongest seedling. With steady moisture and warmth you can expect germination in about seven to twelve days.
Transplant when seedlings are stocky and about ten to fifteen centimeters tall with several true leaves. At that size the root system moves quickly into prepared beds or large containers and resists minor weather swings.
Simple seed to plug routine
Fill trays and label. Sow two per cell at a shallow depth. Keep evenly moist and bright. Thin to one strong plant. Harden off and transplant once the seedling is sturdy and well rooted.
Preparing the soil
Firm fertile soil is your ally with this crop. Plants grown in loose beds are easily rocked by wind and that movement disturbs the fine feeder roots. The result is often loose or open buttons that never tighten properly. Set yourself up for success by preparing beds in advance so the surface settles before planting. No dig beds naturally firm over time which helps, while dug beds benefit from being prepared in autumn or winter so they consolidate by summer.
Blend in plenty of well rotted compost to raise organic matter and moisture holding capacity. Early in life the crop responds to nitrogen because you are growing a great deal of leafy mass before the buttons form. Gentle organic sources such as compost and mature manure pellets work well. Aim for a soil reaction near neutral since a pH from about six to seven suits most gardens and supports nutrient availability.
Consistent moisture is essential. Soil that swings from dry to wet and back again encourages stress and poor button formation. Mulching with clean straw helps keep the root zone cool and even through warm spells.
Soil checklist
Beds should feel firm underfoot, not fluffy. Organic matter should be high enough to hold water without becoming waterlogged. Nutrients should not be extreme but steady, with a little extra nitrogen early on to support leaf building.
Spacing, sun, and water
Give each plant enough room to build a thick stalk and a full skirt of leaves. In compact gardens one plant per square foot works, though twelve to eighteen inches between plants is kinder for airflow and harvest. Traditional layouts use about two feet in each direction, which makes netting and staking easier later in the season.
Sunlight is welcome when air stays cool. In classic cool climates place sprouts in full sun from autumn through winter. In warm regions and on balconies with heat reflecting surfaces a little afternoon shade can prevent stress. The plants will still need bright conditions but protection from harsh late day heat pays off.
Water deeply and less often rather than frequent shallow sips. A thorough soak about once a week in the absence of rain pushes water to the full depth of the root zone and supports even growth. Keep the topsoil from drying out with mulch so the shallow feeder roots never bake. Regular moisture and bright light during cool weather are the quiet habits that lead to tight, even buttons later.
Everyday care routine
Check moisture with your fingers and water when the top few centimeters are drying. Keep mulch topped up. Adjust exposure so plants get strong light during cool hours and light protection if sun intensity and heat build in the afternoon.
Warm climate adaptations that work
Growing this cool season crop in a mild or subtropical region is possible when you lean on timing, light management, and variety choice. Begin seeds in September while days are still warm. Keep starts in bright shade so they avoid intense sun and heavy rain. Move them outside when nights settle in the sixties and ideally dip into the fifties Fahrenheit. Transplanting in November lets the plants spend their main growth period in the coolest months and finish before spring heat arrives.
Pay attention to winter sun angles. Beds near fences often sit in shade when the sun travels low across the horizon. Choose a position that gathers maximum winter light. If an area turns out darker than expected, understand that lower light and shorter days extend the season and can slow sizing.
Choose seed that was bred to handle warmth and to mature quickly. Heat leaning hybrids such as Jade Cross have shown reliable performance where older types linger. As the season advances watch for small dimples forming at each leaf node. When you see them it means the buttons have started. Remove the growing tip at that stage to send energy into sizing before temperatures climb. Cut the top at a slight angle so rain runs off while the plant finishes.
Warm zone checklist
Start early under shade. Transplant once nights cool. Prioritize full winter light. Use a quick maturing, heat tolerant variety. Top when buds appear to push size before heat returns.
Containers and small spaces
You can raise a good crop on a balcony or patio with the right pot and mix. Aim for fifteen to twenty liters per plant. Ten liters can work with lighter yields if that is all the space allows. In hot regions clay containers help because they run cooler and breathe through the sides.
Fill pots with a humus rich blend that holds moisture without staying soggy. A compost forward mix with a little clay content keeps roots evenly hydrated. Container crops are heavy feeders and need steady nutrition from start to finish. Rotate gentle organic feeds through the season. Nettle based feeds support early leafy growth and a later addition of chicken based pellets balances nutrients as buttons begin to form.
Keep the surface from drying with a thin mulch and water whenever the top few centimeters lose moisture. Expect three to four months from transplant to harvest in containers. If you notice cracked or misshapen buttons, consider that pots can run short on micronutrients. A balanced feed that includes boron can correct issues when applied early in development.
Small space routine
Choose a pot with real depth. Use a compost rich mix. Feed lightly but often. Keep moisture even. Harvest as buttons firm to two to four centimeters.
Protecting your crop
A simple physical cover prevents most problems before they start. Fine mesh or a tight net over tall hoops keeps the white butterflies from laying eggs on leaves and blocks birds from pecking tender tops. In open beds a floating cover also deters pests while allowing air and light to pass.
Check plants regularly and act early. Hand pick caterpillars when you see leaf holes. A quick blast from a hose knocks back aphids. If populations surge, soapy water can help. Organic options such as BT or spinosad are available, though many gardeners hold these for tougher moments and rely first on physical barriers and hand controls.
Diseases are best handled through prevention. Raise your own seedlings and practice clean habits to avoid introducing clubroot to your soil. Ask visitors to keep dirty footwear off the beds. For black rot, start with tested seed, rotate brassica plantings each year, and remove sick plants promptly. Where root fly is a known issue, place collars at the base of stems to block egg laying.
Preventive habits that matter
Cover early and keep covers tall as plants grow. Walk the bed weekly and remove pests by hand. Keep tools and shoes clean. Rotate families each season.
Pruning, topping, and support
Guided pruning improves airflow and focuses energy where you want it. Remove the lowest leaves as the plant rises so light reaches the young buttons and the base stays dry and clean. Late in the season when buds are visible, take off the top to halt vertical growth and send resources into sizing. Make the cut at a slight angle so water runs away from the wound.
Tall stalks catch wind as storms return in late summer and early autumn. Stake plants before the weather turns wild. Preventing wind rock protects the fine feeder roots that move water and nutrients into forming buttons. In compact beds, a single sturdy stake and a soft tie are often enough. In long rows, string between posts gives even support.
Simple structure plan
Clear old bottom leaves. Top once buds are present. Stake before storms. Keep ties snug but gentle so stems can thicken.
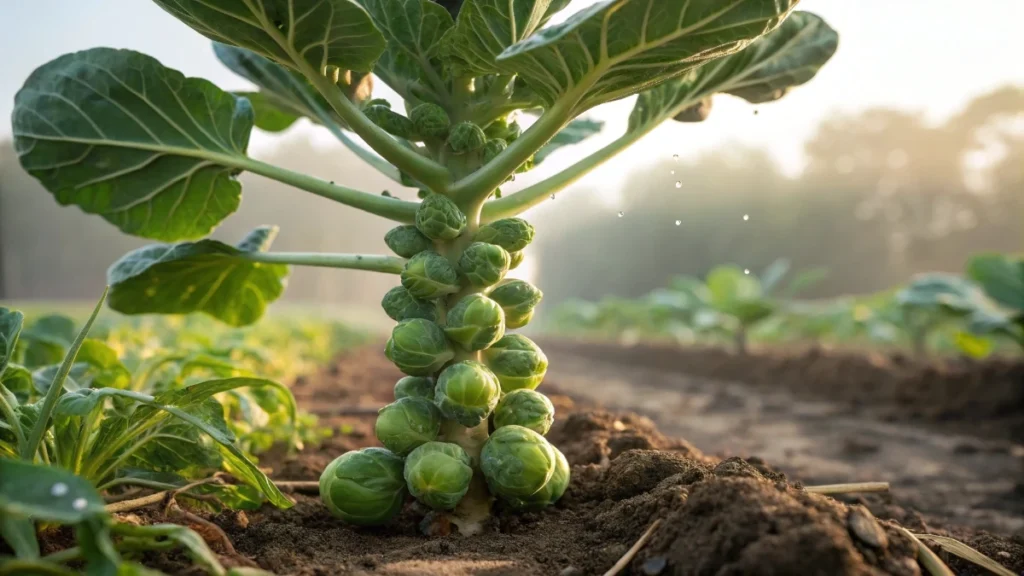
Harvest and storage
Buttons mature from the base upward. Begin picking the firm lower sprouts while the top continues to size. A good cue is a tight feel and a diameter of about two to four centimeters. Harvest with a quick downward twist. Regular picking encourages the remaining buttons to fill.
Many gardens start their main picking run in mid to late autumn and continue through winter. In cold areas a light frost often improves flavor. If you prefer a single big harvest you can cut the entire stalk and strip the buttons in the kitchen. After the main harvest a final treat waits at the top. The head at the tip cooks like a small, tender cabbage leaf bundle and makes a welcome meal.
Storage is flexible. Sprouts hold on the stalk outdoors for a long window, which turns the bed into living storage. For freezer stores, blanch briefly and cool before packing. They keep their color and most of their texture this way. In the pan stick to quick methods that keep them bright and sweet. Halving and roasting at a high oven temperature or a fast sauté with aromatics brings out their natural sugars. Avoid long boiling, which can release a strong sulfur scent and dull the flavor.
Harvest rhythm
Pick from bottom to top as they firm. Take the tip head at the end. Use the stalk as living storage or blanch and freeze for later meals.