
Microgreens are tender, nutrient-rich plants harvested just days after germination, but their delicate nature means they spoil quickly without proper care.
Knowing how to preserve microgreens the right way can make the difference between enjoying them for just a couple of days or keeping them fresh for weeks.
Whether you are growing microgreens at home, selling them at markets, or supplying restaurants, storage methods directly impact flavor, texture, and shelf life.
From harvesting techniques that prevent excess moisture to smart refrigeration strategies and even long-term options like dehydration or vacuum sealing, there are proven ways to extend their freshness.
This guide explores practical, step-by-step methods to help you maximize the shelf life of microgreens.
Why Preservation Matters
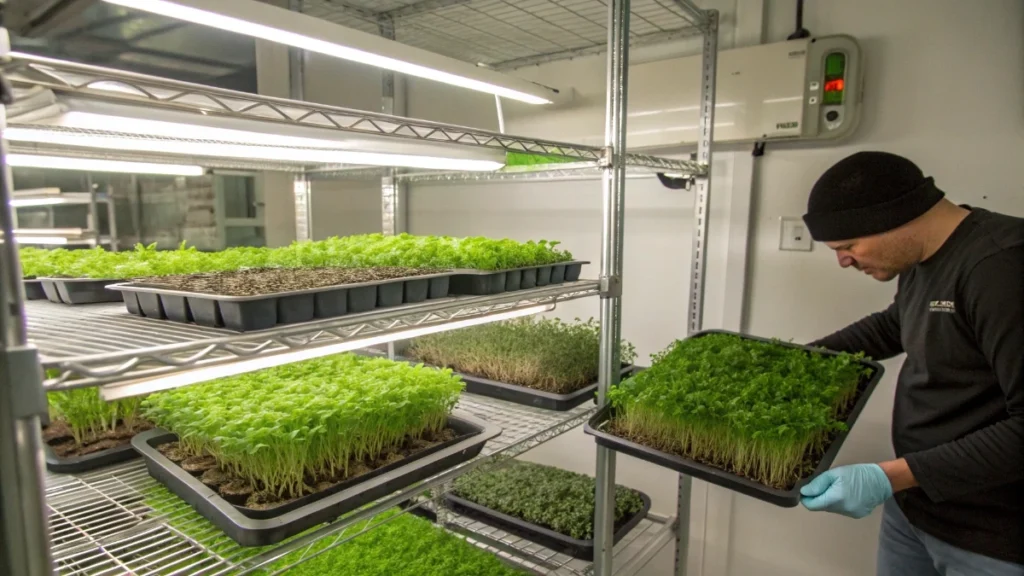
Microgreens are young plants with lots of surface area and very high moisture, which makes them wonderfully tender but also prone to fast decline once cut. If they are harvested wet, they can turn slimy in a few days. If they are handled roughly,y the bruising speeds up the breakdown. With the right routine, you can move that outcome from a handful of days to well over two weeks for many crops and even past one month for hearty types like pea shoots. The foundation is simple to say and important to execute well. Keep them dry. Keep them cold but not frozen. Limit oxygen exposure and light. Handle them gently fromthe cut to the container.
Core Principles That Drive Shelf Life
Keep them dry
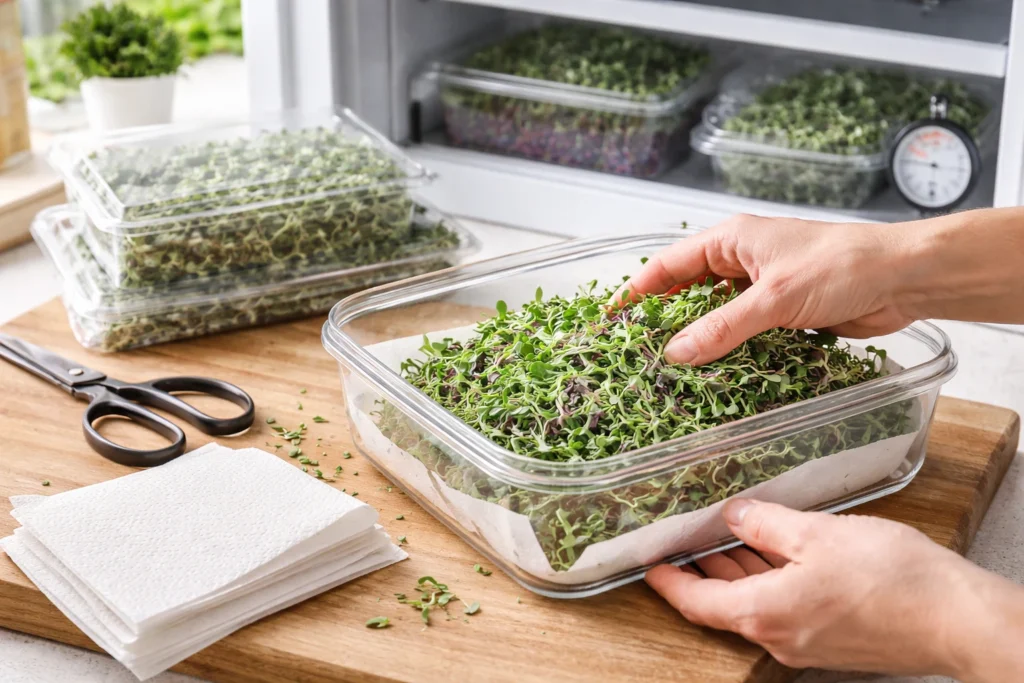
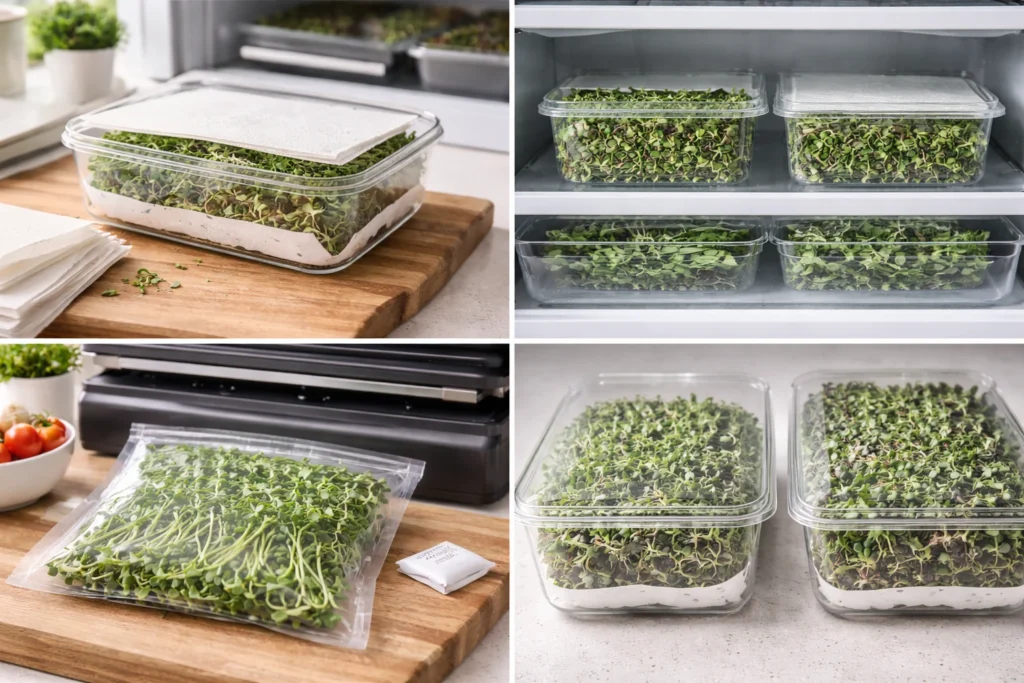
Moisture control is the number one lever. Growers who top water often harvest damp plants and see rapid spoilage. Bottom watering keeps foliage dry, so the product goes into the box already in good condition. Several growers reported that a wet harvest collapses to a few days of life, no matter what you do afterward. An easy home method is an airtight container with a dry paper towel at the bottom and another on top to absorb humidity. That simple step has kept mixed microgreens crisp for up to about ten days in a home refrigerator when other parts of the routine are solid.
Keep them cold but not frozen.
Cold slows respiration and wilting. One experienced grower keeps storage near 33,°F, which is about 0.5°C, and sees strong results. The warning is just as important. Do not let packages sit against the back wall or in front of the cold air inlet, where leaves can freeze. Frozen microgreens turn to mush after thawing. For markets or short displays, they can sit near room temperature, around 65°, F for a day and go back to refrigeration, but doing that routinely will shorten total life.
Limit oxygen and lig.ht.
Oxygen drives oxidation. A sealed clamshell or a purpose-made produce bag reduces air exchange. Vacuum sealing goes a step further by pulling air out, so oxidation slows, and crispness lasts longer. Light is an overlooked culprit on retail shelves. Bright case lights speed decline. Position displays a little away from the bulbs, and you will see a real difference.
Handle gently
Microgreens bruise easily. Crushing handfuls while packing or sawing with a dull blade shortens life. A clean, sharp knife or scissors and a light touch prevent cell damage and the fast rot that follows.
🌿 Recommended Microgreens Supplies |
Pre-harvest Prep For a Truly Dry Harvest
Time for the last watering
Stop watering before harvest, so plant surfaces are dry at the cut. The exact pause depends on your setup and humidity. One method is to hold water for about six hours before cutting, which works well for daily snips at home. Another method for larger harvests is to water the night before and harvest roughly twenty-four hours later. That timing lets the medium approach dry without letting plants wilt.
Manage room conditions the night before
Aim for around forty percent relative humidity with good airflow. A dehumidifier and a small fan aimed above the canopy help dry the crop so you are not cutting wet tissue in the morning. If your space is humid, this single change can add many days of life.
Harvest window by crop
Cut most varieties by about day fourteen or sooner if flavor turns bitter or a third leaf appears. Pea shoots are an exception because the stems can turn woody quickly, so many growers cut peas around day eight to day ten for the best texture and storage.
Keep the foliage dry while growing.
Bottom watering throughout the grow is a quiet hero of shelf life. It prevents wet foliage at harvest and reduces the need for any rinse later.
Harvesting Technique That Protects Quality
Use the right tool and motion.
Use clean, sharp scissors or a sharp produce knife and cut just above the medium. A smooth cut closes quickly and leaks less moisture. Avoid tugging that pulls roots or growing medium into the product. Pick out any fragments of medium if you see them.
Handle with a light touch.
Hold small bundles loosely and lay them into containers rather than pressing them down. Rough handling crushes stems and leads to quick rot, even if everything else is perfect.
Choose a timing that supports dryness.
Many growers like an evening harvest after about twenty-four hours without water. Others prefer morning once leaves have dried from overnight airflow. Either way, the goal is the same. Cut when foliage feels dry to the touch, yet the plants are not wilting.
To Wash or Not to Wash.
The default recommendation
Do not wash before storage. Added water shortens life dramatically. This is especially true when plants are grown indoors with clean practices such as bottom watering and careful hygiene. In that case, the cut product is already clean enough for storage.
If you must wash
If you have a reason to rinse, such as outdoor growing or visible debris, remove as much water as possible right away. A salad spinner helps, and so does spreading the greens on towels for a brief air dry. Even with careful drying, expect a shorter storage window compared with never washing. Several growers pointed out that washed crops rarely match the life of an unwashed dry harvest.
Wash right before eating.
A simple compromise is to keep stored portions dry and unwashed, then rinse only the amount you will eat at that moment. That habit keeps the rest of the box in ideal condition.
Packaging Options and What They Actually Do
Airtight container with paper towels
For home kitchens, an airtight container with a dry paper towel at the bottom and another on top controls humidity inside the box. Stored in the fridge crisper, this setup has kept mixed microgreens fresh and tasty for up to about ten days. Replace the towels if they become damp.
Sealed clamshells for refrigerators with frost-free cycles
Many home refrigerators pull moisture out of the air as part of their frost control. In that environment, a vented clamshell can dehydrate greens within about two days. A sealed, non-vented clamshell shields them from that airflow and preserves texture much better.
Purpose-made produce bags for larger varieties
Special produce bags marketed to slow oxidation have shown standout performance with hearty crops such as pea shoots and sunflowers. Growers report these bagskeepg those varieties in good shape for over a month when the product was harvested dry and stored cold.
Vacuum sealing to reduce oxygen
Removing air slows oxidation and keeps stems snappy longer. Vacuum sealing works best for sturdier crops and for customers who will open and use the package in a few sessions rather than nibbling little by little all week.
Humidity-absorbing packs when condensation appears
Small food-safe desiccant packs can soak up moisture inside a closed container and prevent the cloudy condensation that often appears after packing. Less free moisture means less mold risk and longer life.
Fill level matters
Leave a little breathing room, but do not leave a giant pocket of air. Too much headspace invites oxidation. Cramming the container bruises the greens and traps moisture between compressed leaves. Aim for a comfortable fill where leaves can sit loosely without being squashed.
Material choices
Compostable cornstarch containers are a popular alternative to conventional plastic for those who value presentation and sustainability. The material does not change shelf life by itself. What matters most is dryness, seal quality, and cold storage.
Fridge Strategy and Placement
A steady cold environment preserves texture and slows respiration. Aim for about 33°F, which is close to 0.5°C. That temperature has kept greens firm and bright when the other steps are done right. Keep packages away from the back wall of the refrigerator and away from the cold air vent. Those spots are prone to freezing, and frozen leaves turn mushy after thawing.
The crisper drawer is a smart home base because it moderates humidity and protects from direct airflow. In frost-free refrigerators, the general air stream is dry. Sealed containers help resist that effect, so the leaves do not dehydrate in a couple of days.
Short displays at room temperature are workable for markets and tastings. About 65°F for the day is acceptable if the product returns to refrigeration afterward. Expect a slight reduction in total life when this happens often. In stores and at events, keep displays away from bright case lighting. Prolonged light exposure noticeably speeds decline.
Realistic Shelf Life Ranges.
Brassica types such as broccoli, cabbage, kohlrabi, rutabaga, and mustard can reach two to three weeks in cold storage when harvested dry and packed well. There are consistent reports of these lasting up to four weeks in good conditions. A chef-style blend built on radish and cabbage with other additions has been shown to look and taste fresh at about sixteen to eighteen days.
Pea shoots are standouts. Properly packed and kept cold, they can hold for three to four weeks and often longer. With high-performance produce bags, the same shoots and sunflowers can remain in good shape for over a month.
More delicate varieties, such as amaranth, tend to show settling and quality decline around the two-week mark even when handled carefully. For home kitchens using the paper towel method in an airtight box inside the crisper, mixed microgreens commonly stay fresh for up to about ten days, which is a practical, conservative figure for everyday use.
A clear dating practice helps everyone. For retail shelves, a best-by date set to harvest plus fourteen days matches what shoppers expect to see on packaged produce. For direct sales to cooks and households, it can be better to show a harvested on date so freshness is obvious at a glance.
Restaurant and Market Workflows
Whole tray service changes the plan. In a walk-in refrigerator, the cool temperature slows growth and helps the tray last through a busy week. Light watering is important. About half a cup per day is a useful starting point for a standard tray in a cool walk-in. The goal is to keep the tray lively without pushing fast new growth.
Timing by crop helps. Fast growers like radish can become oversized and bitter by the weekend if delivered fully mature on Monday. Delivering those trays one to two days before full maturity lets them peak midweek when service volume is highest. Slow growers such as cilantro hold their size and flavor more steadily and are easier to manage over several days.
At markets and pop-ups, expect the product to tolerate time on a table near room temperature for the selling day. Moving it back to refrigeration after the event protects the remaining shelf life. Shade the display from direct lighting, and avoid placing it under the brightest bulbs in the case.
Long-term Preservation Beyond Fresh
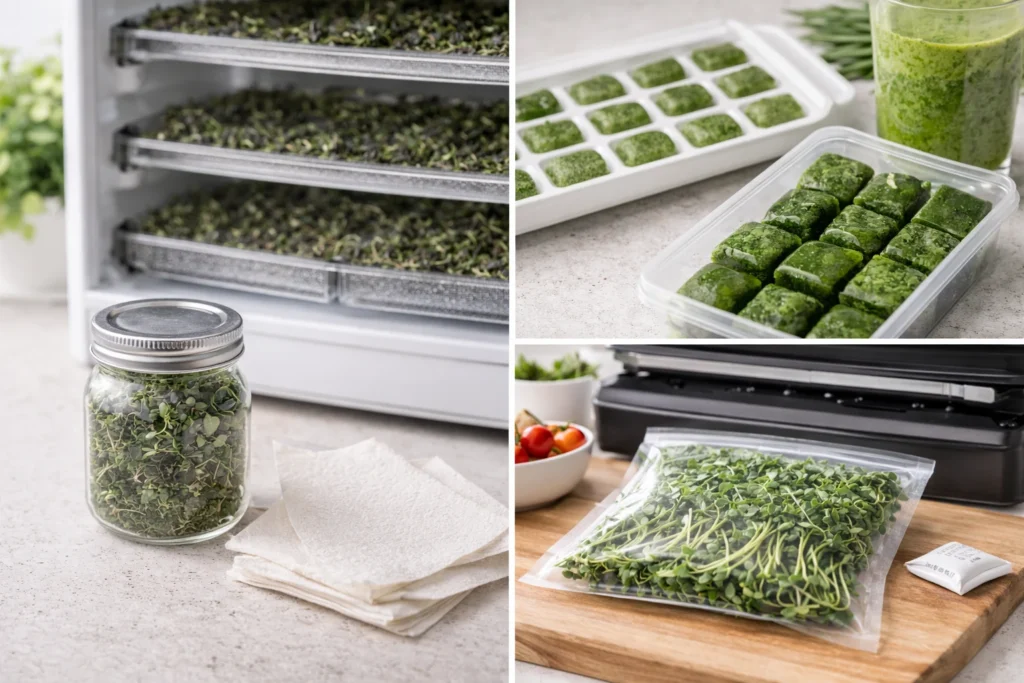
Dehydration turns a short-lived crop into a shelf-stable pantry ingredient. For nutrient-friendly drying, set a dehydrator in the neighborhood of 95 to 115°F and run until leaves are fully crisp. Grind to a fine powder and store in a jar. The powder blends seamlessly into smoothies and soups and can be mixed with salt to make a finishing sprinkle. A practical ratio is one part microgreen powder to five parts salt, which adds color and micronutrients without overwhelming the dish.
Faster dehydration at higher heat is also effective for preparing powders that go into robust recipes. A common setting is about 158°F for roughly four to five hours until completely dry. That powder works well in marinades such as a bison or beef jerky mix, where it adds flavor and a nutrition boost.
Freezing is a special case for wheatgrass. Fresh juice held in the refrigerator loses quality within hours. Pressing and freezing the juice in small cubes preserves it for months. One full tray can be portioned into a few dozen cubes that drop straight into a morning smoothie.
Vacuum sealing belongs here, too. Pulling out air slows oxidation and helps maintain snap. It is particularly useful for sturdier crops and for users who open a package a few times rather than every day.
Troubleshooting Fast Spoilage
If greens are failing within a few days, the most common cause is moisture at harvest. Fix this first by pausing water for six to twenty-four hours before cutting and by using airflow or a dehumidifier to keep relative humidity near forty percent the night before. Leaves should feel dry when you pick them up.
Look at the package type next. Vented clamshells in a frost-free refrigerator can dehydrate tender leaves in about two days. Switch to a sealed clamshell or airtight box to avoid that constant air draw. Add a paper towel liner to manage interior humidity. If you see condensation inside the package, a small food-safe humidity pack can help.
Check how full the container is. A large pocket of air accelerates oxidation while overstuffing bruises the product and traps moisture between compressed leaves. Repack to a comfortable fill level with a bit of space to settle. Keep containers away from the coldest back wall and from the direct blast of the air inlet to prevent freezing damage. For retail and markets, reduce light exposure since bright case lighting noticeably shortens life.
Finally, reassess handling. Use a sharp, clean blade, cut just above the medium, and avoid gripping bunches tightly. Gentle packing preserves cell integrity and keeps spoilage organisms from getting a head start.
One-page Checklists
Home storage checklist
Pause watering six to twenty-four hours before cutting. Aim for around forty percent room humidity with airflow the night before. Harvest gently with a sharp tool and avoid pulling roots. Pack in an airtight container with a dry paper towel on the bottom and another on top. Store in the crisper near 33°F while keeping away from the back wall and vents. Do not wash until right before eating. Expect up to about ten days for mixed greens when all steps are followed.
Retail and market checklist
Harvest dry and pack in sealed clamshells or high-performance produce bags. Date packages with best by equal to harvest plus fourteen days. Keep displays cool and out of direct case lights. A room temperature of around 65°F is acceptable for the selling day. Return the remaining product to refrigeration as soon as the event ends.
Restaurant tray checklist
Deliver fast growers one to two days before full maturity so they peak midweek. Place trays in the walk-in to slow growth. Water lightly at about half a cup per day as a starting point and adjust to conditions. Keep trays away from freezing spots in the cooler. For slow growers such as cilantro, expect stable size through the week with minimal adjustment.
Dehydration and pantry checklist
Choose a drying path based on use. For nutrient preservation, dry around 95 to 115°F to crisp, then grind and jar. For robust recipe powders, dry around 158°F for four to five hours until crackling dry. Mix powders with salt at about one to fiveparts for finishing salts or add directly to soups and marinades. For wheatgrass, press and freeze in cubes to hold quality for months rather than hours.