
Microgreens farming lets you turn a spare corner into a profitable home agribusiness. In this step-by-step guide, you will learn how to grow microgreens at home from seed to harvest in 7 to 14 days, set up lights and trays, dial in seeding rates, and price your greens for weekly sales.
Unlike mature vegetables that need 60 to 90 days, you can raise 6 to 9 microgreen crops in the same time and in one square foot.
Microgreens can reach up to 40 times the nutrient density of mature plants; for example, two ounces of sunflower shoots can provide 133 percent of vitamin C, plus iron and vitamin K.
Why microgreens and why now
Microgreens farming delivers speed, density, and a strong value story. A head of broccoli might sit in the garden for sixty to ninety days before harvest. In the same window, a single square foot can turn over six to nine crops of broccoli microgreens. That pace changes the math for a small home grower.
Nutrition is a second hook. Multiple sources in the growing community report that microgreens can reach up to forty times the nutrient density of their mature counterparts. A practical example often cited by growers is sunflower microgreens, where a two-ounce handful can provide roughly one hundred thirty three percent of daily vitamin C needs, seventy one percent of daily iron, and forty four percent of daily vitamin K. That kind of profile makes tiny servings feel meaningful.
Demand is real and growing. Shoppers pay premium prices at retail. It is common to see small clamshells of two to four ounces priced around eight dollars in many markets. On the business side, the Indian market has been described as thirty-five thousand crore rupees today, with expectations of reaching one lakh crore rupees within a few years. The broader global market has been described at about three point two four billion dollars in twenty twenty four, with projections near seven point nine seven billion dollars by twenty thirty two. Restaurants, organic stores, and smoothie bars are steady buyers. Health-focused consumers pick them up for salads, grain bowls, and toppings. With a crop cycle of seven to twenty-one days, you can seed this week and have something to show buyers next week.
What you need to start
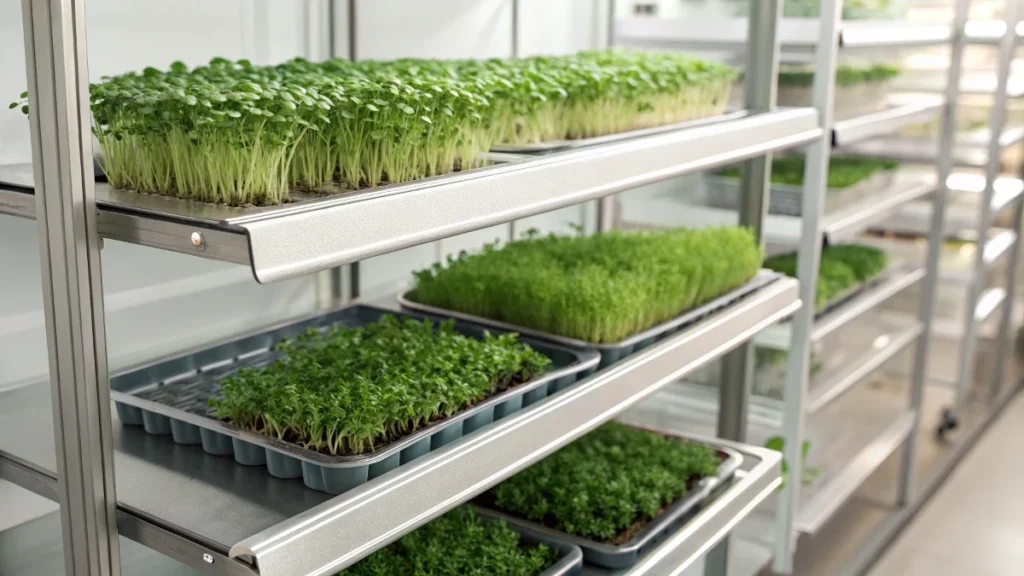
You do not need a greenhouse. A spare corner of a room, a balcony shelf, or a section under kitchen cabinets can carry an entire microgreens farming workflow. A simple metal rack with three or four shelves multiplies capacity without taking much floor space.
Trays matter more than most beginners expect. Shallow sturdy trays are easier to harvest from because you do not need to reach down a deep wall with a knife. Use paired trays. One has drainage holes for the crop. One has no holes to act as the watering reservoir.
Lighting does not need to be intense. One full-spectrum LED per shelf is enough for microgreens. A small fan on a timer helps keep air moving through the canopy, which reduces moisture problems. Keep a clean spray bottle or watering can only for seedlings. Use a sharp kitchen knife for harvest rather than scissors because a clean slice avoids a stem pinch that can speed spoilage. You will also want labels, simple clamshells or food-safe boxes, and a refrigerator space to hold finished packs.
Startup costs can stay modest. You can assemble a beginner setup with roughly ten thousand to thirty thousand rupees for trays, racks, medium, seeds, and basic lighting. A scale-up to a small dedicated room with more lights or a simple irrigation support can be done for around one lakh rupees. These figures come from practitioners who have built home-based systems and give you a grounded range rather than a guess.
Seeds and growing medium
A clean indoor potting mix is the most forgiving medium for beginners and for many small businesses. It arrives free of pathogens, holds water evenly, and produces thicker, faster growth than many mats or reusable screens. Alternatives like coconut fiber mats or hydroponic screens can work and offer tidy handling. Expect plants to be a little thinner and to take a bit longer when you move away from potting mix. Avoid outdoor compost or garden soil for indoor growing because it can carry fungus gnat eggs and other pests.
Microgreens farming does not demand special seeds. The difference is in the packaging size. Buying in bulk cuts your per tray cost dramatically. To illustrate the spread, growers often compare tiny garden packets with bulk bags. A three-gram packet of broccoli might list about nine hundred seeds for a couple of dollars, while a one-pound bag at a modest price can contain roughly one hundred forty-four thousand seeds. Sunflower shows a similar gap, with a five-gram packet listing fewer than one hundred seeds for a few dollars and a multi-pound bag with tens of thousands of seeds for a few tens of dollars. The point is simple. Bulk turns a high-priced crop into a very low-cost input per tray.
Heavy seeding also lets you use older seed. Many growers routinely sow seed that is three to four years old with fine results because dense coverage compensates for any minor loss of germination. For consistent timing and clean harvests, place one variety per tray rather than a mixed tray. Different varieties grow on different clocks and respond differently to light and water. Keeping trays single variety makes your workflow predictable.
🌿 Recommended Microgreens Supplies |
Seeding rates and soaking
Think in terms of a standard ten-by-ten tray as a baseline. Small seeds like broccoli, kale, mustard, arugula, cabbage, and bok choy are typically sown at about one tablespoon per tray. They do not need a soak. Sprinkle them for full but not piled coverage so the canopy closes quickly without forming thick mounds.
Larger seeds like peas, sunflowers, and chard appreciate a soak. Four to twelve hours is a good window. Most small operators find that about three tablespoons per ten-by-ten tray gives full coverage without suffocating the seedbed. After soaking, spread the seed evenly. The goal is a uniform layer that touches most of the media surface without forming ridges.
Even coverage is not cosmetic. A well-distributed canopy shields the media surface, keeps humidity more stable around the stems, and creates even light exposure later. Overcrowding traps moisture and raises mold risk. Sparse sowing leaves gaps that slow growth and reduce yields per shelf.
Watering at sowing
There are two reliable approaches, and both work. Choose one and use it consistently.
One approach is to pre-moisten the potting mix until it is damp but not dripping. Fill and level the tray. Sow the seed. Use a light mist to settle the seed against the surface. This gives excellent seed to soil contact right away without disturbing the pattern you just spread.
The other approach is to level the potting mix while dry. Sow the seed on the dry surface so the seed spreads cleanly and does not stick to your fingers or the walls of the tray. Then water once to bring the whole profile to field capacity. This single thorough pass wets corners and edges evenly and avoids the common mistake of watering multiple times during germination.
Overwatering at this stage is the mistake that causes most early failures. Too much water lowers germination, invites mold, and slows the entire cycle. Whether you pre-moisten, then mist or sow dry, then water once, the principle stays the same. Deliver enough moisture to carry the seed through germination without creating a soggy bed.
Germination with weight and what comes next
Weighted germination is a simple trick that reliably improves results. After seeding, stack trays and place a weight on the top of the stack. You can safely stack several trays. Many growers stack up to six. A paving stone around fourteen pounds is a common top weight. The pressure encourages roots to grow downward and anchor firmly. Stems thicken in response, and the canopy emerges more uniform.
Leave the stack alone. Do not lift trays to peek or water during this phase. Germination creates its own humid pocket, and frequent disturbance introduces spores and disrupts the seedbed. The trays will tell you when it is time. As sprouts grow, they begin to push the upper tray away. When you see the stack separating, it is time to unstack and move the crop under the lights.
From here, there are two proven styles. Some growers flip the now-empty tray over the seedlings for a short blackout period. This encourages a bit of stretch, which is useful for microgreens because extra height makes harvesting cleaner without degrading nutrition. The blackout period is brief. As soon as seedlings reach an inch or two, they are ready for light. Other growers skip blackout entirely and go from weight to lights in one move. Skipping blackout keeps humidity lower and reduces the risk of mold in rooms that are already run humid.
Both styles work. Choose the one that fits your room conditions. If your space is very humid or has limited airflow, skipping blackout may reduce issues. If your space is dry and your microgreens stay very short, a short blackout can help the stand reach a comfortable cutting height. In either case, once the crop is under lights, you transition to the daily routine of first saturation, then bottom watering and steady airflow.
Lights, airflow, and daily watering
Healthy growth in microgreens farming comes from steady light, gentle air movement, and a simple watering rhythm. These crops do not need intense horticulture lamps. One full-spectrum light per rack shelf is enough to keep plants short, green, and uniform. A window can grow a tray, but clouds and short winter days take away your control. Lights deliver a reliable schedule that keeps trays on time for harvest.
Place trays so the light footprint covers the full surface. When seedlings first come out of germination, give them their first drink under lights. Many growers use a single top watering at this moment to saturate the medium from edge to edge. After that, switch to bottom watering and make it a morning habit. Lift the crop tray, add water to the reservoir tray, and let the roots drink for a short period. You are aiming for roots that stay plump and white with no standing water left the following day. If water sits in the reservoir, use less next time. If the medium is dry by evening, increase it slightly the next morning. This small feedback loop is the core skill that prevents mold and weak growth.
Air movement is your quiet helper. A small fan on a timer for several hours a day keeps the canopy drier and more resilient. It also pairs well with bottom watering to limit surface moisture. If you prefer to grow into baby greens, or if you use an inert medium like coconut fiber mats, consider a mild feeding program. A practical dilution used by many indoor growers is about one teaspoon of indoor liquid fertilizer per quart of water delivered through the reservoir. For short microgreen runs in high-quality potting mix, fertilizer is optional.
Light level and plant response
Microgreens are very young plants. With proper light, they develop chlorophyll and stay compact with sturdy stems. Without light, they stretch, turn pale, and lose the look buyers expect. One light per shelf is usually enough to keep the crop on track.
The first water under lights
The first water under lights unifies the moisture profile. A measured top water here reaches every corner without moving the seed. The crop then transitions to bottom watering only. This change prevents splash and keeps leaves clean for harvest.
Daily bottom watering routine
Water once each morning. The goal is simple. No standing water the next day, and no wilt in late afternoon. The tray should feel evenly moist, and the roots should stay bright and healthy. Consistency here shortens time to harvest and boosts quality.
Airflow for a clean canopy
Run a small fan for a few hours to keep air moving across the tray surface. Airflow and bottom watering together are the easiest ways to avoid spot mold on stems and leaves. If your room is already very dry, shorten fan time. If your room is humid, increase it.
When to harvest and how to manage regrowth
Harvest timing depends on the crop. For the brassica group, like broccoli, kale, cabbage, and bok choy, watch for the first true leaves. The first pair that emerges is the seed leaves, and they look similar across varieties. The next leaf shows the signature shape of each plant. That is the moment to cut.
For peas and grasses, use height instead of leaf stage. Pea shoots are typically cut at four to five inches. Wheat grass is similar in height, even though it is used differently in the kitchen. Sunflower is best taken as a full tray when the first true leaf just begins. Leaving sunflowers too long turns the stems coarse, and the flavor shifts.
Use a sharp knife rather than scissors. A clean slice does not pinch the stem. Pinched stems can darken and shorten storage life in the refrigerator. Keep the harvest dry. Washing adds moisture that speeds the decline in storage and can change how your product is classified in some regions.
Cut and come again crops.
Arugula, mustard, lettuce, Swiss chard, beets, cilantro, parsley, kale, bok choy, and broccoli can be harvested as needed and left to grow on for a time if you want baby greens from the same sowing. Cut above the medium so the crown stays clean. Pea shoots can regrow one to two times when you cut above the lower leaves. Wheat grass can produce several rounds as well. Sunflower does not hold quality as a regrow crop, so take the main flush and replant.
Troubleshooting and hygiene
Clean habits prevent almost every common issue in microgreens farming. Start with clean trays and a quality indoor potting mix. Avoid outdoor garden soil indoors since it often carries fungus gnat eggs. If you must use garden soil, sterilize it with boiling water before planting, and do that outside your kitchen.
Fungus gnats are easy to monitor and reduce with yellow sticky cards placed near the trays. Small spots of fuzzy growth can appear on dense stands when humidity sits high. Airflow and bottom watering prevent most of it. If you see a small patch, spot treat with a mild hydrogen peroxide solution. A practical mix is about two tablespoons of hydrogen peroxide in one cup of water. Put it in an opaque spray bottle and mist the exact spot. It usually clears within a day or two.
Damping off is a different situation. It is a fungal issue that collapses stems, and it is not reversible in the affected area. Harvest what looks good from the rest of the tray, discard the remains, sanitize the tray, and plant again. Since each planting uses a small amount of soil and seed, taking a loss on a tray is better than risking spread.
The role of watering in most problems
Overwatering is the root of most failures. Too much water during germination lowers sprouting rates. Too much water after uncovering keeps stems wet and invites mold. The daily routine of bottom watering once and aiming for no standing water by the next day keeps the balance right.
Clean harvest, clean storage
Keep the harvest off the medium by cutting above the surface. This is easier when trays are shallow, and stems have stretched to a comfortable height. Clean cutting keeps debris out of the pack and extends storage life.
Beginner-friendly crop list
Some crops reward new growers with quick wins. Arugula and mustard are very fast and often ready before you expect. Broccoli and kale have consistent timing and deliver that familiar mild flavor that works in many dishes. Bok choy gives a tender stem and a mild brassica note. Red Acre cabbage adds color and makes blends look premium. Lettuce is simple but takes a little longer.
When you are ready to step up, try China Rose radish. It grows fast, has a peppery kick, and looks beautiful in a mix. Beets and Swiss chard bring striking stems and make attractive baby greens if you let them run longer. Pea shoots are easy once you learn a good soak and a slightly longer weight during germination. Sunflower needs a soak and benefit from a longer weight so the hulls slip cleanly. Parsley, cilantro, and basil need patience because they can take two to three weeks just to germinate.
Packaging, channels, and basic compliance
Simple clamshells or food-safe boxes keep the product protected and visible. Pack dry and chill promptly. Label with variety and harvest date. A small note that says rinse before eating fits most home and retail expectations. If you pack for restaurants, label each pack with the weight so chefs can portion quickly during service.
There are many ways to sell. Restaurants, fine dining rooms, cafes, smoothie bars, and organic stores are steady buyers once you prove consistency. Retail platforms in some regions include large grocery delivery services and quick commerce apps. Health-focused households often prefer subscriptions with a weekly drop of a few varieties. A mix of pea shoots, radish, and a brassica blend covers a lot of uses and looks great in photos for your social page.
If you are in India, two simple steps help you sell with confidence. Register as a micro and small enterprise to formalize the business and apply for a basic food safety license for commercial sale. If you plan to sell online or to larger markets, having registration in place builds trust with buyers and speeds onboarding. In many regions, washing greens changes how the product is regulated or taxed, which is one reason many small growers keep the product dry and instruct customers to rinse before eating. Always check the local rules where you operate.
Ten-day launch plan from seed to first sales sample
Day zero is set up and sowing. Prepare trays and medium, sow single varieties per tray at the rates described earlier, then stack and add weight. Leave the stack alone. Do not peek and do not water again.
Days three and four are the usual window when seedlings push the trays apart. Unstack and go under the lights. Some growers place an empty tray over the crop for a short blackout to encourage stretch. Others skip blackout and head straight to lights. Give one thorough top watering now to saturate the medium, then switch to bottom watering once each morning. Start the fan for a few hours a day.
Days six through nine bring the first cuts from fast crops like arugula and radish. Take a small sample harvest and pack it neatly for chefs or early retail testers. Use this moment to collect feedback on flavor, texture, and packaging.
Days seven through twelve are the full harvest window for many trays. Cut with a sharp knife above the medium, pack dry, label with variety and harvest date, and chill. Deliver to a short list of target buyers and capture a standing order for the following week. Keep the sowing cycle moving so that new trays are always in germination while you are harvesting the current batch. This steady rhythm is what turns a spare corner into a reliable microgreens farming business.