
Microgreens are one of the easiest and most rewarding ways to start gardening at home. These tiny seedlings are packed with nutrients, grow quickly, and require very little space or equipment. With just a tray, some seeds, and a sunny window or simple grow light, beginners can harvest fresh greens in as little as 7 to 14 days.
From radish and broccoli to pea shoots and sunflower, microgreens add flavor, texture, and color to everyday meals while boosting nutrition.
They are also inexpensive to grow compared to store-bought packs. This guide explores simple microgreens garden ideas for beginners, covering seeds, soil, containers, care, harvest, and creative culinary uses.
Microgreens Garden Ideas for Beginners
Why microgreens matter for a first garden
Microgreens are the seedlings of vegetables and herbs picked very young, often within one to three weeks. At this stage, they deliver concentrated taste and a surprising nutritional punch. Several sources in your material note that young greens can contain up to forty times the nutrients of their mature counterparts, depending on the plant. Broccoli microgreens are frequently highlighted for their content of sulforaphane, a phytochemical that has been widely studied. Beyond nutrition, cooks reach for microgreens because small amounts bring a strong flavor hit and an instant upgrade in color and presentation.
Fast results and a small space-friendly
A main reason beginners love microgreens is speed. Many commonly grown types reach harvest in about seven to fourteen days. Some go longer, but the overall cycle is still short. Setups can be tiny. A single shelf with one full-spectrum light per level can supply a steady rotation. If you have a bright south-facing window, you can grow with six to eight hours of direct sun. Under artificial light, most growers run twelve to fourteen hours on, and some go as high as sixteen to eighteen hours, as long as plants are not heat-stressed. Keeping the light close to the canopy prevents thin and leggy stems.
Real-world cost perspective
Store prices can sting. One guide in your material pegs retail around eight dollars for two to four ounces. Home growing can be dramatically cheaper once you dial in. One beginner documented two runs. The first tray cost nine pounds forty and produced one hundred seventy-one grams. After switching to bulk seed and shallow trays, a second tray cost two pounds nineteen and produced three hundred twenty-eight grams. That is the kind of learning curve you want as a new grower.
🌿 Recommended Microgreens Supplies |
Beginner Setup Options
Ultra budget kickoff
You can start with what you already have. Recycled food containers or aluminum baking tins work well if you add drainage holes. A simple LED shop light hung over a bench can be enough for a tray or two. Mist from a spray bottle for early moisture, and use a second empty tray as a cover during the early days to slow evaporation.
Step up for smoother results.
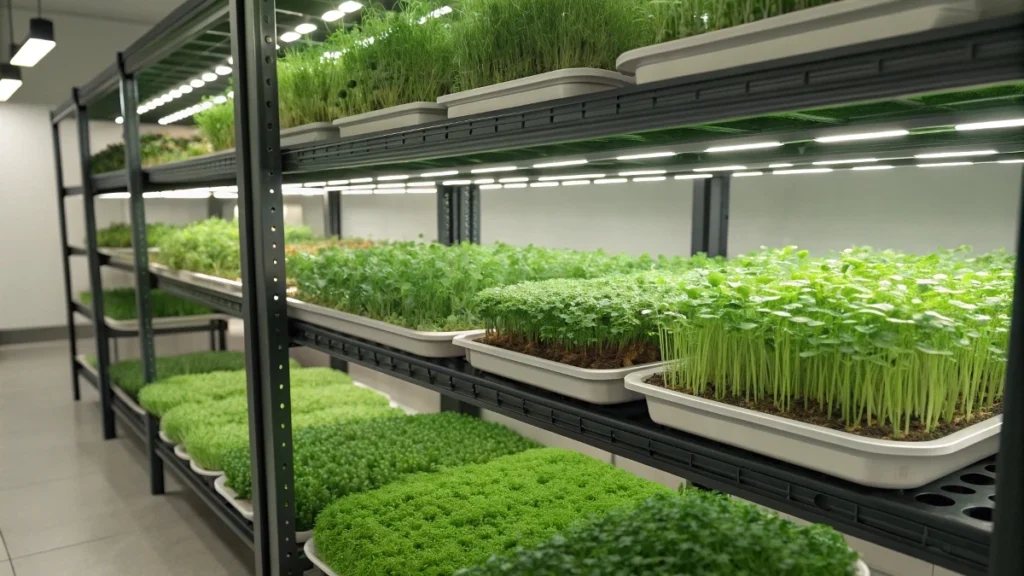
Shallow nursery trays give better airflow across the base of the crop, which helps reduce mold and makes harvesting easier. Durable trays cost more up front but do not crack and will save money over time. A metal rack with one full-spectrum grow light per shelf is a popular format because the single light still grows strong greens while keeping power draw reasonable.
What to avoid
Very deep containers make harvest awkward and slow airflow across the media. Flimsy trays that flex will eventually crack and turn into a recurring expense. For indoor food greens, skip outdoor composts that could contain pathogens. Clean materials and simple workflows are your friends when the crop is eaten raw.
Seeds and Crops to Start With
Easiest wins for beginners
Radish is fast and very forgiving. Mixed brassicas such as broccoli, kale, kohlrabi, collards, turnip, and mustard grow similarly and finish quickly. Pea shoots are another favorite because they are robust and taste like sweet peas. Sunflower is popular fortheirs crunchy texture. Wheatgrass is simple and can even be cut more than once.
Flavor and visual standouts
Purple kohlrabi delivers striking color that chefs love. Nasturtium leaves bring a peppery note that feels special in small amounts. Tendril peas make plates look lively and taste great sautéed briefly with garlic.
Crops that require more attention
Cilantro often takes around thirty days and can be fussy in sterile media. It benefits from careful moisture management, good airflow, and sometimes light feeding because seed reserves do not carry it as far as faster crops. Chives are slow but rewarding and have very specific seed behavior during sprouting that can confuse first-timers.
Buy seed the smart way.
Bulk seed is the lever that moves your budget. One grower notes a basic lettuce mix at roughly eight dollars per pound when purchased in larger quantity and that a pound can cover many trays. Small retail packets are expensive and limit density, which hurts yield. The cost swing in the beginner example above came almost entirely from switching to bulk seed in the second run.
Growing Media Explained
Fine potting or seed starting mix
A clean, fine-textured mix supports even rooting and uniform stands. The emphasis is on fine particle size. Large bark pieces and chunky wood bits can physically block tiny roots and cause uneven growth. Several guides you shared prefer a high-quality potting or seed starting mix because it arrives clean and consistent.
Coco coir
Coco coir bricks rehydrate into a neutral medium that is tidy to use indoors. Many people succeed with coir for quick crops like radish, brassicas, peas, and sunflowers. One grower reported that cilantro grown for more than four weeks in coir showed yellowing until a light liquid feed was added. That aligns with the idea that coir is inert, and long-running crops may need nutrients beyond the seed’s reserves.
Mats and media-free approaches
Mats and media-free screens keep things clean and can suit tiny kitchens. Expect slightly thinner plants and sometimes a longer grow time compared with a good soil-based mix. They are a fine choice when cleanliness and reuse are top priorities, especially for home use.
Mixes to skip for raw greens
Avoid manures and outdoor compost blends that have had animal or wild exposure. Microgreens are eaten raw, and excess biological load is a real risk. When in doubt,t choose sterile seed starting mix or fresh coir.
🌿 Recommended Microgreens Supplies |
Containers and Drainage
Shallow containers with good drainage
Shallow trays encourage airflow across the surface and dry down predictably. The depth does not need to be extreme. Many growers work in trays around two inches deep or shallower. Whatever you use, add drainage holes so excess water can escape. Soggy media and standing water are a fast path to mold.
Prepare the tray for clean harves.ts
Recess the media surface roughly one quarter to one half inch below the rim. This simple step keeps blades away from grit and helps you harvest clean greens that store longer. Level and lightly compact the surface before sowing the seed so that it distributes evenly and does not clump in ridges or depressions.
Creative and low-cost options
Old food containers and dollar store trays can produce impressive crops if you respect the basics. One grower documented dense harvests from one-dollar trays by drilling holes for drainage and keeping a light mist routine. These containers are a sensible way to test varieties before investing in a full rack.
Seeding Densities and Prep
How dense to sow
Sowing densely is the secret to a tight canopy that supports itself and blocks weeds and algae. For small brassica seeds, a common amount used in your material is about one and a half ounces per standard ten-by-twenty tray, and some growers push closer to two ounces depending on seed size and temperature. The goal is an even carpet without bare corners or thick clumps. Under-seeding leads to spindly, weak stands. Over-seeding traps humidity and raises mold risk.
Even distribution techniques
Start from corner to corner and sweep across the tray so you do not starve the edges. Leveling and lightly compacting the surface beforehand helps seeds land evenly. After sowing,g give a very light mist so seeds stick to the surface and do not bounce when you move the tray.
Do not bury the seed.
Leaving seed on the surface keeps harvests clean. Several beginners learn this the hard way when a thin layer of media sprinkled on top leads to gritty stems that need washing. Washing shortens shelf life. Keep the crop dry, and you can store it longer.
Pre-soak the right seeds.
Large or hard-coated seeds benefit from soaking. Guidance from your material includes wheatgrass at eight to twelve hours, peas commonly six to twelve hours, although one beginner soaked for twenty four hours with success, and black oil sunflower roughly four hours with cool water. Nasturtium seeds are slower and also respond well to soaking. Avoid marathon soaks. Overwatered seed can drown, rot, or demand overly wet media to sprout, which invites mold.
First watering plan that prevents mold
Before filling the tray, many growers pour water into the bottom tray so moisture wicks up through the media. This sets a moist baseline without splashing the surface. After sowing, mist to start germination. During germination,n resist the urge to peek or water. Once trays move to light, shift to bottom watering so the canopy stays dry. Let trays sit in water for about five to ten minutes, then drain off any excess.
One variety per tray helps with timing.
Different seeds have different speeds and preferred handling. Keeping one variety per tray keeps harvest timing clean and helps you learn proper density for each crop. Mixed seed trays sound fun, but they complicate daily care when you are new.
Germination made simple
Stacking, weight, and darkness
Once seeds are on the surface and lightly misted, the most consistent approach is to stack trays for a short germination period. Several growers report stacking up to six trays and placing a weight on the top one. A paving stone weighing around fourteen pounds is commonly used. The gentle pressure helps roots drive downward and anchor, and it builds sturdier stems. During this stage, you do not need light. Many beginners are tempted to peek or water daily, but leaving trays undisturbed delivers better germination and lowers contamination risk.
Darkness is handled in two ways. One camp prefers a blackout period by placing an empty tray on top for about twenty-four to forty eight hours. This keeps humidity high and encourages the seedlings to stretch slightly, which can make harvesting easier. Another camp avoids domes or upside-down tray covers because trapped humidity can favor mold. Both methods work when moisture is managed well. If your space runs humid, favor stacking with weight and skip domes. If your space is dry, a short blackout cover can prevent surface drying.
A useful signal is the tray lifting itself. Within about two to four days for fast seeds such as brassicas and radish, you will see the stack begin to separate as sprouts push upward. That is your cue to remove covers and move trays to the light. Expect pale yellow leaves at this moment. They green rapidly once exposed to light.
Water discipline during germination
Overwatering early is a top beginner mistake. When the tray is built correctly, the only water before light is a modest baseline moisture in the medium and a light mist to tack seeds. After that, leave trays alone until they go under the lights. Repeated spraying or daily top watering during germination invites mold and reduces oxygen around the seed.
Light that grows compact greens
Natural light targets
A bright south-facing window can support a small microgreens garden. Aim for six to eight hours of direct sun daily. Rotate trays to keep growth even because seedlings will lean toward the brightest direction.
Artificial light that stays close
A single full-spectrum fixture per shelf is enough for strong growth. Many home setups use inexpensive LED shop lights, while others use purpose-built fixtures. Microgreens are light-hungry and respond best when the fixture is placed close to the canopy without causing heat stress. Keeping the light close prevents stretching and keeps stems stocky. Typical schedules under lights range from twelve hours on to fourteen hours on. Some growers push sixteen to eighteen hours on with good results. Watch the crop rather than the clock. If you see bleaching or curled leaves, raise the light slightly. If you see thin stems leaning hard in one direction, bring the light closer or rotate trays beneath the brightest part of the fixture.
Practical spacing
One light can cover multiple trays if the footprint matches the shelf. For example, a wide white LED can cover four trays on one level, while a narrow shop light may cover two. Place trays so each receives similar intensity, and swap positions every day or two if growth shows a bias toward one side.
Watering that prevents mold.
The first day under lights
Give a thorough but controlled drink when trays first come out of the stack. Many growers do a top water at this moment to fully wet the media edge to edge. After that, switch to bottom watering to keep foliage dry.
Daily routine that works
Water in the morning so the surface dries by evening. Separate the grow tray from a matching bottom tray, add water to the bottom, set the grow tray back in, and let it wick for about five to ten minutes. Pour off any leftover water. The goal is moist media that is never waterlogged. Lift trays to learn the feel. A light tray needs water. A heavy tray does not. If your climate is dry, you may need a brief check in the afternoon for very dense crops.
What to avoid
Avoid overhead soaking once greens are up. Heavy top watering bends delicate stems, slows air exchange in the canopy, and can leave you with wet crops that store poorly. Do not let trays sit in standing water. Soggy media is the fastest route to fuzzy growth on stems and soil.
Growth timelines you can plan around
Fast movers
Radish, turnip, and mixed brassicas are commonly harvestable in about seven to fourteen days. In warm, bright conditions that can be closer to eight to eleven days. These are ideal for your very first cycle.
Medium speed
Pea shoots and sunflowers typically reach a good harvest stage around ten to fourteen days. Sunflower cotyledons are at their best before the first true leaves become noticeably fuzzy. Wheatgrass grows rapidly once established and can be cut at about four to five inches, often ready in a similar ten to fourteen-day window after sowing.
Slow but worthwhile
Chives are slow and can take twenty-five days. Cilantro often needs around thirty days and may ask for extra care in an inert medium such as coco coir. One grower saw yellowing at that stage until a light liquid feed was provided.
General range to remember
Across many common crops, the total range is seven to twenty-one days depending on seed type, temperature, light, and density. Use this range to stagger trays so you always have something ready to cut.
Harvest, tools, and clean handling
How to cut for longevity
Harvest just above the media with a very sharp blade. A clean slice keeps stems intact and reduces the risk of rot traveling up from a crushed cut. Some growers prefer a chef’s knife. Others use micro shears or fine scissors for small sections. The principle is the same. Sharp and clean tools produce a smooth cut surface. Recessing the media surface below the tray rim helps you avoid nicking the soil while you cut.
Keep the product dry.
Dry greens store longer. If you have kept the media recessed and used bottom watering, your cut product should be clean enough to skip washing. If you do wash, dry thoroughly before refrigeration. For storage, place in an airtight container or zip bag with a paper towel to capture condensation. Several growers report three to ten days of good quality in the refrigerator, with sturdier greens such as pea shoots holding well. One practical tip for peas is a breathable crisper bag in a high-humidity drawer.
When to harvest for the best flavor
Harvest by visual cues rather than only by date. For many crops, the ideal point is when the cotyledons are fully open and bright. For sunflower this is before fuzzy true leaves expand. For wheatgrass, you can cut higher to allow regrowth. For fragile greens that will be eaten raw on the plate, cut close to mealtime.
Troubleshooting common issues
Mold and surface fuzz
If you see fuzzy patches on the media or at the base of stems, check your watering and airflow first. Likely causes include frequent overhead watering, standing water in the tray, or heavy blackout covers in a humid space. Correct the routine by switching to bottom watering, draining after each session, spacing trays for airflow, and keeping the canopy dry. Small spots can sometimes be spot-treated with grapefruit seed extract. If the patch spreads, compost the tray and reset.
Leggy or leaning growth
Long pale stems and a strong lean toward one side indicate insufficient light intensity or distance. Bring the fixture closer or upgrade to a brighter unit, and rotate trays so each side spends time under the brightest portion. Remember that a single light per shelf can be enough when placed correctly.
Dirty harvests
Grit on stems almost always traces back to burying the seed or filling the media to the rim. Surface sow only. Reduce the media one quarter to one half inch. Use a sharp blade and a gentle upward lift during cutting to keep the product clean and dry.
Cilantro-specific pitfalls
A tray that runs close to a month can run out of steam in inert coir. Yellowing leaves and lingering seed husks are common complaints. Provide excellent airflow and careful moisture, and consider a light nutrient feed once true leaves appear. If the canopy becomes thick and stays damp, mold can start near the center. Thin the densest areas early and water strictly from the bottom.
Sunflower seed hulls that stick.
It is normal for hulls to ride up on sunflower cotyledons. When the stand is thick, you can gently brush the surface with your palm to knock many hulls free. Harvest before true leaves appear for the best texture.
Overwatering during germination
Lifting covers daily and misting seeds that are already sitting on moist media is a recipe for low germination and contamination. Set the tray correctly on day one, then wait until the crop pushes up before any additional water. Patience at this stage pays for itself later.
Costs and yields at home scale
Understanding seed costs
The biggest factor in the cost of home microgreens is the seed. Buying small packets from garden centers often makes a tray very expensive. For example, one grower calculated that their first attempt at a tray cost them around nine pounds forty because they had purchased tiny packets of radish and broccoli seeds. Once they began buying seeds in bulk, that same tray cost only about two pounds nineteen. Bulk seed can be several times cheaper per gram and is usually fresher, which also improves germination.
Medium and supplies
Growing media such as coco coir or a seed starting mix is inexpensive. A compressed block of coir costing about one pound forty was enough for a full tray. Reusing trays many times and composting the used media make the overall setup sustainable.
Yield numbers
A shallow tray of radish yielded around 121 grams in the first run, but later adjustments in sowing density and tray preparation improved broccoli yields to over 328 grams from one tray. Sunflower provided about 260 grams in 13 days, and coriander about 68 grams after a much longer growth period of nearly thirty days. These numbers give a range: fast and simple crops return more bulk in less time, while slow herbs require more patience and usually deliver less weight.
Value comparison
When calculated by cost per kilogram, the early radish harvest equated to roughly fifty pounds per kilo because of the expensive seed source. Switching to bulk seed reduced costs dramatically. Many growers notice that home production not only brings down cost but also gives continuous harvests that are fresher than anything purchased.
Safety and compliance
Food handling basics
Because microgreens are eaten raw, clean handling is essential. Always harvest with sharp, sanitized tools. Wash your hands before touching the crop and use clean trays and media. Avoid wet harvesting greens, as this shortens shelf life and increases the chance of spoilage.
Moisture management for safety
Most mold issues begin with excess water or trapped humidity. Keeping foliage dry by using bottom watering and spacing trays for airflow minimizes risk. If mold does appear, do not attempt to salvage a tray that is heavily contaminated. Compost it and start fresh.
Storage safety
Store harvested greens in the refrigerator immediately in a clean container. A paper towel inside the container helps absorb excess moisture. Aim to consume within three to five days for peak quality, though some sturdier greens like pea shoots can last longer when stored properly.
Growing environment
Choose a clean growing area free from dust, pests, and strong temperature fluctuations. If using artificial lights, ensure cords and fixtures are secured safely away from moisture. Using trays with proper drainage holes and avoiding standing water reduces the chance of bacteria developing at the bottom.
Creative culinary uses
Everyday meals
Microgreens are versatile and can be added to most dishes you already prepare. They work in salads either on their own or mixed with other greens. They add freshness to sandwiches, wraps, and burgers. A handful of them, on top of scrambled eggs or folded into an omelet, brightens the dish with flavor and nutrition.
Finishing touches
Many cooks enjoy sprinkling microgreens over soups and stews just before serving. They can also be tossed into pasta or rice dishes at the last moment, or added to stir-fries right after the pan comes off the heat. This preserves both flavor and nutrients.
Special applications
Pea shoots are particularly good sautéed with garlic, while radish microgreens bring a spicy kick to sushi rolls or tacos. Sunflower greens add crunch to pizzas as a topping after baking. Microgreens such as basil or mint can even be used to infuse water, teas, or cocktails with a subtle herbal note.
Garnish and fine dining
Because of their colors and delicate shapes, microgreens are a favorite garnish in professional kitchens. They transform the appearance of simple plates and add an extra layer of taste. Even at home, a small sprinkle can turn a basic meal into something memorable.
Snacking and small bites
They can be eaten raw straight from the tray as a quick snack, paired with dips, or rolled into small appetizers. Their concentrated flavor makes them satisfying even in small amounts.
A beginner’s two-week plan
Week one: sowing to sprouting
Day one: Prepare trays with coco coir or a seed starting mix about two inches deep. Dampen the medium evenly. Surface sow chosen seeds such as radish or broccoli densely across the tray. Lightly mist, cover with another tray, and place a weight on top.
Day two to three: Leave covered. Do not water again unless the media feels very dry.
Day four: Check trays. When seedlings begin lifting the cover, remove it and place the trays under strong light.
Week two: growing to harvest
Day five to seven: Begin bottom watering once a day as needed. Keep lights close to the canopy. Rotate trays for even growth.
Days eight to ten: Monitor for stretching or yellowing. Greens should be turning vibrant. Continue bottom watering and ensure good airflow.
Days ten to fourteen: Most brassicas and radishes are ready for harvest when cotyledons are fully open. Cut above the soil with a clean,n sharp blade. Collect, store dry, and enjoy immediately in meals.
Following this plan, a beginner can go from dry seed to first harvest in about ten to fourteen days with a predictable routine.
Scaling up without complexity
Adding more trays
Once you are comfortable with one tray, it is easy to add more without extra effort. Stacking trays during germination saves space, and one full-spectrum light can cover several trays at once.
Crop rotation
Grow two or three types in rotation so that new trays are always germinating as older ones are being harvested. This ensures a steady supply of fresh greens without overwhelming your kitchen.
Bulk supplies
Buying seeds in bulk and reusing media trays are the simplest ways to reduce costs and make scaling affordable. Coco coir blocks, large bags of seed, and stackable trays allow you to grow more without constant shopping.
Storage and use
Scaling up only makes sense if you use or share the harvest. Plan meals, offer extras to friends or neighbors, or preserve some greens by blending them into pestos or smoothies. Keeping a balance between production and consumption prevents waste.