
Growing clean, flavorful microgreens starts with a stable room climate. This guide gives you recommended microgreens temperature and humidity targets so trays stay vigorous, mold-free, and ready on schedule.
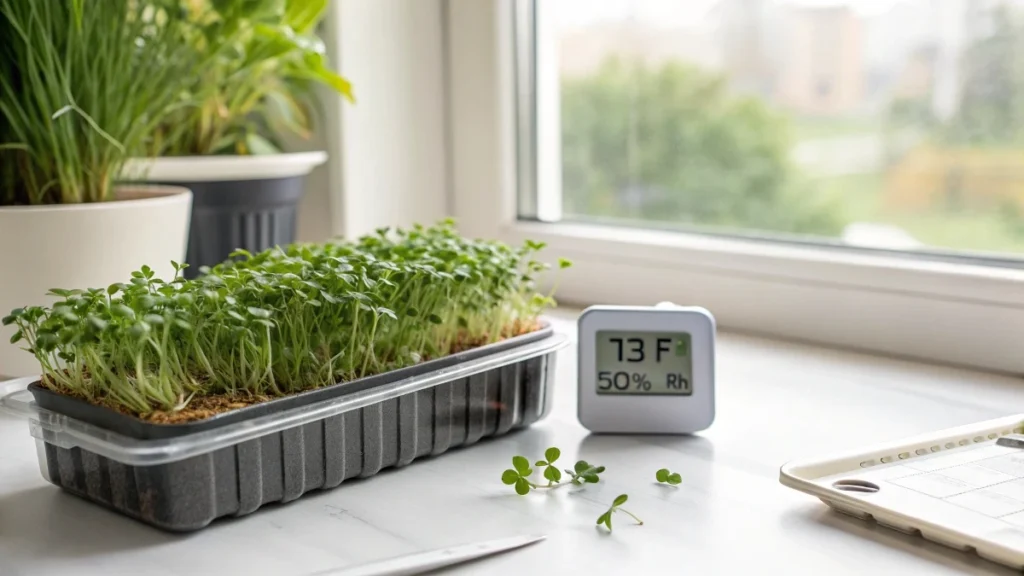
You will learn why temperature sets growth speed, how relative humidity controls evaporation, and the exact ranges to use from germination through harvest. For most indoor microgreens, aim for about seventy three degrees Fahrenheit and around fifty percent relative humidity with steady airflow.
When you need faster cycles, warmer rooms near seventy eight to eighty with forty to fifty percent relative humidity can work if airflow and density are managed. We cover tents in cold rooms, gear choices, and practical troubleshooting.
Why temperature and humidity matter
Healthy microgreens are a balance of growth speed and moisture control. Temperature sets the pace. Warmer rooms push faster cell activity and quicker tray turns. Cooler rooms slow growth and can tip conditions toward condensation on leaves and the medium. When warm air meets a cooler surface, water condenses and lingers in the canopy. That wet film shortens shelf life and invites disease.
Humidity governs evaporation and how easily plants can shed excess moisture. High relative humidity slows evaporation, so water stays in the canopy and the medium longer. That creates soft stems, mushy textures, and a higher chance of mold. Very low relative humidity dries the medium rapidly and forces frequent watering that can stress young roots. The sweet spot allows moisture to leave the foliage and the surface of the medium at a steady rate while keeping seedlings turgid.
Consistency is the quiet hero of microgreens production. Stable temperature and relative humidity keep germination predictable and harvest windows reliable. When the room swings by several degrees or the air swings from dry to damp, trays that were seeded on the same day drift apart in readiness. Stable settings align growth, reduce rework, and make planning deliveries simpler.
🌿 Recommended Microgreens Supplies |
Stage-by-stage targets
Germination is stacked or covered.
Stacked trays generate their own warmth. The mass of seeds and the early burst of metabolism create waste heat between trays. Because of that extra warmth at the tray level, a room around 70°F or 21°C is usually enough to keep germination moving without overheating the seedbed. Slightly higher relative humidity during this stage reduces the number of misting passes you need. Even so, keep a light breeze in the room so air does not sit still around the stacks. Stagnant air with added moisture is the fastest way to create problems under covers.
Grow out under lights.
For dependable quality, a room near 73°F or 23°C with relative humidity around 50 percent works well. At this setting, evaporation is brisk enough to keep canopies dry after watering, and growth is steady. If you need quicker turns, a room in the 78 to 80°F or 25 to 27°C range with relative humidity in the 40 to 50 percent band will speed growth while allowing leaves to dry between waterings. Avoid temperatures above 85°F or 29°C. At that point, disease pressure rises, and sensitive crops can falter at germination. Seeding density and watering cadence matter here. Dense mats trap moisture, so pair warmer rooms with sensible densities and real airflow across racks.
Pre-harvest drying day
The day before you cut, think like a food packer. Aim for relative humidity around 40 to 50 percent and move air across the tops of the canopies with oscillating fans. The goal is a dry leaf at harvest. Dry greens cut cleaner, chill faster, and keep their snap longer in storage.
🌿 Recommended Microgreens Supplies
These are the tools and supplies I personally recommend for growing healthy and flavorful microgreens at home.
As an Amazon Associate, I earn from qualifying purchases.
Reconciling 50 percent RH and 60 to 70 percent RH
Both targets can be correct when you match them to the room and the hardware.
Fifty percent relative humidity is the safest default in rooms with lots of trays, frequent bottom watering, and average airflow. At this level, leaves and the growing surface dry promptly after irrigation. Mold pressure drops, and shelf life improves because less free water rides into cold storage.
Sixty to seventy percent relative humidity can work in dry and cold rooms, especially inside small tents, as long as two safeguards are in place. First, drainage and exchange must be real. Mesh trays on risers breathe, while solid trays with nowhere for water and air to move will trap moisture at the roots. Second, airflow must be continuous and gentle so humid air never sits over the canopy. If either safeguard is missing, higher relative humidity turns into wet canopies, soft stems, and the kind of spotting that grows after harvest. When in doubt, start near 50 percent and climb only as the room proves it can exchange air and shed moisture.
Humidity control that actually works
Exhaust to the outside
Moving moist air out is the simplest way to keep relative humidity in check when the outdoor air is cooler or drier than the grow space. An inline fan in a window or through a dedicated vent creates a steady pull. The room relaxes because warm, moist air leaves and is replaced by fresher air. This approach is inexpensive to run and avoids the extra heat that other solutions can add. It is most effective in seasons and regions where outside air is not already saturated.
Dehumidifiers
Dehumidifiers work anywhere, which is why they are common in grow rooms. They condense water out of the air and collect it or route it to a drain. They also add heat to the room, so plan for that load. Placement matters. Water vapor rises with warm air, so mounting higher or at least drawing air from higher in the room increases moisture capture. Give them a continuous drain where possible, since full buckets stop the cycle right when you need it most.
Capacity planning does not need to be guesswork. As a feel for scale, a grow area around five hundred square feet often needs two or three units in the seventy to seventy-five pint class to keep relative humidity near target during heavy production. Larger rooms benefit from commercial units that can mount overhead to save floor space and pull from the warmest, most humid air near the ceiling.
A note on relative versus absolute moisture
Warm air can hold much more water than cool air. That means relative humidity at a higher temperature represents more total moisture than the same percentage at a lower temperature. It also explains why dehumidifiers are more efficient when the air is warmer and wetter and why high placement helps them grab the richest moisture layer.
Temperature control and zoning
Raising temperature
If the room sits below target, a simple space heater can lift the baseline into the low seventies. Use a unit with a thermostat and keep clearances safe. The aim is even warmth, not hot spots near racks.
Lowering temperature
Lights and dehumidifiers add heat. When the room runs above the target, an air conditioner becomes the main tool. Give it a little headroom so it does not run flat out all day. A common approach is to size with ten to twenty percent extra capacity over the basic calculation for the space and the equipment load. In small rooms, a window unit or portable unit can carry the load. In larger rooms, a mini split is quieter and more efficient. Remember that dehumidifiers add heat while they remove moisture, so balance how much they run against how much the air conditioner must pull back out.
Create a real zone
A thermostat in a hallway or living room does not reflect the heat inside a grow room. Treat the grow space as its own zone with its own sensor so the readings match the air around the trays. Temperature also stratifies. The air near the ceiling is warmer than the air near the floor, especially around tall racks. Gentle vertical mixing with a ceiling fan helps keep the entire column in a narrow band. You can also use the gradient to your advantage by placing heat-loving crops on higher shelves and cooler preferring crops lower down when the difference is small and stable.
Keep the pieces in balance.
Cooling, dehumidifying, and airflow all interact. Strong dehumidification dries the air but warms it, which can push the air conditioner to work harder. Exhaust lowers both temperature and humidity, but pulls in outside air that may be dry or damp, depending on the season. The best setup for microgreens is usually a modest, steady use of each tool rather than leaning too hard on one. This keeps relative humidity stable near the target and holds temperature in the narrow band that delivers both quality and predictable harvests.
Airflow and canopy drying
Air movement is the quiet engine behind a clean, mold-resistant microgreens room. Still pockets form inside dense canopies and near the surface of wet media. Those pockets trap moisture and keep leaf surfaces wet for hours. Gentle circulation moves fresh air through the tray and carries off excess moisture, so leaves dry soon after watering. It also evens out the temperature from floor to ceiling and helps replenish carbon dioxide right where plants are using it. Think of airflow as the partner that lets your temperature and humidity targets actually work in the real room.
How to create an effective circulation pattern
Aim for a simple loop rather than a blast. In a tent or small room, set one fan high on one side and another low on the opposite side so air sweeps across the racks and returns. In taller rooms, add a ceiling fan to pull warm, humid air down the center while wall fans sweep it along the aisles. You want steady movement that you can feel with the back of your hand without leaves bending over. If one tray gets a constant stream while others barely move, adjust angles or add a second oscillating unit until the breeze feels even everywhere.
Fan types and placement that work
Ceiling fans are excellent for vertical mixing in rooms with high racks. Oscillating wall or pedestal fans create a wide sweep that reaches the middle of the trays. Small computer-style fans aimed directly at a single tray can overdry one patch and leave the center damp, which invites uneven growth and disease. Use room fans to move room air. Keep intakes and outlets clear of clutter so the flow is smooth, not blocked by boxes or stacked supplies.
The pre-harvest drying step
The day before you cut, switch from gentle movement to assertive drying. Keep relative humidity in the range of forty to fifty percent and run oscillating fans on high above the canopy. This removes surface moisture so leaves cut clean, chill quickly, and hold texture longer in storage. It is one of the highest return habits you can add to a microgreens harvest routine.
How airflow connects to watering and density
Seeding density and watering cadence set the load that airflow must clear. Dense sowing narrows the channels where air can pass and slows drying. Bottom watering keeps water off leaves, so the air has less work to do. Mesh trays on risers let air and moisture move from below, while solid bottoms restrict exchange. When you raise density or increase watering, add a bit more sweep from oscillating fans to keep leaf surfaces dry within a reasonable window after irrigation.
Stacked trays and rack strategy
Stacked germination and multi-tier racks change the microclimate around your trays. The trick is to use those shifts instead of fighting them.
Stacked germination runs warmer.
The mass of seeds and the early burst of metabolism create real warmth between stacked trays. Because the space between trays runs warmer than the room, you can keep the room itself near seventy degrees Fahrenheit or twenty-one degrees Celsius and still get brisk sprouting. A slightly higher relative humidity during this stage reduces the number of misting passes you need. At the same time, keep a light breeze in the room so moisture and heat do not sit still around the stacks. The goal is a calm exchange of air, not a draft.
Use vertical gradients to your advantage.
Upper shelves will read warmer and a bit drier. Lower shelves will be cooler and may hold moisture longer. Place heat-loving crops on higher levels and crops that dislike heat on lower levels. Check with a thermometer and a hygrometer at both heights rather than trusting a single reading at head level. If the gap from floor to ceiling is large, add a slow ceiling fan to blend the column so the difference from bottom to top stays small and steady.
Tray hardware and spacing that help airflow
A mesh tray nested over a solid reservoir gives roots access to water while allowing air to pass under and through the canopy. Add small risers so the mesh tray never seals against a flat surface. Leave a little space between trays on a shelf so air can enter from the ends and move through the middle. If a tray sits in a solid bottom with no path for air, moisture can build under the mat, and the center stays damp far longer than the edges.
Managing heat from lights across racks
Lights add steady warmth to the air near the fixture. Keep distances consistent from tier to tier so one shelf does not run several degrees warmer. If a top tier trends hot, raise the fixture a little or increase the sweep of a nearby oscillating fan. Small adjustments here keep the whole rack inside the target band without changing the entire room setting.
Quick troubleshooting
High humidity and a wet canopy
If relative humidity sits above sixty percent for long periods and leaves stay wet, increase moisture removal and exchange. Add capacity to dehumidifiers and place at least one unit where it can draw from higher in the room. If your outdoor air is drier than the room, use an inline fan to exhaust moist air and pull in fresher air. Reduce seed density on the worst trays so air can pass through the canopy. Confirm that you are bottom watering and that mesh trays are not sealing against solid plastic. After irrigation, use oscillating fans to create a clear path for moisture to leave the leaves and the media surface.
The room temperature is climbing above the target.
If the room drifts into the eighties, remove heat before it builds. Air conditioning is the main tool because dehumidifiers add heat while they work. Give the cooling unit a little headroom so it does not run flat out all day. If the climate allows, exhaust a portion of the room air to the outside to lower both heat and moisture in one move. Raise fixtures slightly on the hottest tiers and use a ceiling fan for gentle vertical mixing so warm air does not pool at the top of racks.
Dry room and crispy edges
If leaf edges are crisp and the medium dries very quickly, nudge relative humidity toward the middle of the range, around forty five to fifty five percent. Ease back on fan intensity so leaves move but do not whip. Check your watering cadence and confirm that the bottom trays are taking up water evenly. In a very dry space, a small humidifier can smooth out swings, but keep the goal of quick leaf drying after irrigation in mind.
Uneven growth across shelves
If top shelves finish days ahead of bottom shelves, measure temperature and relative humidity at each level. Add a slow ceiling fan to even the column and adjust the light distance to soften hot spots. Group crops by preference so heat lovers take the warmer positions and sensitive crops sit lower. Confirm that airflow reaches the center of each tray, not only corners and edges.
Signs of mold on the media surface
If you see fuzzy growth on the medium or around seed coats, review drainage and exchange first. Make sure trays are not sitting in stagnant water. Improve airflow so the surface dries soon after watering. Lower relative humidity toward fifty percent to speed evaporation. Reduce seeding density on the next cycle so air can reach the middle of the mat. For trays in progress, focus on moving air across the surface and keeping leaves and media dry between irrigations rather than trying to treat the symptom.
These practices bring the room back to a balanced state where microgreens benefit from steady temperature, controlled humidity, and reliable airflow. The result is predictable timing, clean harvests, and better keeping quality without constant firefighting.